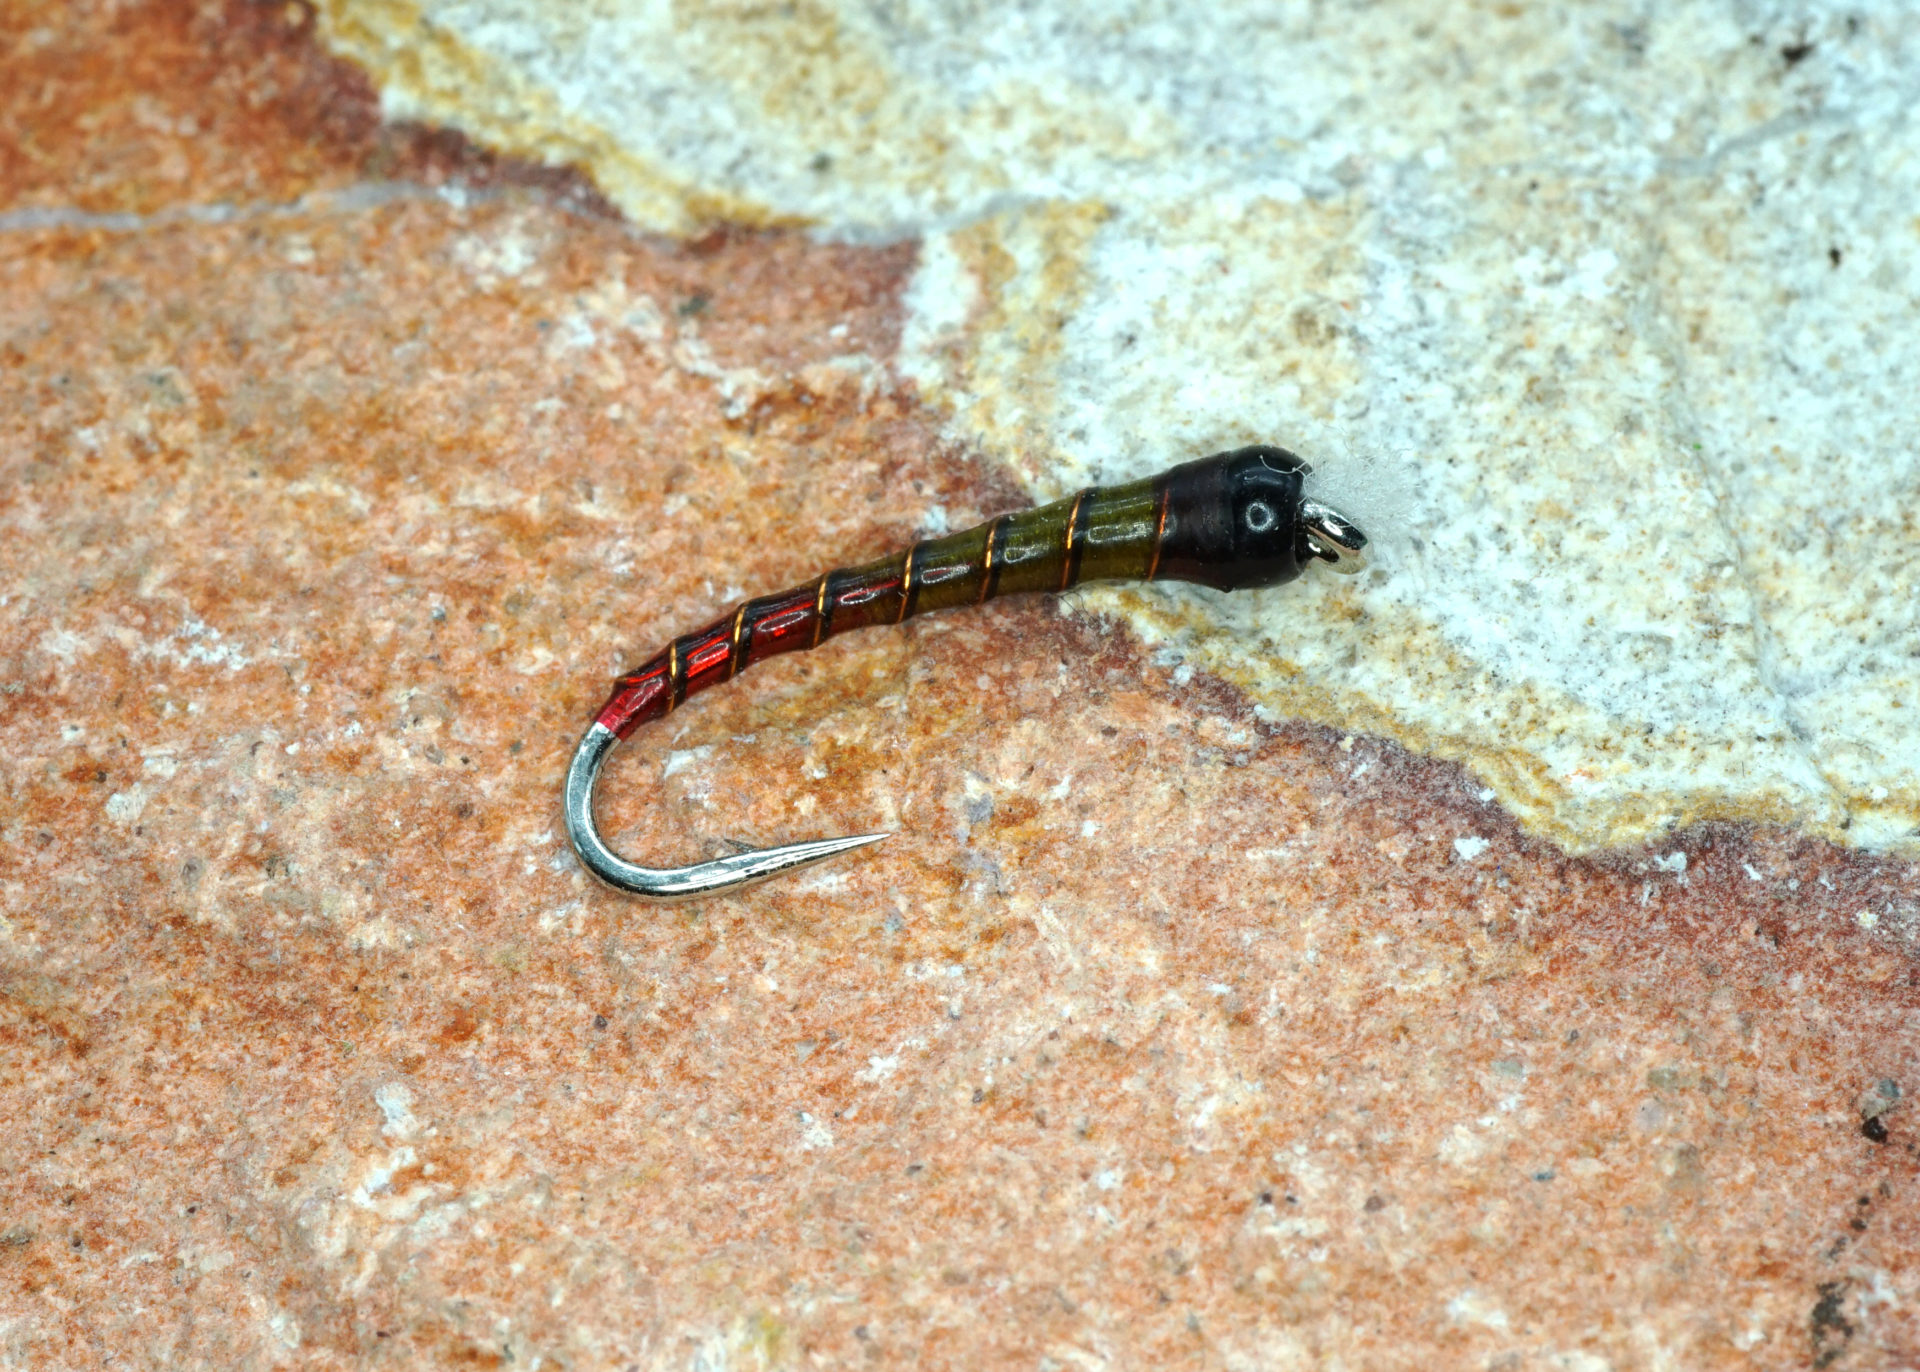
At first glance, chironomid pupae appear simple to imitate. If you follow some basic principles, match the size of the naturals, maintain a slender profile, use the appropriate body, thorax, and gill colours, incorporate body segmentation, you should catch fish. In recent years, several tyers are taking chironomid pupa design to a whole new level. Their attention to detail with overall fly proportions, using double rib combinations to highlight body segmentation and blending body colours to match the natural pupa is nothing short of incredible. Trevor Tatarzcuk is one of those tyers. His Swindler chironomid pupa is an example of his keen eye and attention to detail.
Advertisement
Trevor’s blended bodies are one of his signature trademarks. Many chironomid pupae are not one solid colour, but a blend of two or more colours. UTC 70 tying thread is a crucial component common to all of Trevor’s blended body patterns. Spinning UTC 70 counterclockwise removes thread twist, allowing the creation of flat, almost transparent, wraps. Flat, transparent wraps create a natural colour bleed when wrapping lighter-coloured thread over darker-coloured thread, such as red. To maintain an overall thin profile, Trevor is always conscious of thread placement. There are no random wraps. Every thread wrap Trevor makes has a purpose.
Advertisement
Counter-winding the tying thread to remove any twist and flatten the wraps is critical to proper body construction. This process ensures the flat, touching turns necessary to maintain the slim overall body profile required for success. When Trevor is within three to four inches of a transition point between the darker underbody and the lighter body, he exposes roughly four inches of thread and counter spins the bobbin, if necessary, to flatten the wraps, while pulling down and gently rocking the bobbin. This trick further flattens and opens the wraps, aiding the translucent transition between thread colours. Trevor repeats this process for the first three to four wraps back up the shank as he begins to form the body taper.
Although Trevor fishes barbless, he doesn’t de-barb his flies until his pupa pattern is complete. Trevor uses the barb as a reference point when building the body, making it easy to tie multiple flies accurately. When forming the underbody and securing the wire ribbing down the shank, he places two thread wraps behind the wire near the hook bend and uses just one flat, 45-degree wrap back up to in front of the wire before continuing back up to the bead. The lighter body colour finishes at the hook point. This practice not only makes the creation of the small red butt, common to many chironomid pupae, but also helps to achieve a seamless transition to the hook bend.
Advertisement
Trevor follows a disciplined process when creating the body taper, which is essential to match the natural pupa. Chironomid pupa bodies must be slender and tapered. After winding the body thread down to the hook point, using flat, touching turns, return to the rear of the bead. Take the thread back halfway between the hook point and return to the bead. Continue to build a small taper in the remaining space between the bead and midpoint. Once satisfied with the overall body taper, lock the body thread off using a half hitch or minimal turn whip finish; don’t remove the tying thread.
During his observations, Trevor noticed the shadow line and raised edge of each body segment. Trevor uses double ribs to highlight these features. The Swindler utilizes contrasting wire colours in two different sizes, such as small amber wire and extra small black wire. When using contrasting colours and wire sizes, wind the smaller-diameter wire in front of the larger-diameter wire to create both segmentation shadow and depth. You can also use wire and mylar or Flashabou rib combinations to provide additional segmentation highlights.
Use care, securing the wire down the shank. If you aren’t careful, the fly’s body profile suffers should the wire attempt to migrate around the shank as it wants to follow the thread tension-induced torque. To combat thread torque, Trevor uses his thumbnail to maneuver the wire down the shank. Once secure, lightly rubbing a clean tying bobbin up and down the shank also helps guide the wire into position.
There is an art to winding both ribs forwards. Trevor winds his wire up the shank individually, using seven open, even turns to create eight body segments. When using different wire diameters, wrap the thicker-diameter wire first. Follow up with the thinner diameter wire by trying to rub it against the thicker wire to keep them tight and together. A rotary vise comes in handy when winding the ribs, as it helps provide accurate placement and equal segment spacing on all sides of the fly. To minimize thread bulk, Trevor only uses two flat turns to secure each wire. Once tied off, he then places a half hitch, or minimal wrap whip finish, in front of the wire to lock it off. Once locked off, twist and break off the excess wire. Breaking off the wire creates a neat, smooth tie off while prolonging scissor life. The thin, tapered thread thorax common to all of Trevor’s patterns provides additional security, along with the UV resin or brushable superglue used to finish the fly.
Trevor Tatarzcuk is an elite chironomid tyer. His finished flies are an example of what all chironomid tyers should aspire to replicate.
How To Tie the Swindler
Designed by Trevor Tatarczuk
- Hook: Alec Jackson, Silver Covert #9-#13
- Rib #1: Uni Wire, small, amber
- Rib #2: Uni Wire, extra small, black,
- Underbody: UTC 70 tying thread, red
- Over body: UTC 70 tying thread, yellow/olive
- Thorax: UTC 70 tying thread, rusty brown
- Bead: Black nickel
- Gills: Uni Stretch, white
Tying Instructions
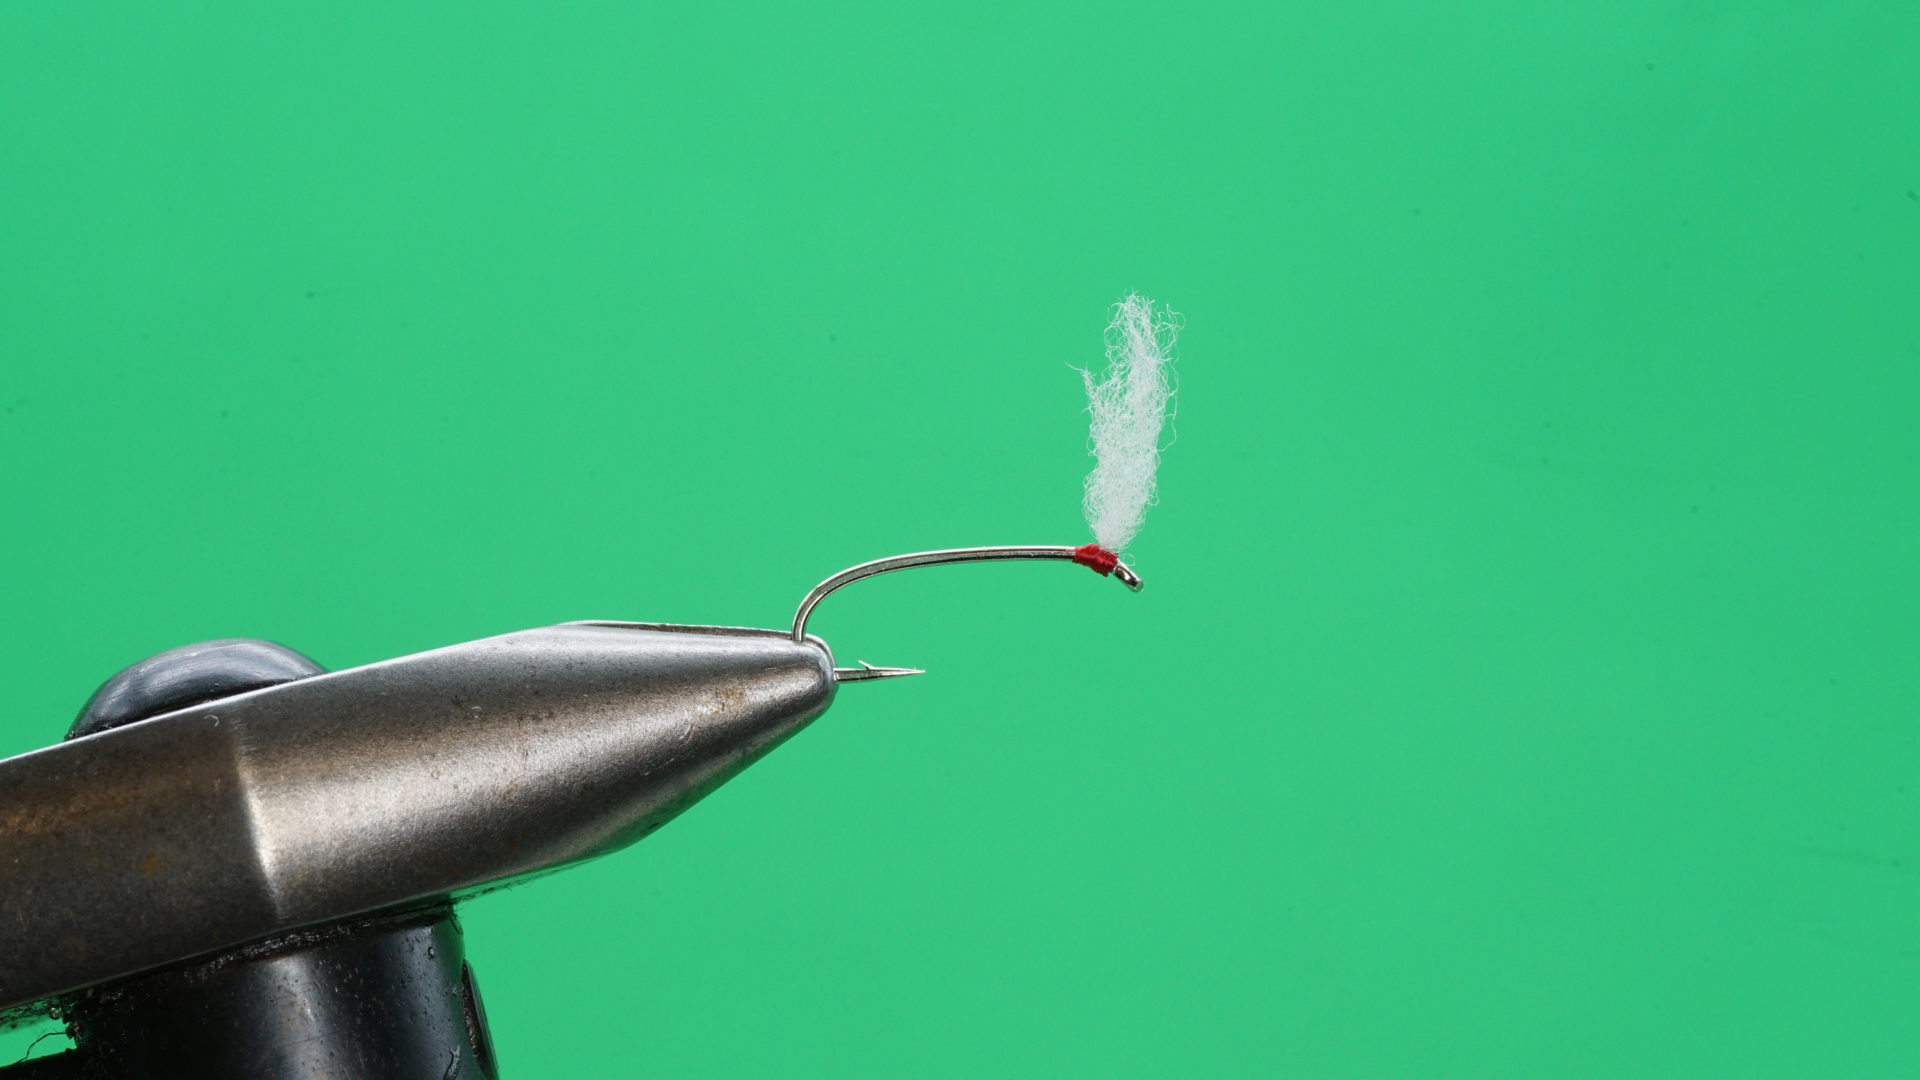
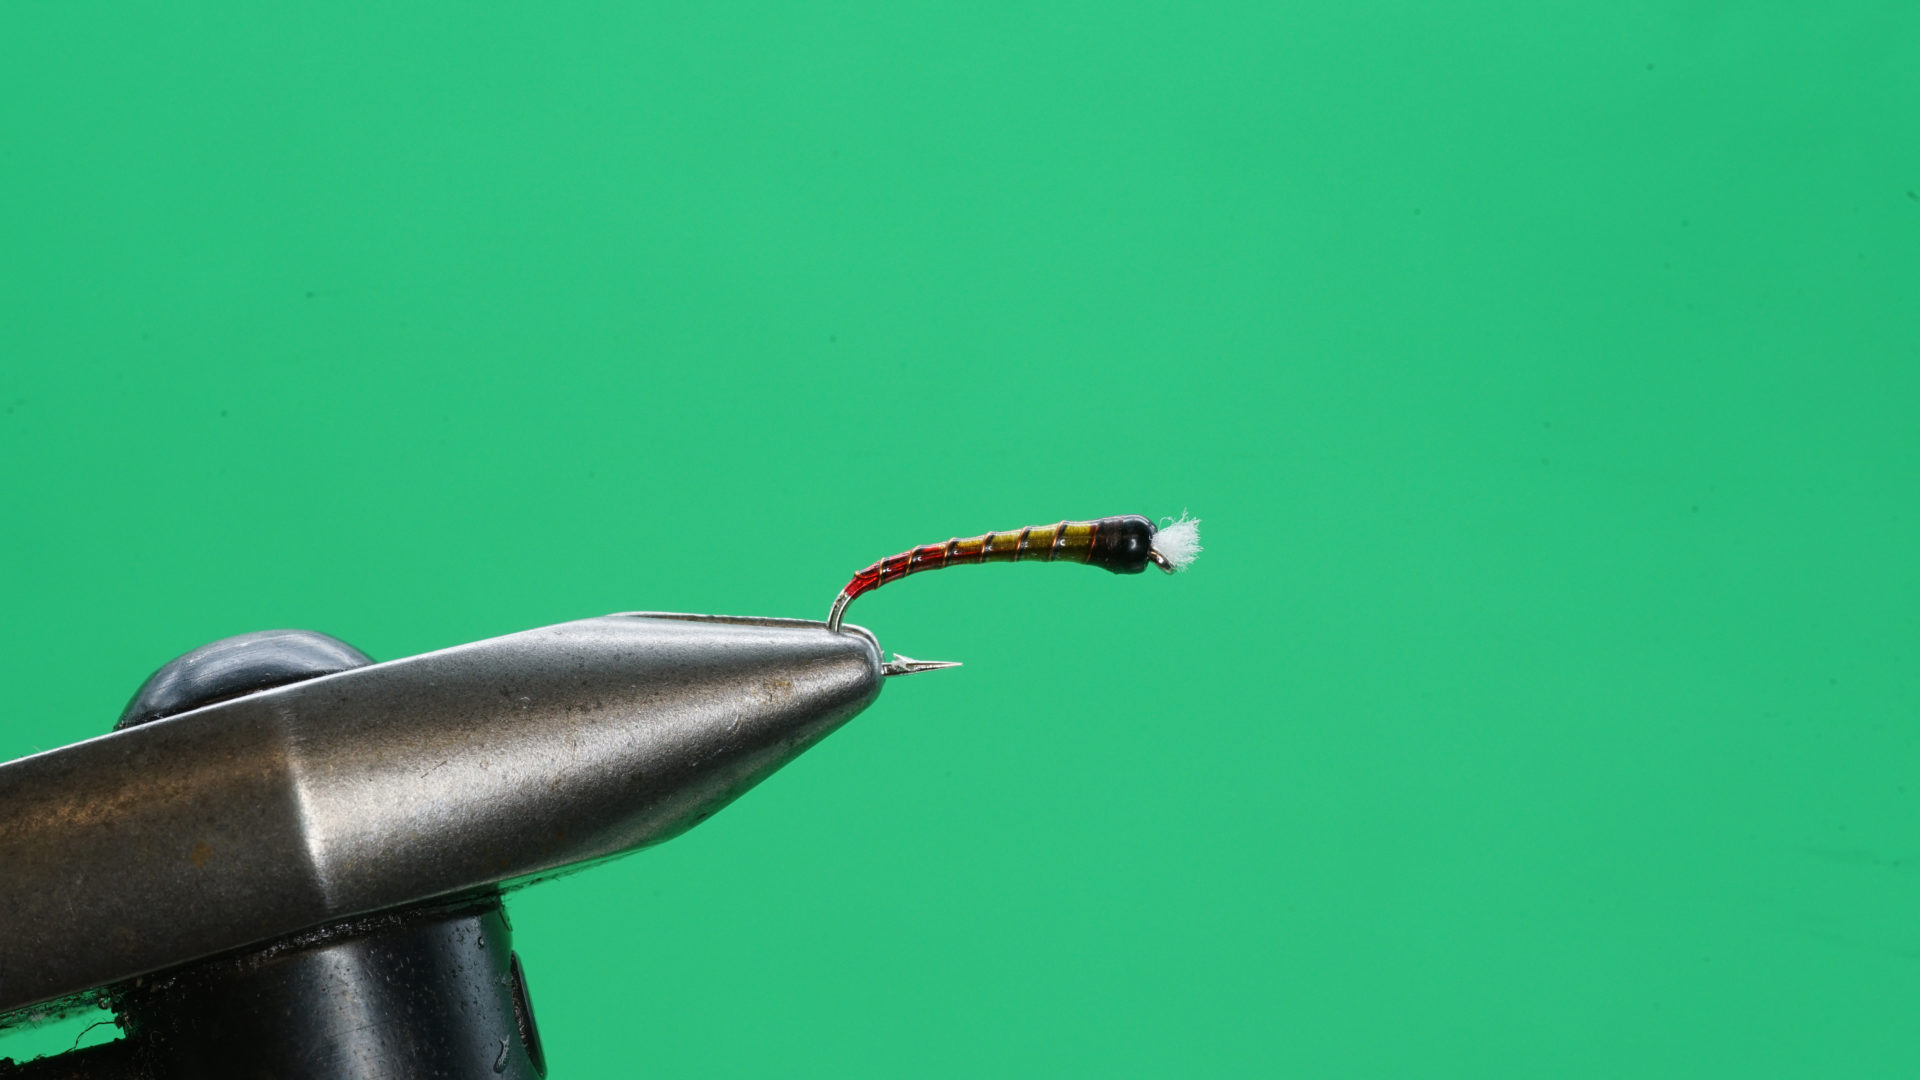
- To avoid not having the gill material crowd the hook eye, slide a black nickel bead onto the hook, so the large, tapered hole faces the hook eye. Push the bead back and attach the red tying thread directly behind the hook eye. Using your tying scissors, take an inch of gill material and strip away one-third of its width. Using a single wrap of tying thread, secure the gill material at its mid-point just back from the hook eye. Fold the gill material behind the initial tie-in point forward over the hook eye to double it with the material facing forward of the initial tie-in point. Secure the doubled gill material in place, facing forward, using three to four wraps. Stand the gills up by placing a half dozen wraps directly behind the hook eye. Place a three-turn whip finish under the gills and remove the tying thread.

 The Swindler: Step 1.
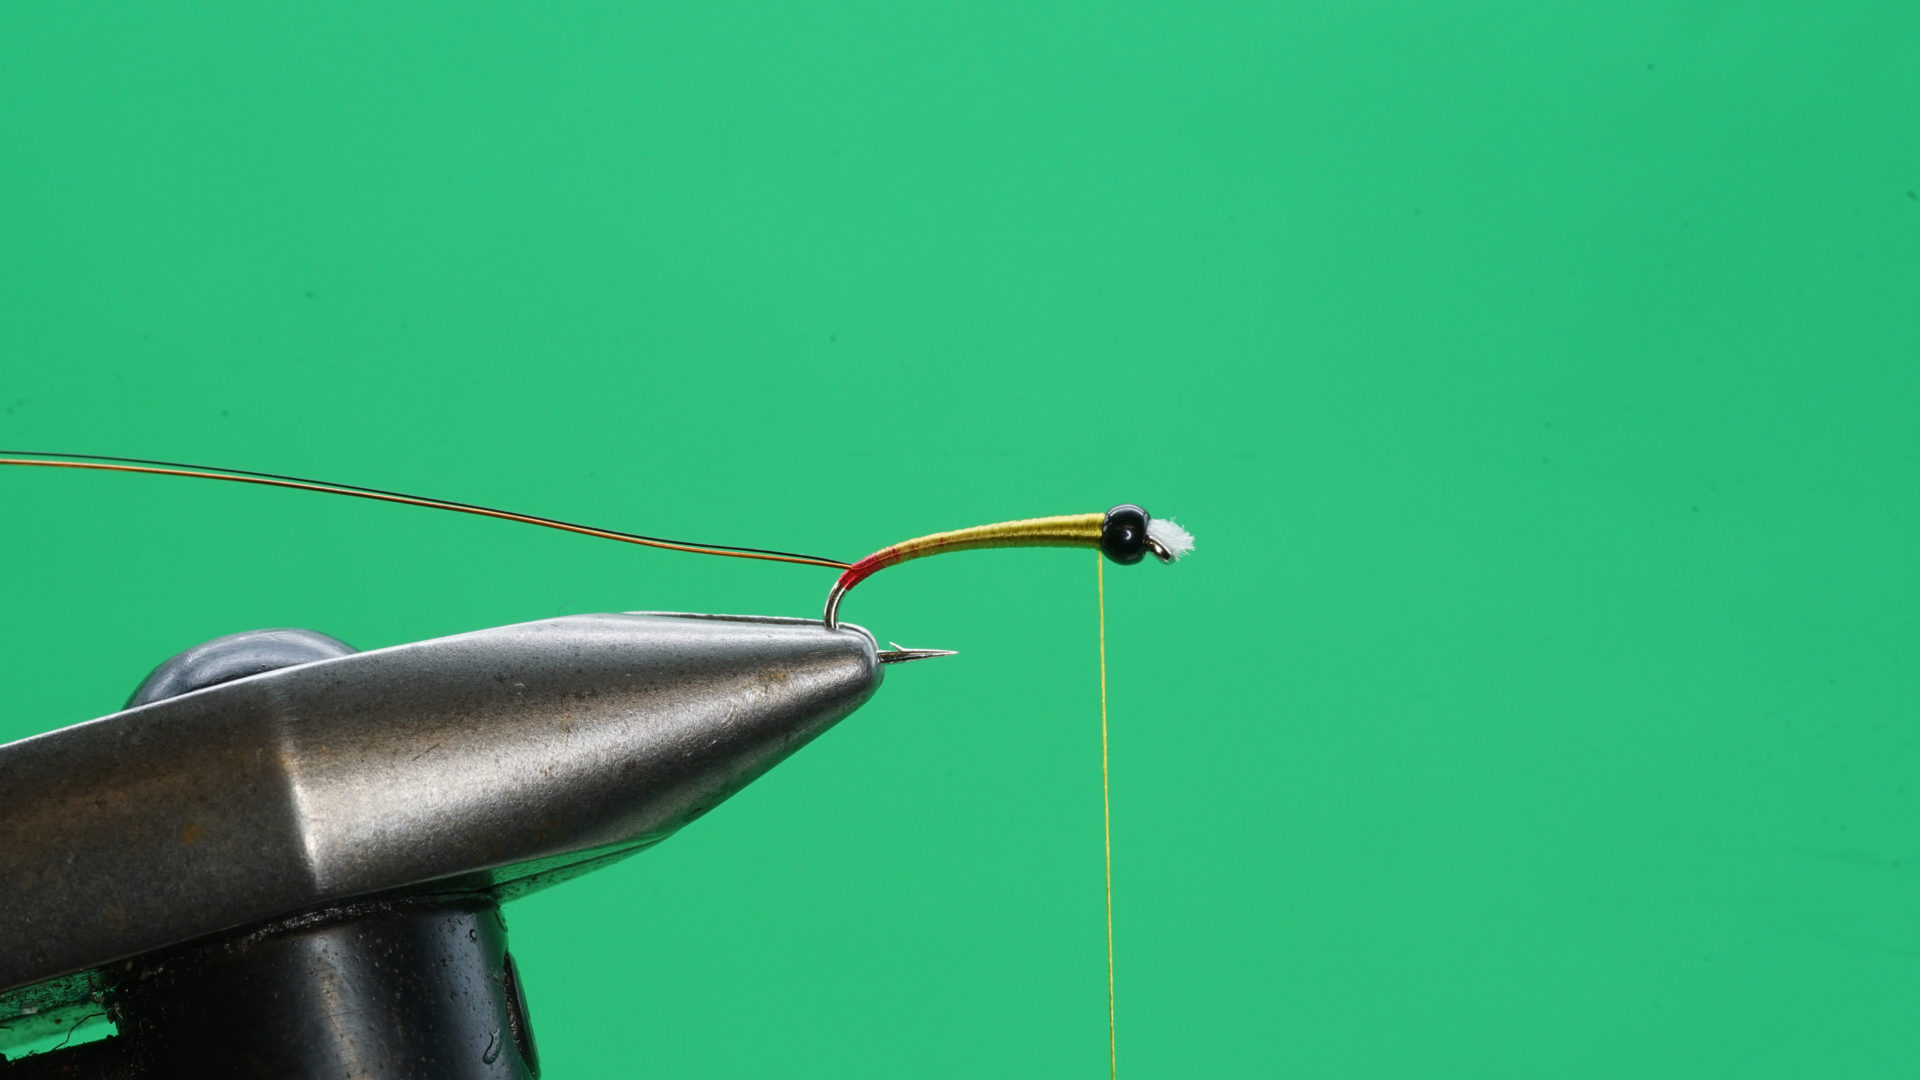
 - Push the bead tight against the gills. Trim the gills to length, about the length of the bead is ideal. Attach the red, underbody thread directly behind the hook eye. Using a minimum number of wraps, tie in a length of amber wire. Tie in a length of extra small black wire on top of the amber wire. Pinch the two wires together and secure them down the shank into the bend just past the hook point using close-touching wraps. Make sure to keep the black wire on top of the amber wire. Lift both wires and place two touching turns of thread behind them. Counter wind the tying thread to flatten it. Wind one flat wrap at a 45-degree angle behind the wire. Continue winding the thread forward using close-touching turns to the rear of the bead to form a slender, flat underbody. Tie off and remove the red thread directly behind the bead using a minimal wrap whip finish or half hitch.
 The Swindler: Step 2.
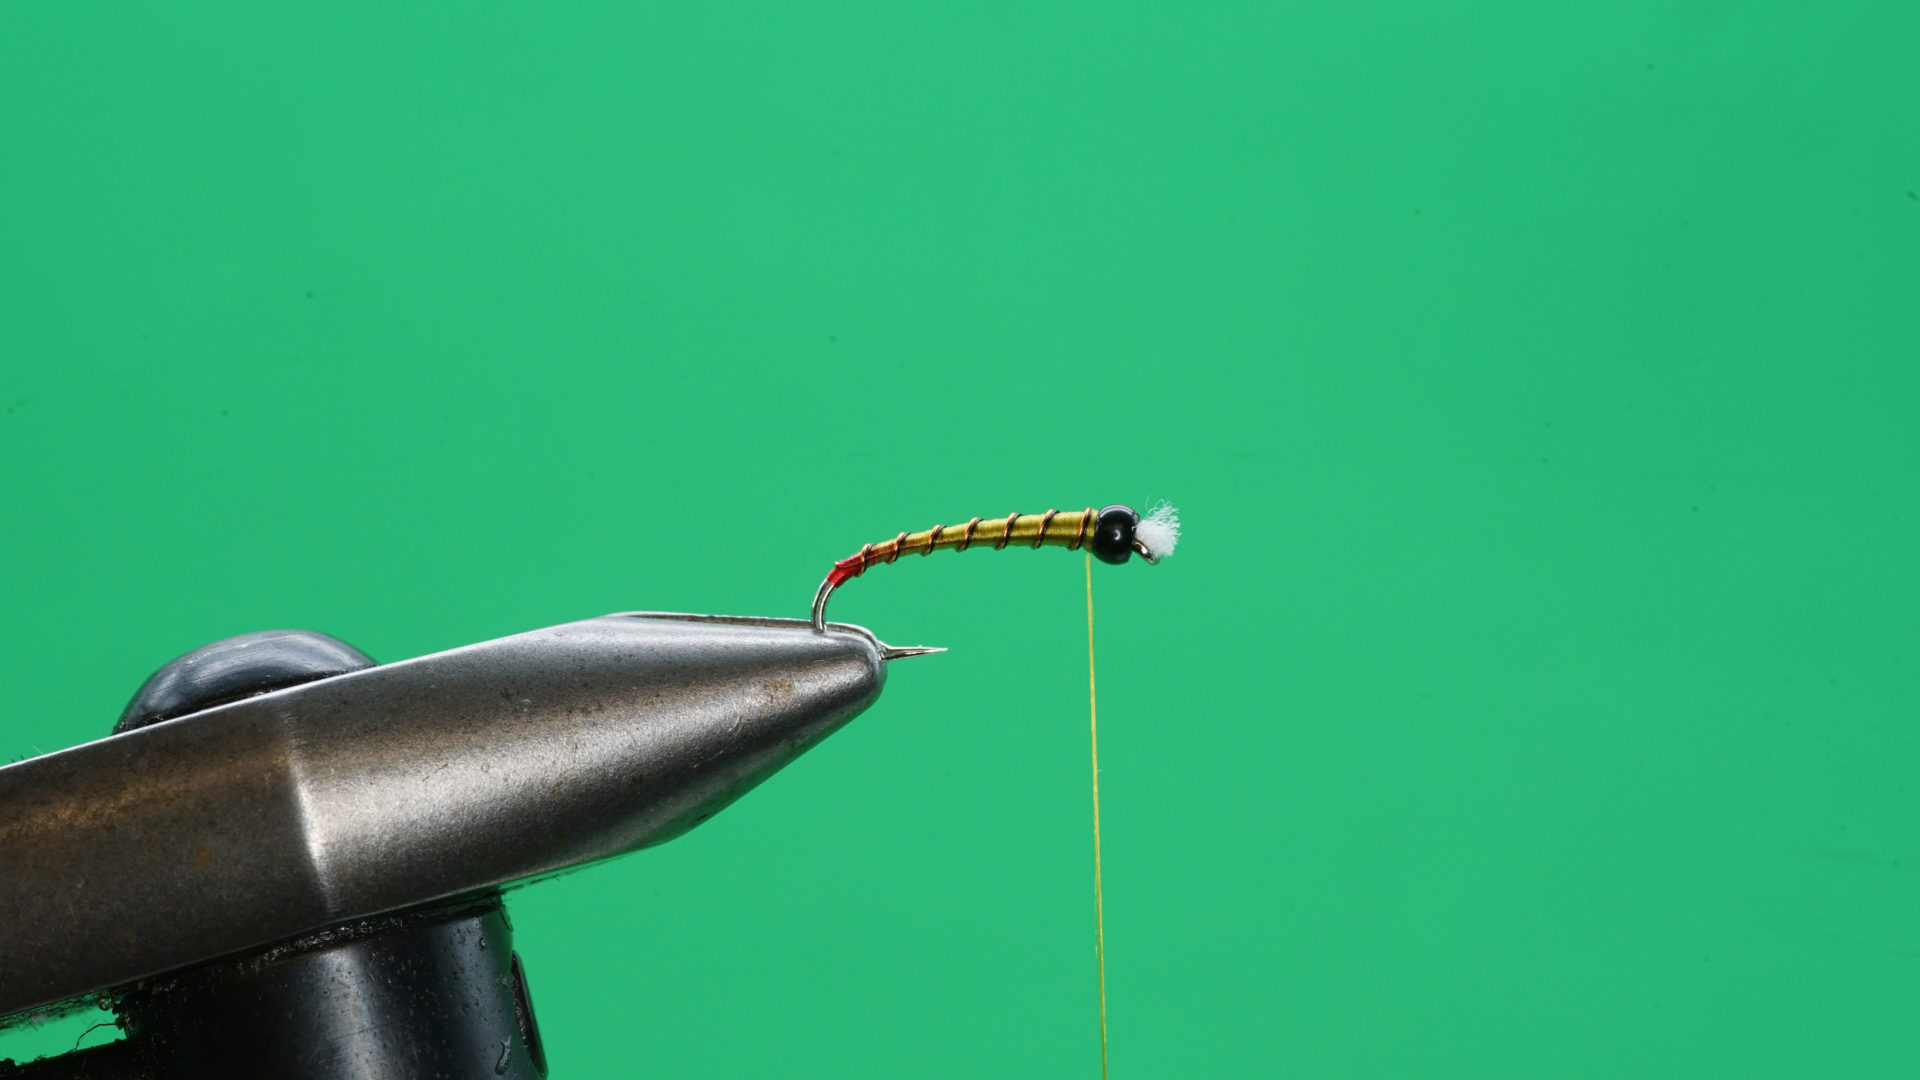
 - Tie in the yellow/olive tying thread directly behind the bead. Using flat, touching turns, wind the yellow/olive thread down the shank to the barb of the hook. Be sure to leave a small portion of the red underbody visible. Make sure the last three to four turns are flat by spinning the bobbing counterclockwise, so the red underbody can bleed through. Rocking the bobbin back and forth while applying gentle pressure helps further open the thread to allow for the best blend of both the body and underbody colours. Using open, flat wraps, wind the yellow/olive thread forward to the rear of the bead. As with the initial wraps, rock the bobbin and apply slight pressure for the first three to four turns going forward. Build up a tapered body by winding back down the shank even with the hook point. Return the thread to the rear of the bead. Wind the thread back down halfway between the hook point and the bead. Return the thread to the rear of the bead. Continue building a small taper in the remaining space between the midpoint of the hook and the back of the bead. Be sure to counter spin the bobbin as necessary, to ensure flat, even wraps. Once the body is complete, lock it off at the rear of the bead using a half hitch or minimal wrap whip finish.
 The Swindler: Step 3.
 - Wind the amber wire forward over the body to the rear of the bead using seven to eight even, open wraps. Tie off and lock the wire in place using two tight thread wraps. Lock the wire in place using a half hitch or minimal wrap whip finish. Pull and twist the remaining amber wire until it breaks. Wind the extra small black wire forward over the body directly in front of the amber wire. Make sure the black wire sits right up against the amber wire. There should be no spaces between the two wires. Using a rotary vise eases the creation of the two-wire rib, as it allows you to rub the fine wire against the small wire as you wind it up the shank. Once you are satisfied with the look and placement of the black rib, tie off and remove the excess in the same fashion as the amber wire. Using a minimum number of wraps, tie off and remove the tying thread.
 The Swindler: Step 4.
 - Using three turns, attach the rusty brown thread directly behind the bead. Build up a small, tapered thorax that is no longer than the bead. Counter spin the bobbin as necessary to ensure you build the thorax using flat wraps. Using a three-turn whip finish, complete the thorax, ensuring the thread stops just shy of the midpoint on the bead. Trim the thread by rocking it against a stationary razor blade to achieve a short, near flush, tag end. Coat the finished fly with a single coat of thin viscosity UV resin and cure.
 The Swindler: Step 5.