Hanging leeches under indicators is now common on most Western Canadian stillwaters. Arguably, you could spend the entire season suspending only chironomids and leeches under indicators and consistently take fish. In recent years, tiny micro leeches have evolved adding yet another dimension to this deadly presentation option.
Advertisement
Traditional leech patterns are often tied on #6 through #10 long shank hooks. Micro leeches, as their name suggests, step down a level, ranging from #10 to #14 hooks depending upon style and choice. I prefer #12 to #14 hooks when tying my long shank micro leech patterns.
A short shank curved scud/pupa hook allows you to use larger hooks while still maintaining an overall tiny profile. Another benefit of a curved scud/pupa hook is its ability to hold trout during a fight; the short shank offers trout little in the way of leverage advantage. I also prefer scud/pupa hooks for suspending micro leeches under indicators as I feel they dance and wiggle in a more appealing manner than long shanked patterns when attached to my tippet via a non-slip loop knot.
Advertisement
Most micro leech patterns are tied using dubbing, marabou or a combination of both. Many tyers prefer strung marabou for their micro leeches. Fine fibered strung marabou breathes and undulates under the slightest movement. The average strand length also allows you to form the tail and the body out of a single marabou clump.
To reduce the tail from fouling around the hook bend it is important to tie in the marabou at the rear of the shank, just before it transitions into the bend. Adding a few wraps under the tail–after the initial tie in–cocks the tail, further reducing the risk of fouling. When it is time to form the body, twist the remaining marabou strands into a rope and wind them forward.
Advertisement
I am not a fan of pinching marabou tails to size, instead I prefer to measure the tail against the hook shank to ensure suitable length. In my opinion, pinching the tail to size removes the fine tapered tips of the feather, which are critical for subtle movement. The flue found at the base of most feathers is another excellent source of fine fibered micro leech tail material.
Slender dubbed marabou bodies are another micro leech option. Try forming a dubbing noodle by twisting a few strands around the thread and winding forward. Blending two or more contrasting marabou colors together allows you to tie unique mottled micro leeches.
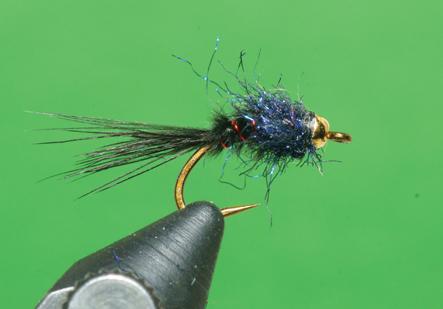
Conventional dubbing mixes are also excellent choices for micro leech bodies, tails and, as Bob’s Boogie Man illustrates, contrasting collars. I prefer to use a dubbing loop for my micro leeches as they produce scruffy, translucent durable bodies.
Wire based dubbing brushes are an alternative to thread based dubbing loops. Dubbing brushes can be produced en masse using homemade or commercially available dubbing blocks. In addition to their durability, pre-made dubbing brushes enable you to churn out patterns at an accelerated paced during each tying session. A number of tying companies offer wire dubbing brushes if you don’t have the time or tools to manufacture your own.
Dubbing can also be used to create slender mobile tails. To form a dubbed tail, roll a slender pinch of dubbing between your thumb and forefinger to align the fibers. Tie in the prepared bundle at the rear of the hook so there are equal amounts of dubbing on each side of the tie-in point. Wind the tying thread forward a few turns. Fold the dubbing in front of the tying thread back over the dubbing clump behind the tie-in point. Bind the folded dubbing back to the hook bend. Shear and trim the finished tail to length using a single scissors blade.
Long strand Mohair dubbing mixes are popular choices for micro leeches and traditional leech patterns. After the fly is complete the strands are often pointing all over the map. Coaxing and manipulation is required to get the fibers flowing back so they suggest the slender profile of a natural leech.
To begin the taming process, I use a Velcro brush to roughen, stroke and comb the fibers back along all sides of the fly. Next, using a microwave or kettle, warm a cup of water just below the boiling point.
Using a pair of forceps to hold the hook, dip the fly into the cup of water and saturate it by moving it back and forth. After a few seconds, remove the fly from the water. Carefully stroke the fibers back along the body and set it aside to dry. The near boiling water removes the memory from the dubbing fibres allowing you to style your flies as you wish.
Micro leeches often need help to sink. Metal beads, preferably tungsten, are the most popular option. Tungsten beads are 10 times heavier than brass beads, an added benefit when fishing in windy conditions. Wind creates circulation currents that can retard the sink rate of small flies. Lead wire or lead wire substitute bodies can also be used both with and without metal beads. Just be careful that the weighted underbody doesn’t negatively affect the slender profile common to successful micro leech patterns.
Dangling micro leeches beneath an indicator is a season long option. Try them as chironomid emergences wane, when fishing is quiet due to low water temperatures or unsettled weather, during early spring just after ice out and in late fall, just prior to ice on. Micro leeches are also a favoured choice when trout focus on tiny Hyallela scuds. Trying to match these minute crustaceans can be both frustrating and intimidating. What is important to recognize with Hyallela fixated trout is they are feeding. Micro leeches make the perfect snack.
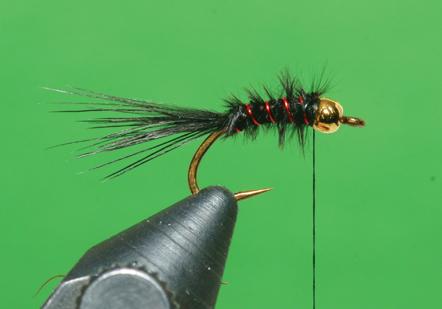
The Micro Leech Designed by Bob Taylor
Hook: Curved Scud Pupa, #10-#14
Tail: Strung Marabou, Black
Rib: Fine or Medium Red Wire
Body: Strung Marabou, Black
Collar: UV Black Ice Dub
Bead: Gold or Black
-

 Via Phil Rowley
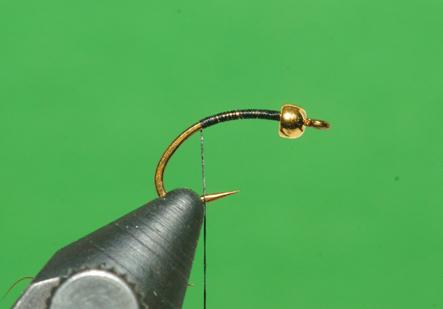
Slide a black or gold bead onto the hook shank. If you are using a tapered bead make sure the narrow opening of the bead faces the hook eye. Place the hook into the jaws of the vise and attach the tying thread directly behind the bead. Form a thread base by covering the hook shank with tying thread. Leave the tying thread hanging about halfway between the hook point and the rear of the flattened barb.
-
 Via Phil Rowley
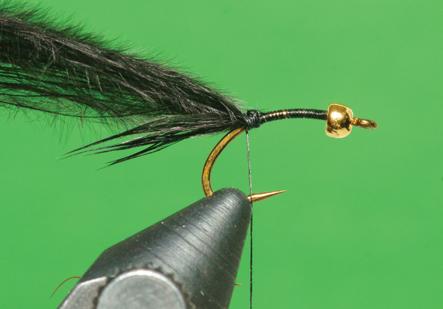
Strip a sparse clump of black marabou fibers from the stem, being careful to keep the tips even. Tie in the marabou at the rear of the hook to form a short, hook shank length long, tail. Place few thread wraps directly under the tail to stand the tail up slightly and to help reduce fouling. Fold and secure the marabou butts back over the tail. The marabou butts will be used to form the body.
-

 Via Phil Rowley
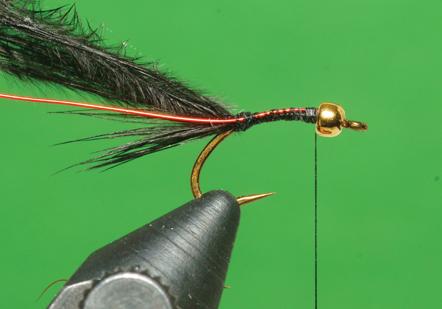
Advance the tying thread forward to the rear of the bead. Tie in the wire rib along the near side of the shank and secure it back to the base of the tail. Move the tying thread forward so it hangs directly behind the bead.
-
 Via Phil Rowley
Gather the marabou butts and twist them into a rope. Wind the twisted marabou forward to the rear of the bead to form the body. Tie off and trim the excess marabou.
-
 Via Phil Rowley
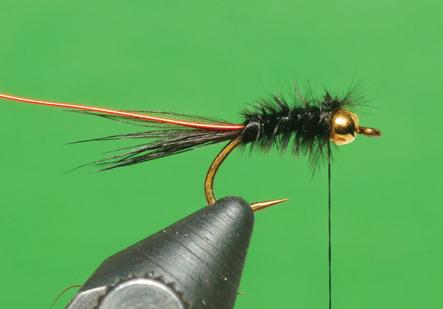
Counter wind the wire rib forward over the body using open even turns. Tie off the wire at the rear of the hook. Using a pulling and twisting motion, break away the excess wire.
-
 Via Phil Rowley
Using a dubbing loop form a small collar of UV black Ice Dub directly behind the bead. Once the collar is complete, coat a small section of the tying thread with brushable super glue. Wind the coated thread three to four times on top of itself directly behind the bead. Whip finish and remove the tying thread. Use a Velcro dubbing brush to roughen the dubbed collar. Stroke any errant dubbing fibers back over the body.