Dubbing is one of the most useful and versatile fly tying techniques. It can be used to create a variety of appearances depending on the needs of the fly or your personal preference. Durability is one of my favorite aspects of a dubbed body, particularly those flies incorporating thread loops. Flies constructed using dubbing loops seem immortal; no matter how many trout try to tear them apart. When tying larger nymph and streamer patterns I believe dubbing loops are the best dubbing option. However, using dubbing loops on smaller flies often results in an unnatural bulky look. In these circumstances, I integrate split thread dubbing to create the same durable ‘buggy’ look.
Advertisement
The first consideration for split thread dubbing is the thread itself. Not all thread can be split. Look for threads that can be untwisted and flattened. Bonded threads are difficult if not impossible to split. If you are just learning to split thread or are perhaps having some struggles splitting finer threads, heaver denier thread such as UTC 140 is easier to split than its 70-denier counterpart. Uni Nylon is another excellent choice. Marc Petitjean also offers four colours of 8/0 tying thread specifically intended for split thread dubbing.
Splitting thread takes a bit of practice and there are a few techniques to make the process easier. Begin by preparing your dubbing material so the correct quantity is nearby and ready to go. Next, pull down on the bobbin to expose three to four inches of tying thread. Spin the bobbin counterclockwise to untwist and flatten the thread so it has a floss-like appearance. Sliding a dubbing needle up and down the backside of the thread helps flatten it further. Once flat, place your forefinger against the underside of the tying thread just below the hook. Using the tip of your fingernail to apply tension, push up against the thread. Stab the middle of the thread just above your fingernail with a dubbing needle, a common straight pin or sewing needle. Once the thread has been pierced, slide the needle down to carry the split down to the bobbin.
Advertisement
Try to split the tying thread equally down the middle along its length. Don’t worry if the split isn’t balanced on your first attempts. Practice makes perfect.
There are companies such as Marc Petitjean or Stonfo Tools that offer specific thread splitting tools. If you plan on integrating split thread dubbing into your tying repertoire on a regular basis, these tools are worth looking into. If not, a dubbing needle or bodkin works fine.
Advertisement
Place your forefinger into the split thread to open it up along its length. Insert the dubbing equally from top to bottom into the split thread loop. Sparse applications work best. Once you are satisfied with the consistency of the dubbing, pinch the loop tight using your thumb and forefinger to hold it in place. Spin the bobbin below the pinch point to cord and twist the thread tight. Slide your thumb and forefinger up the corded thread to carry the twist up through the dubbing. Pluck, preen and brush the finished dubbing loop as necessary to remove any trapped fibers prior to winding it around the hook.
If it looks as though you have too much dubbing trapped within the twisted thread, removal is simple. Use a few counter-clockwise turns to partially unravel the thread and remove the excess dubbing from the bottom of the loop.
Split thread dubbing is an excellent technique for small patterns such as caddis pupa, small nymphs (particularly European style jig nymphs) even CDC winged dry flies. With practice, creating sparse dubbed bodies, collars, working with short coarse dubbing blends or hackles is a breeze.
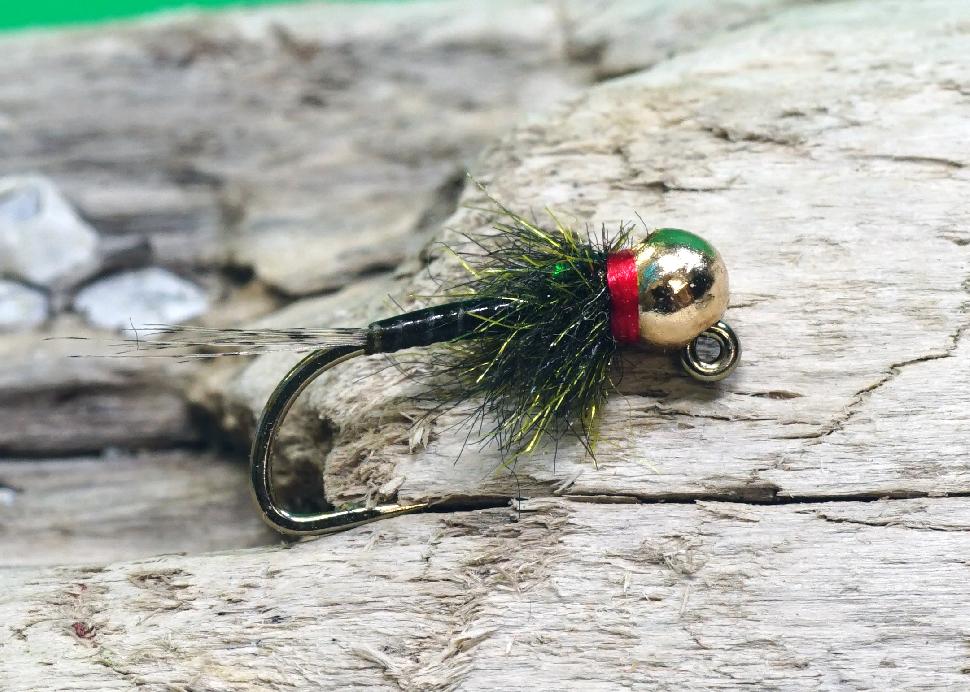
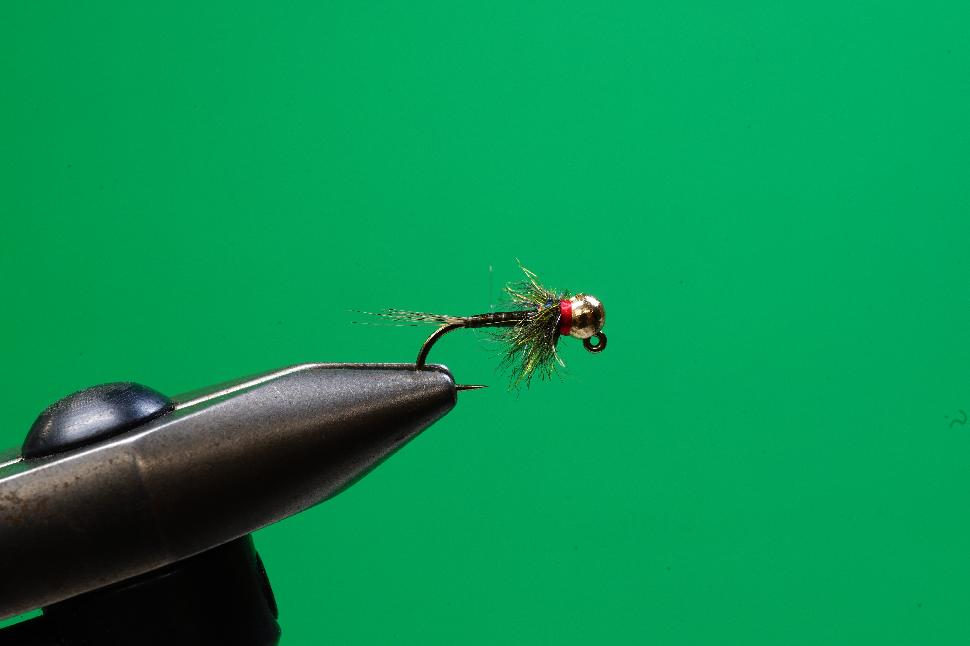
How to Tie The Iron Lotus Designed by Lance Eagan
Hook: 60 Degree Jig Hook #12-#16 (Weighted)
Thread: 70 or 140 Denier, Red
Tail: Coq De Leon Fibers
Rib: Uni 8/0, White
Body: UTC 70, Tying Thread, Olive
Wingcase: Flashback Tinsel, Medium, Black or Holographic Mylar, Medium, Black
Thorax: Arizona Synthetic Peacock
Bead: Slotted Tungsten, Gold
Tying Instructions
-

 Via Phil Rowley
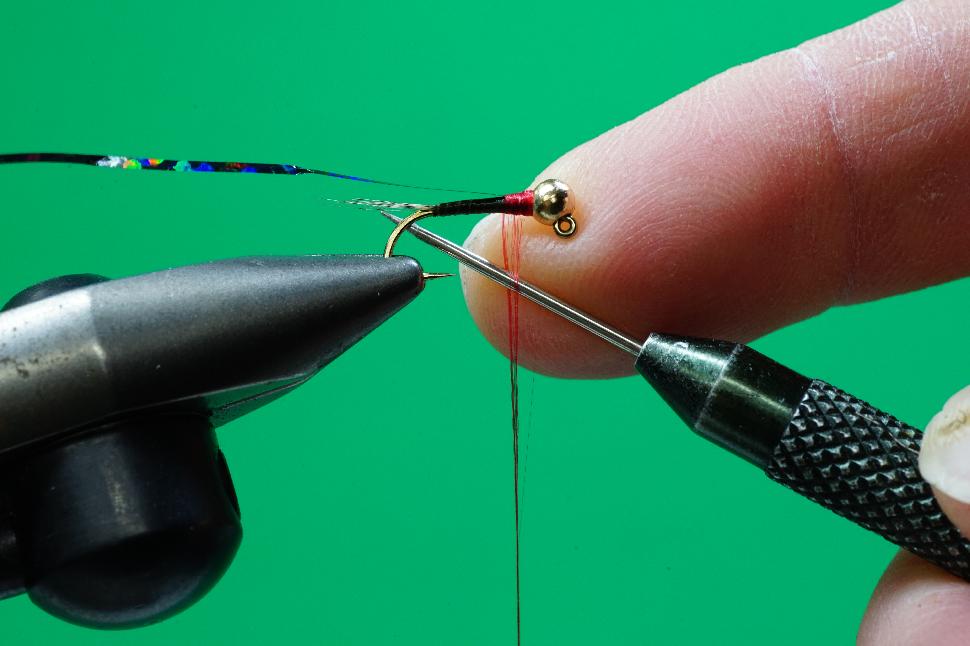
Slide a slotted gold bead onto the hook so the small opening faces the hook eye. Twist and manipulate the bead around the 60 degree bend so it fits tight against the hook eye. Wind 6-8 turns of .010” lead wire or lead wire substitute around the shank behind the bead. Push the lead into the slotted portion of the bead, locking the bead in place. Attach the olive tying thread directly behind the lead underbody and build up a small taper. Using even adjacent wraps move the tying thread to the hook bend. Tie in 8-12 Coq de Leon fibers to form a sparse shank length tail.
-
Via Phil Rowley
Tie in a short length of white 8/0 Uni tying thread. Build up a neat tapered thread body from the base of the tail forward to the rear of the bead completely covering the lead wire underbody in the process. Twist and cord the white tying thread. Counter wind the corded thread forward over the body using open even wraps forward to the rear of the bead. Tie off and remove the excess. Whip finish and remove the olive tying thread. Coat and cure the thread body and rib with U.V. resin. Attach red tying thread directly behind the bead. Tie in the wingcase material and secure it back onto the body slightly. About a bead length is fine.
-
 Via Phil Rowley
Pull down on the bobbin to expose 3-4 inches of thread. Spin the bobbin counterclockwise to untwist and flatten the thread. Rub the bodkin up and down the backside of the unraveled thread to flatten it further. Place your forefinger on the underside of the tying thread just below the hook. Push up on the thread using your fingernail. Pierce the middle of the flattened thread with a bodkin carefully splitting at lengthwise.
-
Via Phil Rowley
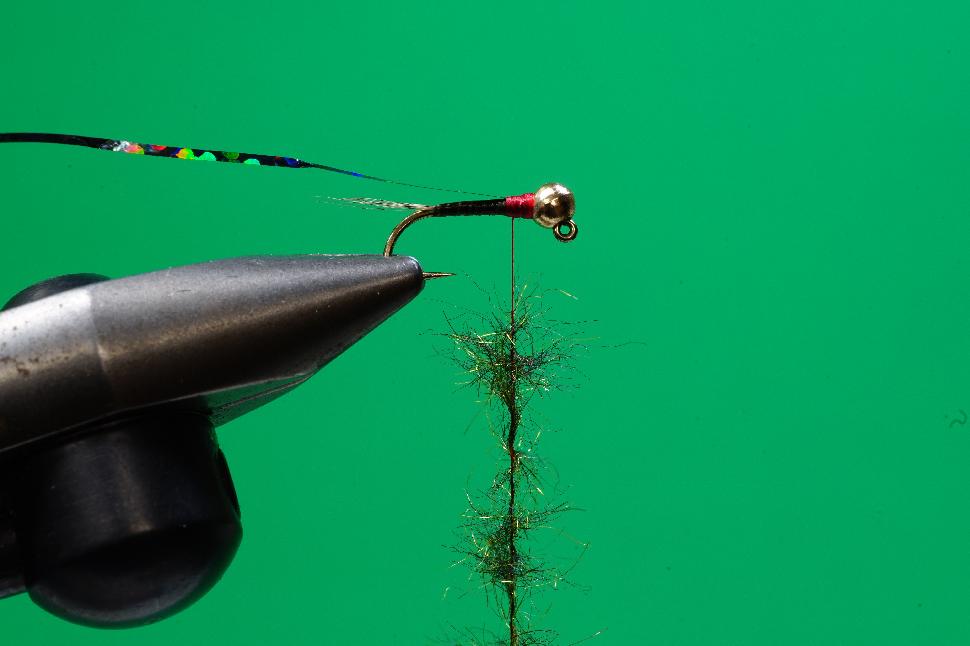
Insert your forefinger into the split thread. Slide your finger down to the bobbin. Beginning just below the hook, insert a sparse amount of dubbing into the split thread loop and pinch tight.
-
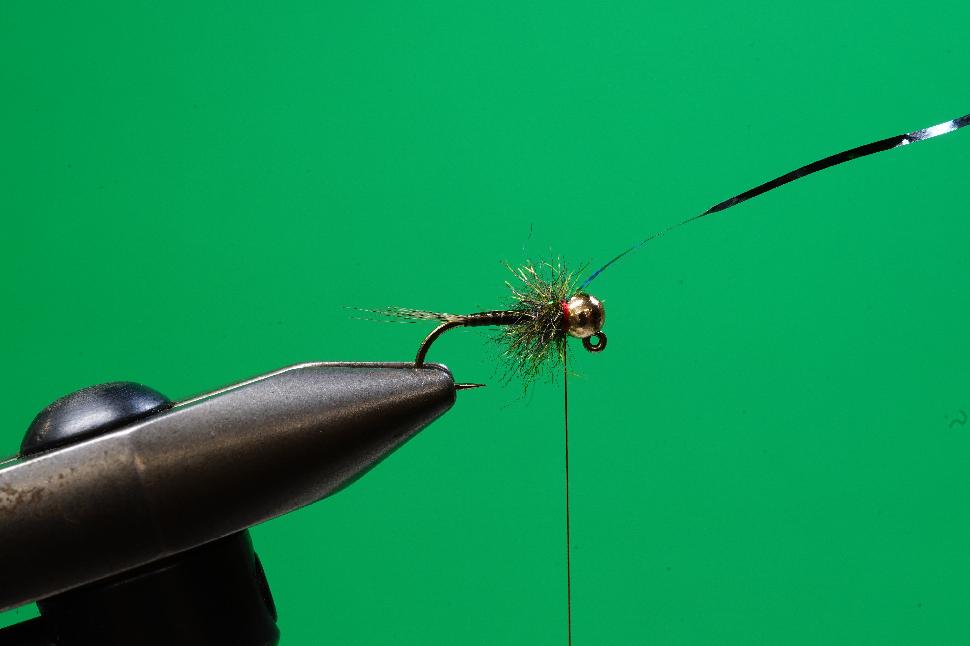
 Step 5 tying instructions for the Iron Lotus
Twist the loop tight by spinning the bobbin clockwise below the pinch, locking the dubbing in place.
-
 Via Phil Rowley
Wind the dubbed thread forward to form a scruffy thorax. Using a dubbing brush or Velcro, roughen the thorax to free any trapped fibers. Pull the wingcase over the top of the thorax. Tie down the wingcase directly behind the bead using 2-3 thread wraps. Fold the excess wingcase material back over itself and lock in place with 2-3 thread wraps. Trim the excess wingcase material.
-
 Via Phil Rowley
Build a narrow thread hot spot directly behind the bead. Whip finish, remove the tying thread and apply cement to finish the fly. Trim any errant dubbing fibers.