Each year, from mid-summer through to early fall, pink salmon return to spawn along BC’s coastal beaches, estuaries, rivers and streams – often in staggering numbers. While Vancouver Island waters are blessed with a pink return of some magnitude every year, the South Coast is on a biennial cycle – meaning the fish only return every other year, on the odd numbers. This is, of course, one of those lucky seasons, meaning fly-fishers will be targeting South Coast rivers such as the Indian, Harrison and Fraser to try their luck for these feisty salmon.
Advertisement
It is widely recognized that pink salmon have a particular affection for pink flies, although it is less well-known that colours such as white, green and blue can be productive as well. In any case, most of my pink patterns lean towards the pink side of the colour chart, involving a hot pink, a lighter bubble gum colour or a shrimp pink. If possible I blend different shades of pink into my patterns so they can handle varied water conditions and a spectrum of fish preferences.
Pink patterns often feature glowing forms accentuated by bright, flashy under-bodies covered with a translucent layer (a technique that works for other pattern styles too, such as chironomid pupae or stonefly nymphs). Aaron Goodis’s Foxy AGP takes advantage of this strategy. A translucent body offers two benefits: first, it diminishes overt under-body materials such as holographic Mylar, which may be too bright on their own. The second benefit is protection: many of the brighter synthetic Mylar or thread materials that make excellent under-bodies are not terribly durable, and left unprotected they are soon reduced to shreds and tatters. Pink flies have to work hard and stand up to a lot of abuse.
Advertisement
There are number of excellent translucent body material candidates to consider. Some of my favourites include Scud Back (or Midge Flex), V-Rib, Larva Lace and Liquid Lace, although each year newcomers arrive on the shelves, each worthy of a try. Scud Back and Midge Flex are flat, stretchy synthetics that can be dyed in a range of colours. They come in two primary widths: 1/8” and 1/2”. I use the 1/8” most often, particularly as a body material, as the narrower width makes it easier to control. The 1/2” size makes excellent wingcases for dragon and stonefly nymphs.
When tying in Scud Back or Midge Flex, trim the tie-in end to an angled point to make it easier to secure. Once initially fixed, pull and stretch throughout the balance of the tie-in process to maintain a thin foundation. Whenever I am tying a body material in I bind it down at the head of the fly and secure it back along the shank. This practice ensures a firm tie-in while keeping your under-body foundation neat and even.
Advertisement
V-Rib is a solid, semicircular plastic cord most often sold on spools. Wound forward the material forms distinct rounded segments. In order to gain this characteristic rounded appearance, V-Rib must be tied in so the flat side of the material faces out. Then the initial wrap forward places a half turn in the V-Rib, causing the flat side to rotate so it seats against the shank with the rounded side out. As with Scud Back, trim the end of the V-Rib to an acute point to ease tie-in and reduce bulk. V-Rib is not as stretchy as Scud Back or Midge Flex, so I tend not to use this product on #12 or smaller flies. Rubbing your fingers along the V-Rib creates friction-induced heat that helps in your efforts to stretch. As with Scud Back, make sure you use strong tying thread to bind the V-Rib in place so it doesn’t pull out as you stretch it down the shank during tie-in.
Larva Lace and Liquid Lace are kinds of hollow plastic tubing with thin diameters. Like V-Rib or Scud Back, these materials can be tied in and wrapped over a thread or Mylar under-body. The hollow nature makes them more elastic than V-Rib, but they don’t always provide the rounded finish V-Rib does. As with V-Rib and Scud Back, trimming the end to a tapered point eases tie-in and reduces bulk when using empty tubing.
The beauty of these hollow materials – Liquid Lace in particular – is that they can be filled with baby or mineral oil dispensed through a 29- or 27-gauge syringe to provide added depth and lustre to your flies. Clamp or tie the ends of the tubing to keep the oil from leaking out. Once tied in the thread pressure on the tubing keeps the oil in place.
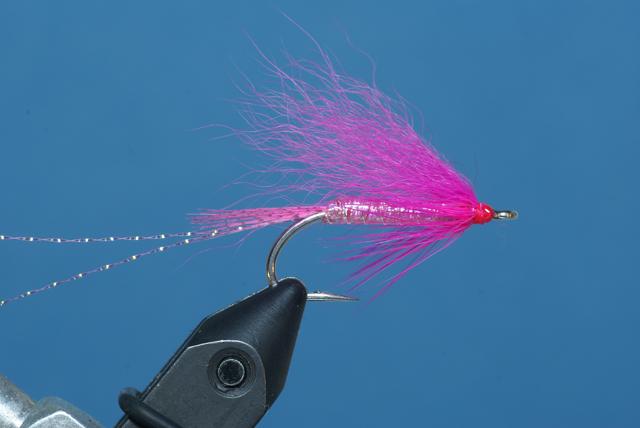
The Foxy AGP Designed by Aaron Goodis
Materials:
Hook: 1XL straight eye saltwater streamer hook, #6 to #8
Thread: 6/0, hot pink or equivalent
Tail: Fluorescent or hot pink barred mallard flank, with two strands pink Crystal Flash trimmed twice as long
Rib: Fine silver wire under-body with fluorescent or hot pink tying thread or silver holographic Mylar
Body: Pink Scud Back (or Midge Flex) 1/8”, V-Rib or Larva Lace
Hackle: Fluorescent or hot pink saddle
Wing: Fluorescent hot pink arctic fox
Directions:
-

 Via Phil Rowley
Place a de-barbed hook into the vise. Attach the tying thread just behind the hook eye. Cover the shank with tying thread. Return the tying thread to the original tie-in point.
-
 Via Phil Rowley
Tie in a shank-length tail just back from the hook eye to ensure a smooth, even foundation for the under-body and body materials. Wind the tying thread back to the original tie-in point. Double a single strand of pink Crystal Flash around the tying thread and secure it down the hook shank to the base of the tail. Trim the Crystal Flash so it extends twice the shank length past the tail.
-
 Via Phil Rowley
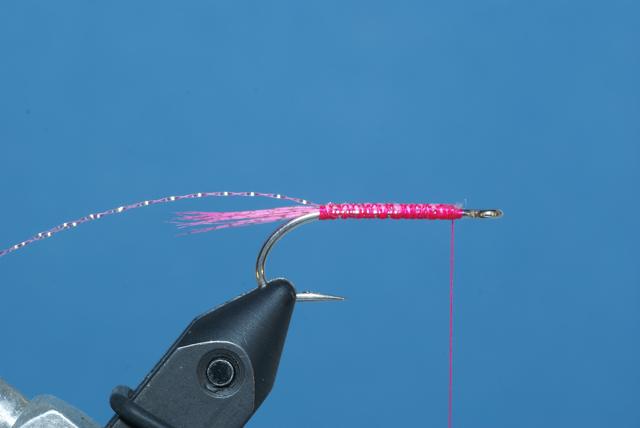
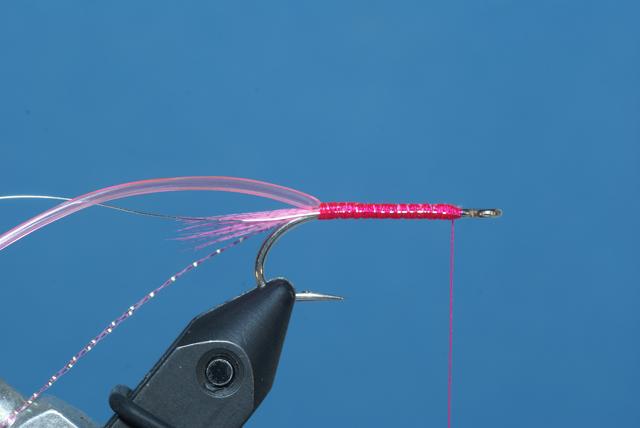
Tie in the silver wire rib just behind the hook eye along the near side of the hook, and secure down the shank to the base of the tail. Tie in the body material along the shank of the hook using firm thread wraps. Stretch the material as you are tying it in to reduce bulk and maintain a smooth under-body foundation.
-
Secure the Mylar in place on top of the shank at the base of the tail. Wind the Mylar forward in close, touching turns to form the under-body. Tie off and trim the excess Mylar two hook-eye-widths back from the hook eye. For a thread under-body, cover the shank from the base of the tail to the same point as for a Mylar under-body, ensuring there are no gaps between the thread wraps.
-
 Via Phil Rowley
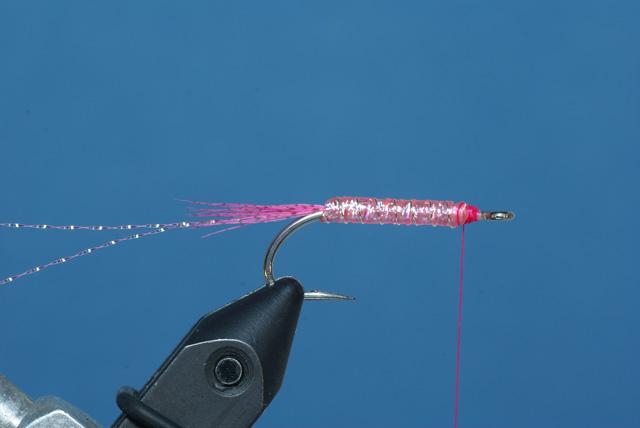
Warm and stretch the body material as necessary, and wind forward over the under-body. Adjust the tension to create a thin, even form. Tie off and trim the excess at the same point as the under-body. Wind the rib forward over the body using open, even wraps. Tie off and break away the excess using a pulling and twisting motion.
-
 Via Phil Rowley
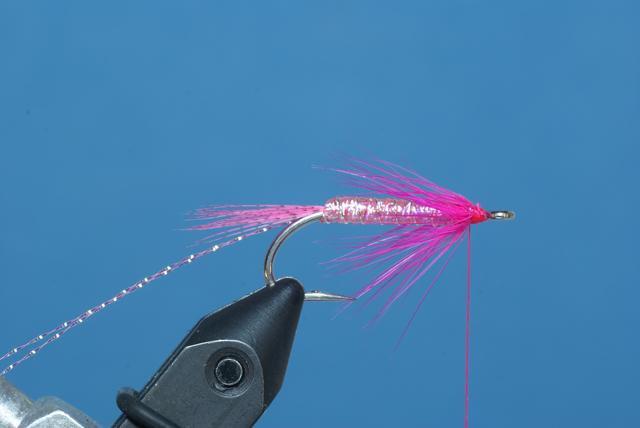
Select a saddle hackle with fibres no longer than the shank. Remove the flue from the base of the feather. Tie in the prepared hackle by the butt directly in front of the body. Wind the hackle three times, then tie off and trim the excess. Using your thumb and forefinger sweep and hold the hackle down and back creating a path for the wing. Secure in place with a few wraps of tying thread. Pinch the fibres to further train and flow them down the shank.
-
 Via Phil Rowley
Even the tips of a sparse clump of fox fur by hand. Tie in the prepared fox fur in front of the hackle directly on top of the shank. The tips of the fur should extend back no further than the tips of the mallard flank tail. Build a neat tapered head, whip finish and apply head cement.