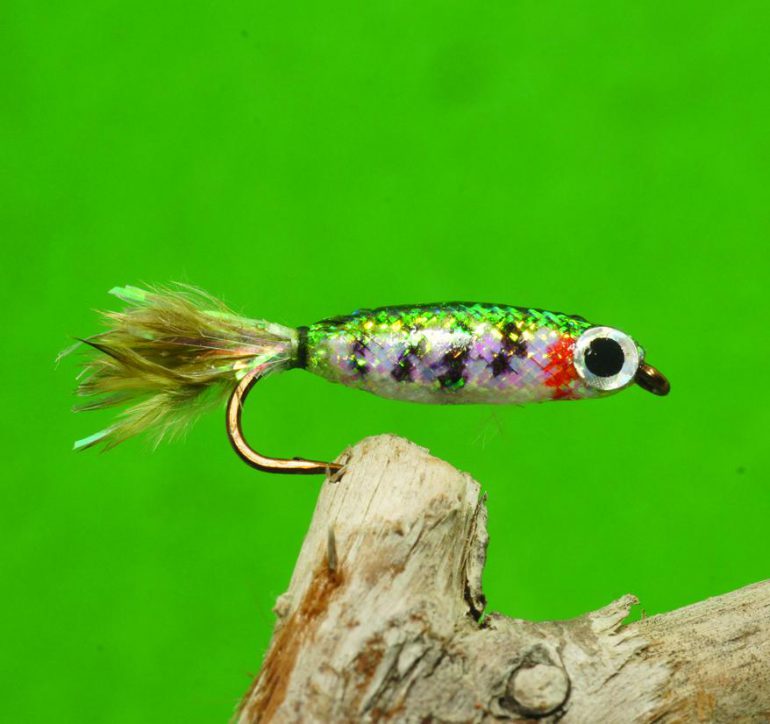
Predatory trout accustomed to supplementing their diet with minnows, fry or other bait fish often herd and chase their prey into shallow areas or drive them to the surface where they ambush them from below. In order to be successful using minnow or fry patterns it is important to keep your fly high in the water. Line choice helps but having a buoyant pattern is a definite asset. When prospecting deeper water in and around rocks, weeds, branches and other sunken debris, patterns with a reduced sink rate also tend to remain snag free. To cope with these presentation demands, I developed the Foam Minnow, inspired in part by Hal Jansen’s realistic looking Epoxy Minnow.
Advertisement
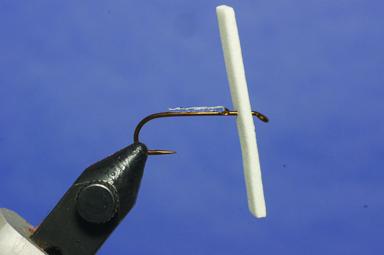
The key to the Foam Minnow is its buoyant 2mm sheet foam core. Start by trimming a narrow, hook-gape wide, foam strip. The hook gape standard ensures body consistency, no matter the hook size. A paper cutter is a great tool for producing a quantity of consistent-width foam strips. Cut a twice-the-shank length section from the strip. Stab the hook point through the centre of the foam at its mid-point. Slide the foam strip around the hook bend and up onto the shank to within two hook-eye widths of the hook eye. Leave space at the front of the hook to ensure there is enough room to tie in the Mylar piping body tight behind the hook eye. Place the hook into the vise. Lay a bead of gel type superglue along the shank. Gel type superglue holds its position without running all over the place. Fold the foam strip along the sides of the shank. A quick two to three second pinch secures the foam in place. Remove any excess superglue that seeps out. Trim the foam underbody at each end to suggest the tapered profile common to most bait fish. Shape carefully, as with each cut you remove floatation.
Hook choice also factors into the pattern’s overall buoyancy. I prefer a 3xl straight-eye streamer-hook. If you use a non-slip loop knot to attach the fly to the tippet, a standard down-eye 3xl hook works fine. I avoid 4xl or longer shank hooks. As a trout shakes its head during the fight, extra-long shank hooks often lever themselves free. Don’t be seduced by straight-eye stainless steel saltwater hooks. These hooks created great looking flies but proved too heavy and my Foam Minnows sunk far too fast.
Advertisement
Marabou and fur clumps make excellent tails. Grizzly marabou or the soft fibers at the base of a dyed grizzly hackle feather are my current favorites. The barred markings of a dyed grizzly feather suggest the banded markings common to trout or salmon fry and many small minnows.
How the pearlescent Mylar piping body is formed is key. After removing the yarn core, most tyers slide Mylar piping over the shank securing it at the hook eye and then at the rear of the hook. This process involves using a second bobbin or reattaching the tying thread in order secure the Mylar piping body in place. After removing the yarn core, I push Mylar piping over the hook eye and secure one end in place right behind the hook eye using firm thread wraps so the balance of the tubing protrudes out in front of the hook. Stout tying thread such as GSP ensures a firm tie in. I then move the thread to the rear of the shank using open, wide wraps and let it hang.
Advertisement
Be careful not to wrap the thread too tight over the foam underbody as this reduces pattern buoyancy.
Using the thumb and forefinger, stroke the Mylar piping back over itself, folding it inside out and down the shank in the process. Pull the errant strands back around the hanging thread into the tail. Pinch and pull the Mylar to form a compact body and secure in place. Using this technique ensures a tight body without having to remove and reattach the tying thread or to involve a second bobbin. The blunt nose this method creates better mimics the look of many minnows or fry. The errant strands trailing back into the tail can be left as is or trimmed to length and volume. I prefer using just a few strands mixed into the tail.
Permanent markers provide the distinct body markings. My favourite combination consists of a dark olive back, thin black vertical bars along the sides and red gill slashes. Pearlescent Mylar piping is semi-transparent so the underbody colour affects the fly’s overall colour scheme. With this in mind, darken the top of the white foam underbody to further accent the dark backs common to many minnows and fry.
Eyes are a critical component to any successful bait fish pattern. The Foam Minnow is no exception. I prefer stick on eyes as they are easily locked in place with a few coats of UV resin. Prior to removing the eyes from the backing, fold the row of the eyes you are going to use horizontally down the middle. This trick cups the eyes so they better fit the rounded profile of the Mylar body. Coat the finished fly two to three times from head to tail using thin formula UV resin. Applying several thin coats ensures a smooth and even build up. The Foam Minnow is a realistic looking fly that appeals equally to both the fly fisher and the fish.
-

 Via Phil Rowley
Cut a hook-gape wide strip of 2MM white sheet foam. Trim the foam strip so it is twice the length of the hook shank. Stab the hook through foam strip at the midpoint of the foam. Place the hook into the jaws of the vise. Lay a bead of gel type superglue along the hook shank.
-
 Via Phil Rowley
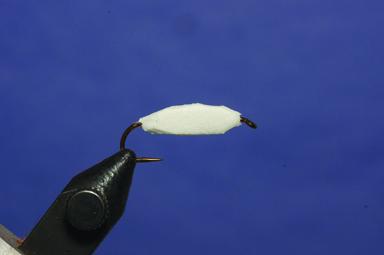
Fold and pinch the foam strip down the sides of the shank. Remove any excess superglue that oozes out of the foam seams. Leave roughly two hook-eye widths of the hook shank bare immediately behind the hook eye to provide enough room to tie in the Mylar piping. Shape the foam underbody so it tapers at each end resembling the basic shape of a baitfish.
-
 Via Phil Rowley
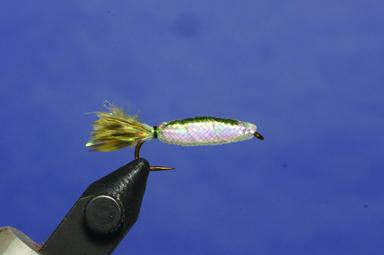
Attach the tying thread behind the hook eye. Trim a section of Mylar piping one and one half times the length of the hook shank. Remove the inner core from the Mylar piping. Be careful not to fray the ends. Stab the Mylar piping over the hook eye so it protrudes out in front of the hook. Using two loose wraps to start, secure the Mylar piping in place directly behind the hook eye. Move the tying thread back to the rear of the hook using open wide turns. Strip a small clump of soft feathers from the base of a dyed olive or brown grizzly soft hackle. Tie in the hackle tuft at the rear of the shank. The finished tail should be no more than half the shank length. Darken the back of the foam using a permanent marker.
-
 Via Phil Rowley
Using your thumb and forefinger, stroke and pull the Mylar piping back over itself along the shank. Pull the ends of the Mylar piping back around and past the hook bend. Pull the Mylar piping tight at the rear of the hook. Secure the Mylar piping in place using 3-4 turns of tying thread. Trim the frayed ends of the Mylar piping flowing into the tail for length and volume. I prefer just a few strands mixed in with the tail. Use a permanent marker to colour the thread to match the dorsal colouring of the minnow. Whip finish the fly at the rear of the shank. Remove the tying thread. Apply a small dab of superglue at the rear tie-off point for added security.
-
 Via Phil Rowley
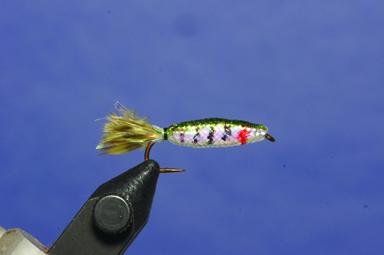
Using permanent markers, apply the dorsal color and body markings. My favorite color combination consists of a dark olive back, red gill slashes and black vertical bars along both sides of the body. Wait a few minutes for the body markings to dry.
-
 Via Phil Rowley
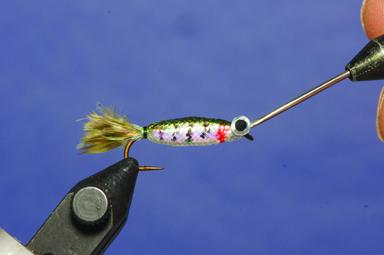
Using a dubbing needle, apply the stick on eyes to each side of the head. Pinch the eyes flush along the sides of Mylar piping body.
-
 Via Phil Rowley
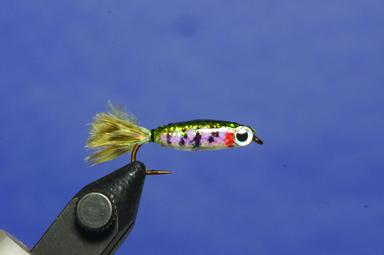
Coat the entire fly, including the eyes and tie down area at the base of the tail, with 2-3 coats of thin formula UV Fly Fish. Cure each coat with the appropriate curing light.