
Those who explored and mapped out our great nation had no GPS, only the maps they made and a compass to guide them. In today’s modern world basic map and compass navigation are being replaced by the convenience GPS, however when these miracles of technology fail it’s best to have a basic navigation skill set to fall back on. Knowing how to use a compass, map and basic navigational skills will make getting lost far more difficult and make it easy to find the way home when the GPS decides to get lost or stop working.
Advertisement
The Map
 Via Michael Major
Topographic maps can be purchased through retailers or downloaded for free from Natural Resources Canada’s website. Maps should be cared for by placing them in a ziplock bag or map case and by covering with a waterproof coating or material. Maps that are made from waterproof paper can be purchased.
Advertisement
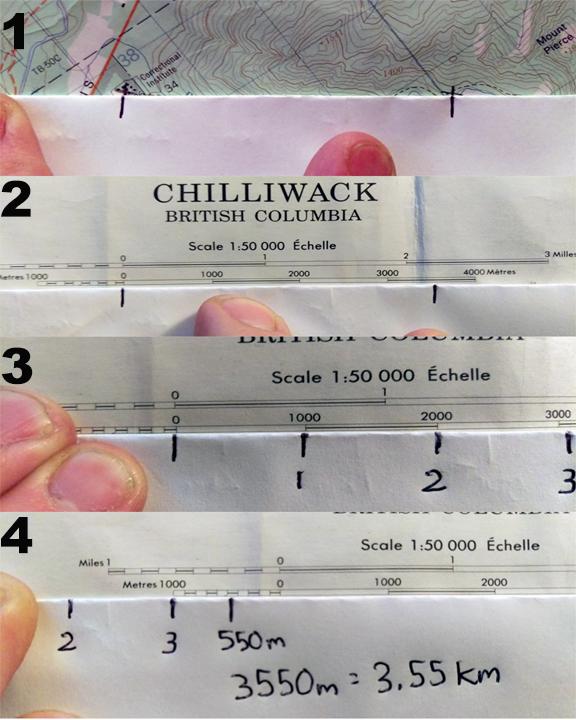
Maps come in several different scales. Scale is represented by two numbers such as 1:50,000. This means that 1 cm on the map represents 50,000 cm (500 metres) on the ground. The higher the second number the larger an area the map shows. For example a 1:25,000 scale map will show a smaller area in greater detail than a 1:50,000 scale map. For general wilderness navigation a 1:50,000 map is a popular choice but if exploring a small area a 1:25,000 or 1:24,000 map are good choices as well. Maps downloaded online can be printed to show only the area required, but care must be taken to make sure the scale does not change during the printing process.
To measure distance using the scale, simply place a piece of paper along the intended route, then mark on the paper the start point and destination. Line up the start point at zero on the map scale, then find which distance the destination lines up with. If the destination goes beyond the scale then use the scale to place a mark on the paper every kilometre until reaching the destination on the paper. The first section of the scale will be in hundreds of meters to help in measuring part kilometres.
Advertisement
Topographic maps contain brown lines that represent changes in the elevation of the ground. These are referred to as contour lines, and are used to demonstrate what three dimensional terrain will look like using only two dimensions. The closer together contour lines are the steeper the slope and the further apart the lines are the gentler the slope. Elevation will be indicated along some contour lines and at points on the map such as peaks. With practice and experience it is possible to visualize accurately how the terrain will look by just looking at the contour lines and it is important to pay attention to contour lines when planning a route. Pay attention to the counter interval, which is the difference in elevation between the lines. This will bring a greater understanding of the changes in elevation along a route.
A declination diagram can be found on maps and looks like the one shown. Magnetic declination is the difference between true north and magnetic north and is absolutely essential to map and compass navigation. Declination must be accounted for by either adding or subtracting it from bearings or by using a compass with adjustable declination. It is preferable to use a compass with adjustable declination because this virtually eliminates mathematical errors in determining bearings. Determining declination and adjusting the compass will be covered in the next section.
The Compass
 Via Michael Major
There are many different styles of compass, but for the average outdoor adventurer either a baseplate compass or a sighting compass are more than sufficient. A sighting compass with a rotating bezel and adjustable declination will make navigation more accurate, especially when dead reckoning or doing a resection. Personally I use a Silva Ranger model 515, which is a good compass at an affordable price.
When it comes to purchasing a compass, it is best to purchase the highest quality compass budget will allow for, after all this is the tool that will make travel in the woods as precise as possible. After purchasing a compass, take the time and read the owner’s manual, especially when it comes to use, handling and safe storage. Taking proper care of a compass will result in decades of service.
The first step is to set the declination (provided the compass used has adjustable declination). Declination changes a small amount each year because the Earth’s magnetic north pole moves constantly in relation to true north. This means current declination needs to be calculated mathematically.
To determine declination as of today, multiply the annual change by the number of years old the map is and either add or subtract it from the declination listed on the map according to whether the change is increasing or decreasing. Usually declination will be represented in degrees, while the rate of change is represented in minutes so when doing the math it is important to remember that one degree has 60 minutes. An example for determining declination would proceed as follows:
Current year 2015 – Year on map 2010 = 5 years difference
Annual rate of change (decreasing) 12.3’ x 5 years = 61.5’ = 1º 1.5’
Declination on map (grid north) 17º 30’ – 1º 1.5’ = 16º 28.5’
Approximate declination from grid north is 16º 28.5’
Once declination is known, follow the method in the compass owner’s manual to adjust the compass for the current declination.
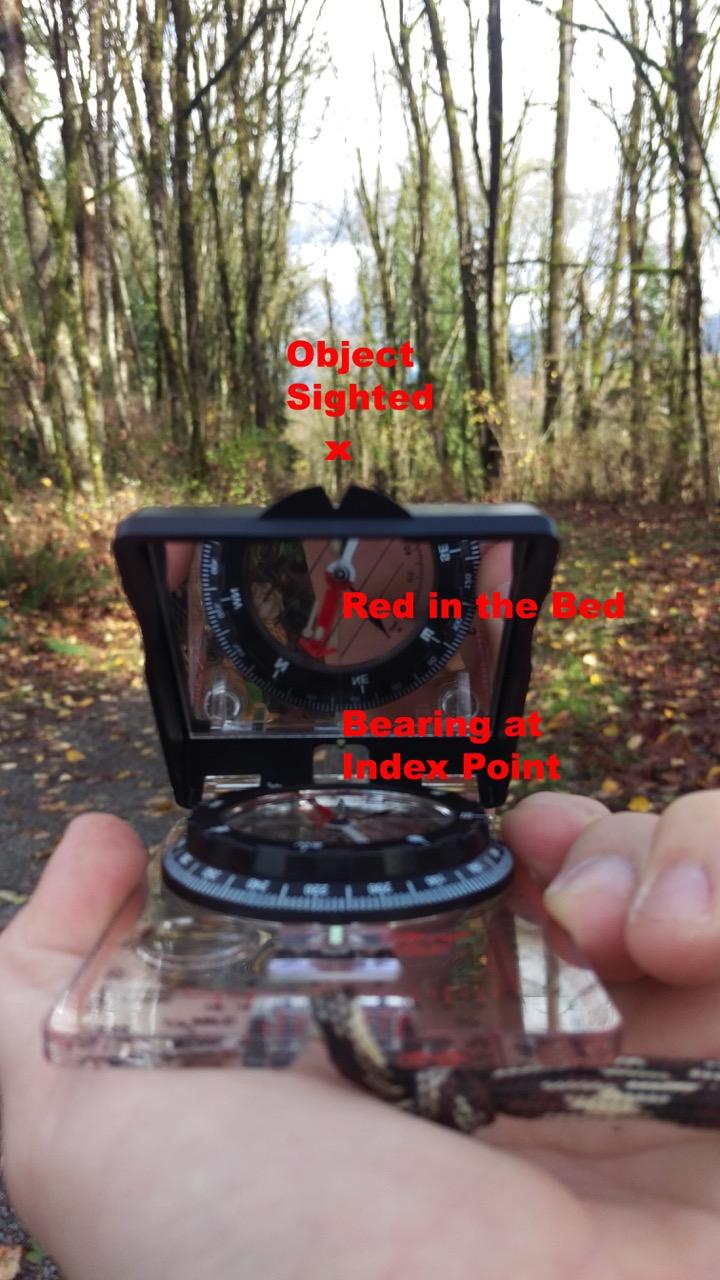
Before using a compass to navigate, note the orienteering arrow, which is normally red in colour, and the north half of the magnetic needle, which is also red in colour. When adjusting declination the orienteering arrow will move showing the offset between true north and magnetic north. When north on the bezel is at the index point and the red north end of the magnetic needle is inside the orienteering arrow, the compass is now pointing at true north. Having the north end of the magnetic needle inside the orienteering arrow is referred to as ‘red in the bed’, and is a critical part of using a compass for navigation.
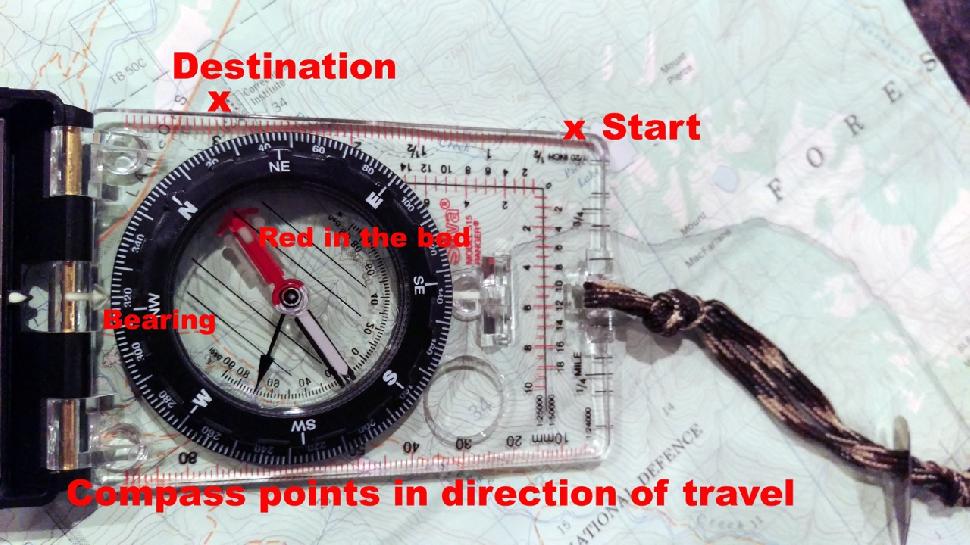
To take a bearing from the map, first orientate the map to the ground. Rotate the bezel until north is at the index point, then lay the map and compass on the ground. Align the edge of the compass with the edge of the map or the north south grid lines with the meridian lines inside the bezel and rotate the map and compass together until you have red in the bed. The map is now orientated to the ground.
To take a bearing from the map place the bottom corner of the compass on the start point and line up the destination with the same edge ensuring the compass points in direction of travel. Rotate the bezel to get red in the bed and then read the bearing at the index point. It is critical that the compass point in the direction of travel.
To orientate the compass to a bearing, either take the bearing off the map or turn the bezel until it reads the correct bearing at the index point. The compass is then brought up to eye level with the sighting mirror tilted at an angle to see when red in the bed has been established. Turn around with the compass until seeing red in the bed, the compass is now orientated to that bearing.
To shoot a bearing off of an object, tilt the mirror to be able to see red in the bed and bring to eye level like before. Aim the compass at an object using the sight then rotate the bezel until red in the bed is established. The bearing at the index point is the bearing to that object.
Pace Counting
Pace counting is used to determine distance by counting paces. The key is to know the number of paces in 100 meters of travel. This is done by counting every time the right foot strikes the ground while walking 100 meters on flat ground, this number will be different for every person and will change based on terrain. With experience and practice the pace count can be adjusted mentally to account for terrain.
Pace beads (also know as ranger beads) are used to keep track of pace count. Pace beads two sets of beads on a piece of cord. One set of nine measures 100’s of meters traveled while a set of five measures kilometres traveled. Every time 100 meters has been travelled, slide one of the nine beads down, and at one kilometre slide down one of the five beads. This way the possibility for error in trying to maintain a count over long distance is minimized, because the pace beads act as a reference. A good place to keep pace beads is attached to the compass, in place of a lanyard.
Dead Reckoning
Dead reckoning uses a bearing and distance taken from a map and allows a person to travel along that bearing while pace counting from point A to B without actually seeing the destination.
Once a bearing has been transferred from the map to the compass, look through the compass sight, turning around until red is in the bed. Using the sights, find an object in the distance that can be walked to. Travel to that object, keeping track of the pace count and repeat the process until destination has been reached. Never attempt to navigate by holding the compass and walking at the same time, the movement of walking will throw the needle off and result in flawed navigation.
Baselines, Hand Rails, Backstops
A baseline is a straight terrain feature such as a road where navigation will start. This should run perpendicular to direction of travel so that no matter where you are traveling in the area, is it is possible to walk along a predetermined bearing to return to it.
Handrails are a terrain feature that runs in the direction of travel. For example, a pipeline, river, road, power lines or any other easily distinguishable feature can be used as a handrail. Handrails are used by either walking in the same direction as them while keeping them in sight or actually walking along them.
A backstop is a terrain feature that again runs perpendicular to travel and is used to denote when travel has gone too far. Using a backstop is handy so that the distance required to backtrack to find a point can be kept to a minimum and also to remove guesswork in whether or not a point has indeed been missed. It is important to also know how far the backstop is from the desired location so it’s possible to navigate backwards easily and accurately.
Aiming Off
There are times when missing a point on a linear terrain feature, even by a small margin of error, will result in walking straight past it. For example, navigating to a sharp bend in a road or river. Aiming off is used to intentionally navigate to one side of the point knowing that once reaching this feature turning left or right (depending on which direction the aiming off was taken) will lead straight to the desired point. For example if trying to navigate to a bend in a river, don’t take a bearing off the bend, take it off a spot 100 meters to the left or right as long as that area of the feature is perpendicular to travel. This way when reaching the river simply turning either left or right (depending on which direction was used to aim off) it is easy to walk straight towards the bend without having to guess which way to go.
Resection
 Via Michael Major
A resection uses triangulation to determine a location on a map. By knowing at least two terrain features, a location can be easily determined.
First orientate the map to the ground. Then find a known terrain feature and shoot a bearing on it. Transfer that bearing to the map by placing the top corner of the compass on the terrain feature used on the map and rotating the compass around that point, getting red in the bed. Draw a line down the side of the compass and repeat for all known terrain features. If multiple features are used then where those lines intersect is the current location. If only one is used then the location is located at some point on that line.
Emergency Navigation
Before leaving civilization, making note of baselines or handrails that can be used to navigate to safety if lost and unable to do a resection. For example, knowing that there is a highway that runs north-south situated to the east, means that to reach civilization requires only to walk in a straight line to the east. Even with lateral drift the highway will still be reached because as long as the direction of travel is generally east then the highway will act as a backstop and be easily found.
There are many ways to navigate without a compass but the best way to return to civilization in an emergency is to always have at least two backup compasses. Have a button compass on a watchband or paracord bracelet and another inexpensive compass in a zippered pocket. For good measure, a magnetized needle taped to a knife sheath is a good last resort.
The most important step to becoming proficient in map and compass navigation is to practice and gain confidence not only in ability, but also in equipment. This was just the barest of essentials and there are many resources online and in books to aide in improving navigation skills. So put the GPS away, and get back to basics.