The Chuck nymph, designer Chuck Furimsky’s wordplay on the Czech nymph, is a unique pattern utilizing leather Bugskin. Prior to his full-time role with the US-based The Fly Fishing Show, Chuck spent over 40 years in the leather industry where he soon realized the tying potential of leather.
Advertisement
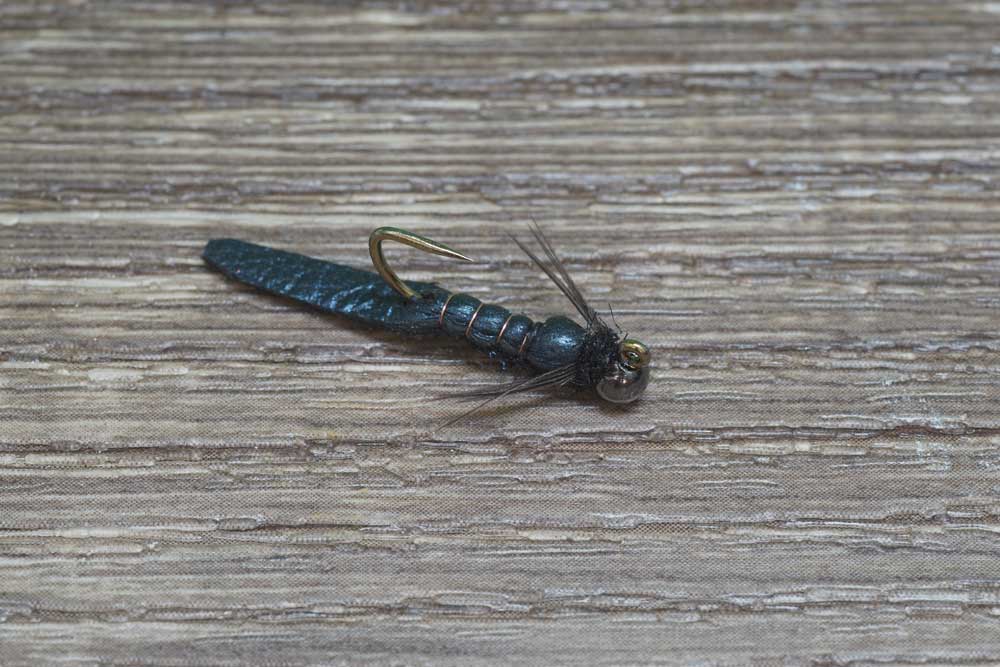
Depending on size and colour schemes, the Chuck nymph suggests a variety of natural nymphs, including stoneflies, mayflies and damselflies. It can also be tied in brighter contrasting attractor colours. As the Chuck nymph utilizes a jig hook and slotted tungsten bead, it rides point up. This trait reduces the risk of snagging, while providing a seductive jigging action, whether the fly is cast and retrieved or suspended under an indicator.
Advertisement
Although small panfish jigs with pre-mounted beads are an option, stout jig hooks coupled with slotted tungsten beads work best. Panfish jigs typically feature soft, thin wire, hooks that just don’t stand up to the rigors imposed by large trout. The variety of colours and sizes in slotted beads also provides additional options.
From a tying perspective, the Chuck nymph is straightforward to tie, but there are a few quirks. The tying sequence begins with securing in the rib, followed by the body and then the Bugskin. A set of divided legs completes the fly.
Advertisement
Bugskin, leather specifically designed for fly tying, is the primary Chuck nymph ingredient. It is thinner and suppler than regular leather, resulting in less weight through water absorption and superior action. Bugskin can be used in a variety of ways, including the creation of durable mobile tails, shellbacks, bodies and wingcases.
With the Chuck nymph, begin by trimming a less-than-hook-gape wide slip of Bugskin. Allowing for the wingcase, shellback and a hook shank long tail, pre-pierce the tail base through both sides of the Bugskin with a bodkin so the hook point passes through without tearing. As the fly rides upside down, ensure the Bugskin faces shiny side up, along the underside of the shank. Once the Bugskin has been stabbed onto the bend, rotate the hook so it rides point up to ease the balance of the tying steps. Slide the Bugskin tight against the rear of the body. Just prior to securing the shellback, Chuck recommends adding a thin coat of contact cement for added security. You should do the same when forming the wingcase.
Tying in individual clumps along each side of the fly is one way to create divided legs. This approach can be challenging to achieve consistent leg position and length. I use a variation of the DaFeo style technique many Atlantic salmon tyers use to create neat, tidy throats to created divided legs.
Select an oversized feather. Using scissors points, isolate the tip section, along with the top portion of the feather, to a point where fibres are longer than the size of fly you are targeting. Snip the stem to remove this portion of the feather. Just below the trim point, expose the desired number of legs fibres by stroking the remainder of the feather back, forming a small V. About six to eight fibres on each side of the stem are preferred. Using a couple of thread wraps, tie in the hackle V just behind the bead. Using the thumb and forefinger, position the fibres so they tuck along the sides of the thorax. Pull on the stem to adjust for length. Trim the excess. If the hackle feather is long enough, you can use the same process for a number of legs. I find the DaFeo style provides consistently divided legs of equal length and volume. The hackle stem also keeps the fibres in place while allowing easy length adjustments.
Bugskin is not easy to find. Your local fly shop may be able to special order it for you or an online search may be necessary. It does, however, create durable mobile patterns and has a number of uses including aquatic worms, crayfish and long-tailed, foul resistant, leeches. Your imagination and ingenuity are your only barriers to blending thin leather into other patterns.
Materials
Hook: 60-degree jig hook, #10-#14
Thread: 8/0 or 70 Denier, colour to compliment
Tail: Bugskin
Rib: Wire, colour to compliment body
Shellback: Bugskin
Body: Natural or synthetic dubbing
Wingcase: Bugskin
Thorax: Natural or synthetic dubbing
Legs: Mottled hen or partridge
Collar: Natural or synthetic dubbing
Bead: Slotted tungsten
Tying Instructions
-

 Via Phil Rowley
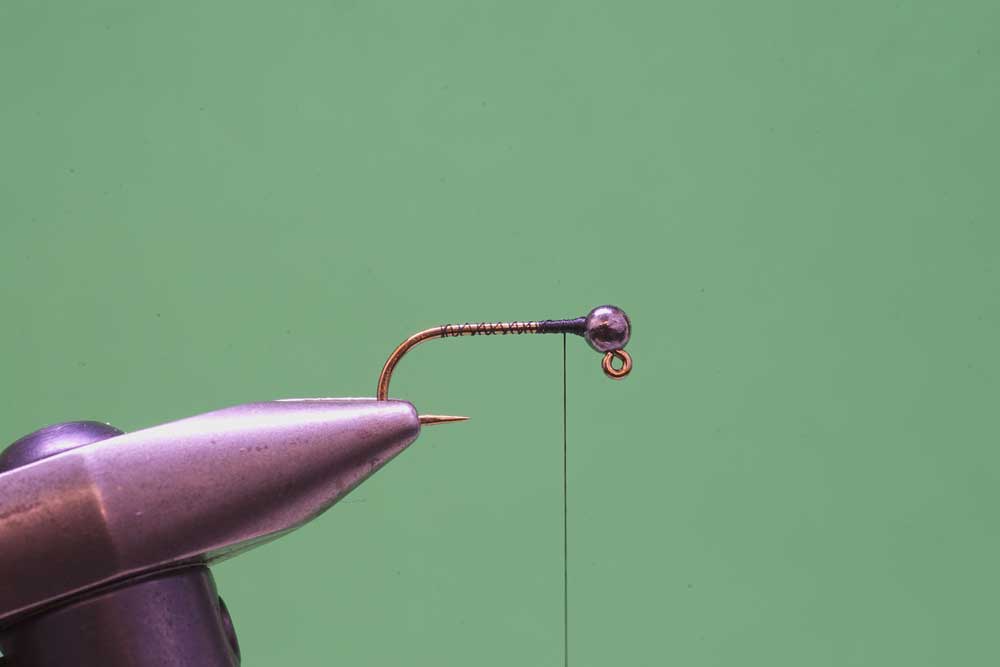
Slide a slotted tungsten bead onto the hook shank, with the narrow opening towards the hook eye. Rotate the bead so it pushes tight against the hook eye. Attach the tying thread behind the bead. Build up a small thread dam to secure the bead right against the hook eye. Cover the balance of the shank with thread.
-
 Via Phil Rowley
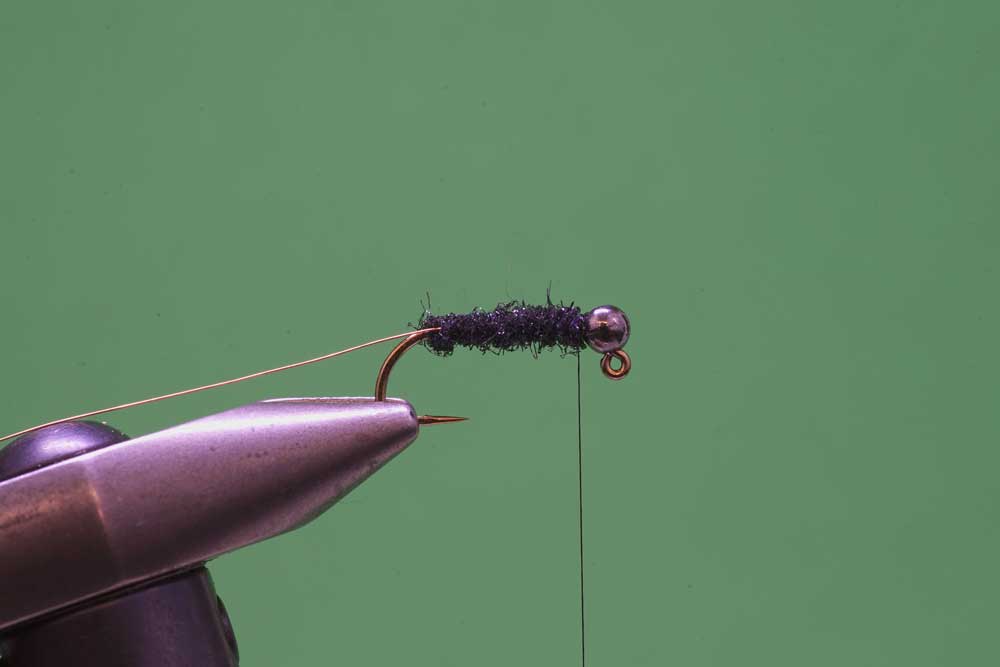
Tie in the wire rib along the near side of the shank. Dub a neat tapered body forward to bead. Leave a bit of space between the body and bead to allow space to tie of the shellback/wingcase. Place a couple wraps of dubbing directly behind the ribbing. This practice helps better secure the shellback while providing a more natural look to the look of segmentation the ribbing provides. Apply a half hitch or whip finish to lock off the thread. Do not remove the tying thread.
-
 Via Phil Rowley
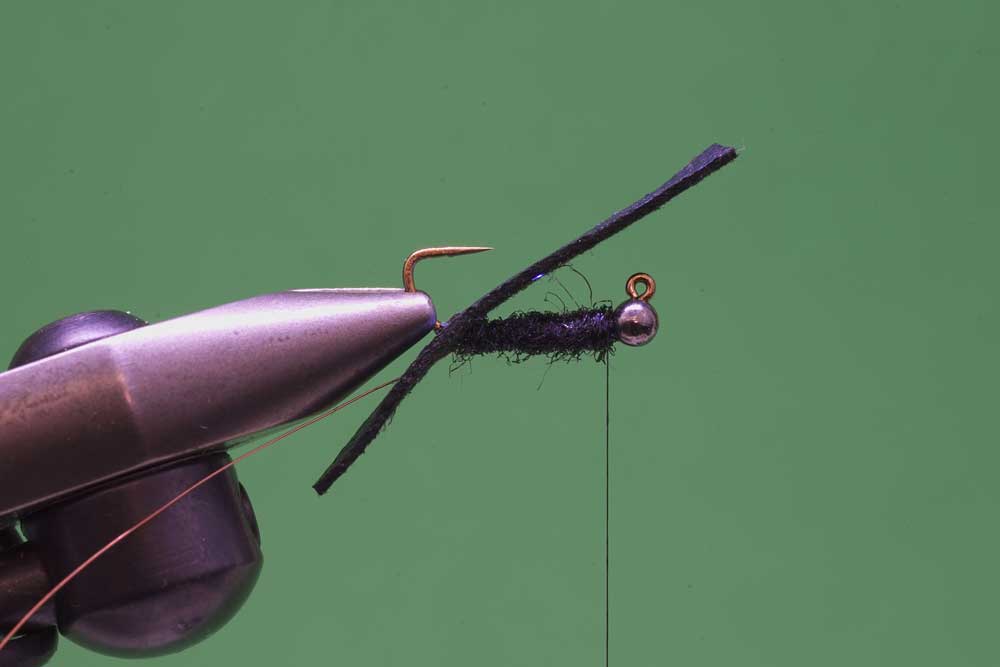
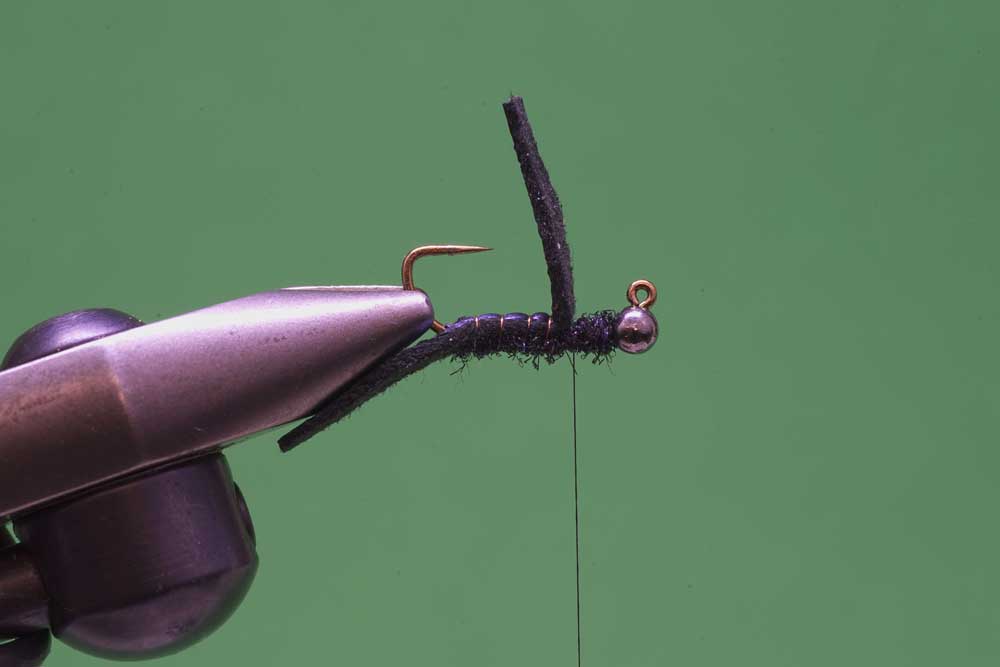
Trim a thin, less-than-hook-gape wide, slip of Bugskin leather that is long enough to form the tail, shellback and wingcase. Using a bodkin, pierce a hole through the Bugskin form both sides where you estimate the base of the shank length tail will be. Remove the hook from the vice. Stab the pierced Bugskin onto the hook point. Slide it round the bend to the rear of the body so the shiny faces up along the underside of the shank. Place the hook back into the vise point up. Trim the Bugskin trailing behind the bend to form a shank length long tail. Taper and round the edges of the tail to further enhance movement.
-
 Via Phil Rowley
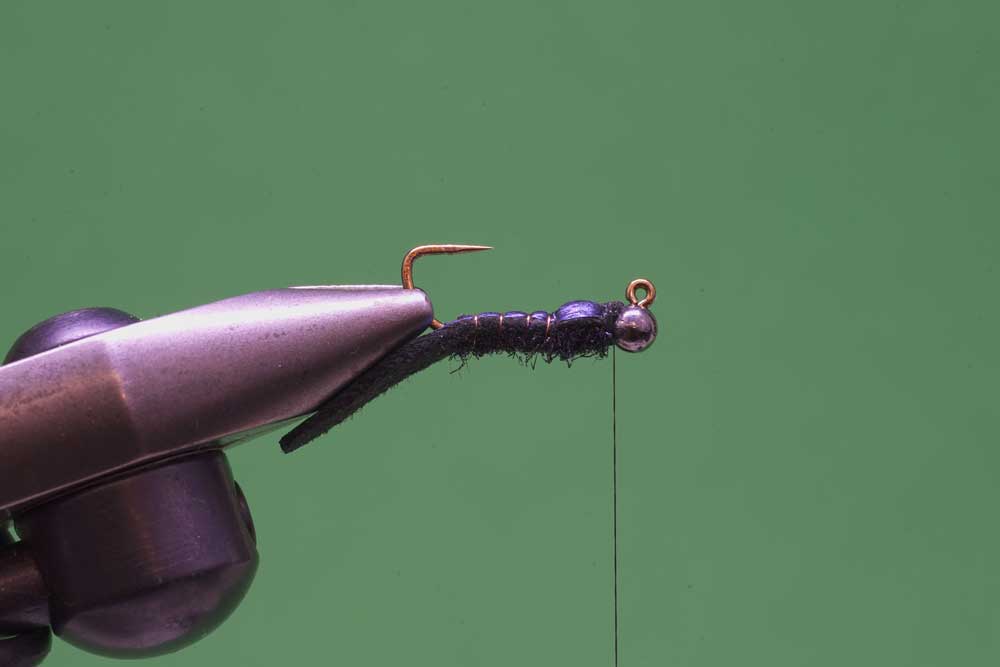
Using a bodkin, apply a thin coat of contact cement to the underside of the Bugskin that will used for the shellback. Pull the Bugskin over the body. Secure the Bugskin in place behind at the two-thirds point on the shank with a couple of thread wraps. Do not trim the excess as it will be used to form the wingcase. Wind the rib over the body and shellback. As you wind the rib forward apply pressure on the downward portion of the wind to ensure the Bugskin shellback remains on top of the body and doesn’t rotate. Use firm wraps to pinch into the shellback to suggest natural segmentation. Fold the remaining Bugskin back and tie off the excess wire. Use a pulling and twisting motion to break the excess wire.
-
 Via Phil Rowley
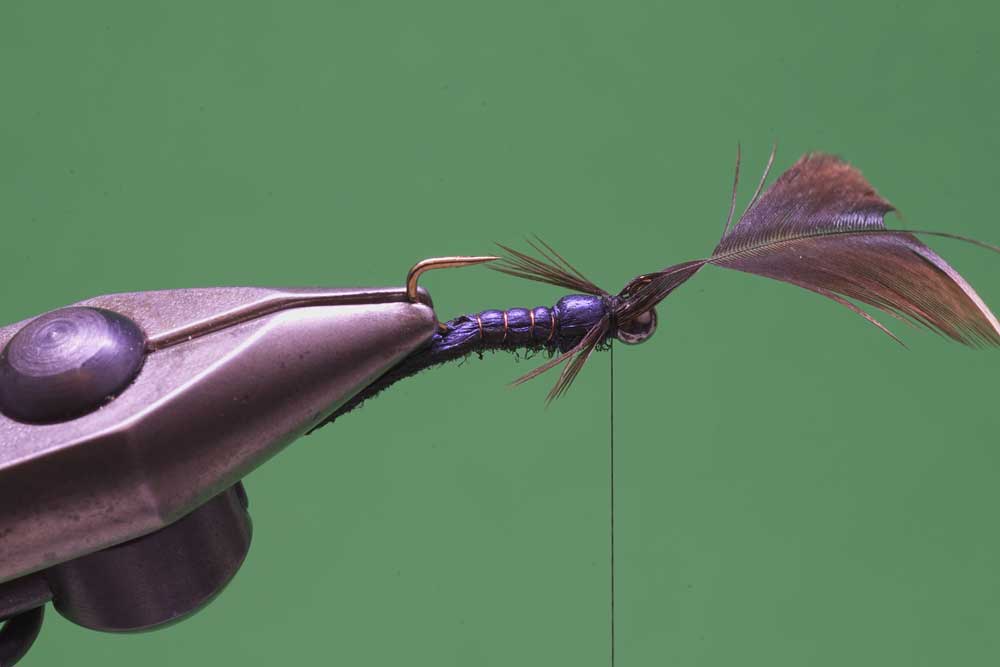
Add a sparse amount of dubbing the thorax to camouflage the wire tie off and to advance the tying thread forward to the rear of the bead. Apply a thin coat of contact cement to the underside of the wingcase. Pull the remaining leather over the thorax. Tie it off directly behind the bead. Trim the excess leather flush behind the bead.
-
 Via Phil Rowley
Remove the tip section from an oversized mottled hen or partridge feather. Sweep the fibres back on both sides of the stem to expose the number of fibres you wish to use for the legs. About 6-8 fibres are fine. Place the V of the prepared feather directly behind the bead so the fibres point back along both sides of the thorax. Pinch the fibres and secure them in place using 2-3 wraps of thread. Carefully pull on the feather stem to adjust the legs so they reach back about half the shank.
-
 Via Phil Rowley
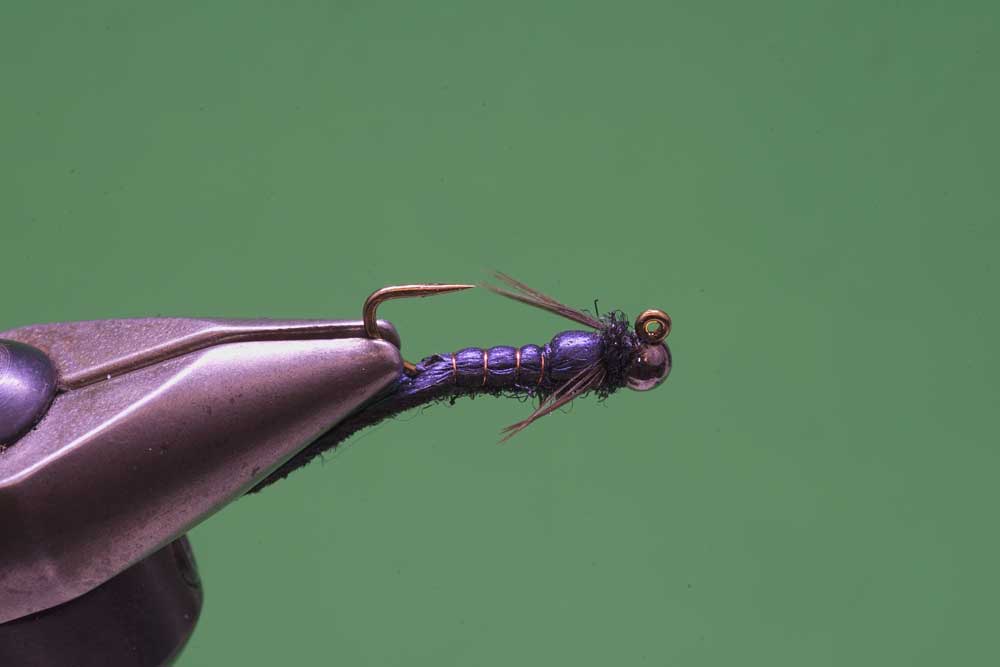
Pinch and tuck the legs along the sides. Add a few thread wraps to hold them in place. Form a sparse dubbed collar behind the bead to cover the tie off area. Apply a thin coating of superglue or head cement to the tying thread. Wind the coated thread directly behind the bead and whip finish.