Mahogany-coloured antlers stood tall out of the cauldron of boiling water. Seeing them now reminded me of the first time I laid eyes on this magnificent, non-typical mule deer buck. He was bedded in heavy brush, mid-slope of a steep ravine, and a glint off those gnarly old tines betrayed him, revealing his location as I glassed the hillside. He was the biggest buck I’d seen in my four days of hunting that landscape of high ridges and deep coulees. Several hours passed as I watched and waited for the buck to rouse from his slumber before I took my shot.
Advertisement
A sizzling sound from the gas burner snapped my mind back to the task at hand – boiling the deer head to create a European mount, a classy yet low-cost way to capture the memories of my hunt forever. I’ve cleaned and bleached many deer skulls and have made few mistakes along the way, so I’ll share with you what I’ve learned. This article focuses on deer, but the methods are similar for elk, moose, sheep, bear, or really any big game animal.
Skull Cleaning
Prep Work
Cleaning a skull starts by removing the meat, brain and, in most cases, the lower jaw. This job is easiest if done shortly after killing the deer, while everything is fresh. If you run out of time and leave the heads outside or freeze them, it’s okay, but removing the hide is more difficult and sometimes even impossible without simmering it first. Don’t worry, a little extra time in the pot and the hide will come right off.
Advertisement
After skinning, I like to remove the eyes by cutting as close to the eye socket as possible and then gently prying the eye and underlying fat away. If you’re cleaning by simmering in hot water, removing the fat now keeps it from floating on the surface to coat the antler bases.
Removing the brain is a critical step before boiling the skull. A simple tool made from a stiff piece of wire with a hook on the end makes short work of this job. Others use commercial tools like the Scrambler by RaptoRazor or even compressed air.
Advertisement
Some people like to include the lower jaw with the skull, but most do not. It depends on the species – predator skulls normally have the lower jaw attached, most ungulate skulls do not.
Down To The Bone
There are four main methods of cleaning a head down to bare bone. Each approach has its pros and cons. Factors to consider when choosing your approach are tools, time, space and the look of the final product.
Au Naturel
The easiest way to remove the hide and meat is to simply leave the head outside or bury it in a harvester ant hill and wait. Over time, insects and bacteria eat the flesh. Removing the hide first expedites the process. Unfortunately, this is also the lengthiest method, taking months to years!
Natural decomposition also has many drawbacks. I carefully buried my wife’s first deer skull in an ant hill. A few weeks later, I went to check on its progress only to find a dog had raided my project. I lost the skull. Bugs and bacteria may leave dried bits of meat and sinew. Rotting flesh stinks and may offend neighbours. In the sunlight, bones bleach to a greyish colour. If you let nature take its course and it doesn’t turn out, the good news is you can still salvage the skull. Soak it in clean water for five to ten days or until the meat softens up. After that, clean the skull with one of the faster, more effective methods below.
Beetles
People who specialize in cleaning skulls often use Dermestid beetles to do their dirty work. Dermestid beetles are bred for cleaning skulls fast, and they have a voracious appetite for meat while passing up bone, leaving it intact. But owning a colony of these meat munchers is not for the faint of heart. I won’t delve too far into this method, because operating a beetle farm is far more work than the average hunter, cleaning a few skulls a year, needs. Another downside of these beetles? If they escape into your home or garage, they will eat books, clothes, and even leather boots.
Stew About It
Boiling (simmering) is the most common method. The only tools required are a large pot, a heat source such as a propane burner, fire or even the stovetop (though I’d advise against using your kitchen stove!) Additional tools include needle nose pliers, a screwdriver, a stiff-bristled brush, dishwasher detergent as a grease cutter and a sharp knife. Sodium carbonate (Soda Ash) added to the simmering pot turns meat tissue to a jelly-like consistency that’s easy to rinse away. As a bonus, it is a mild bleaching agent too, helping to get those bones extra white. An effective recipe is a quarter cup of Soda Ash per four litres of water.
Boiling (simmering) is the most common method. The only tools required are a large pot, a heat source such as a propane burner, fire or even the stovetop (though I’d advise against using your kitchen stove!) Additional tools include needle nose pliers, a screwdriver, a stiff-bristled brush, dishwasher detergent as a grease cutter and a sharp knife.
Removing the meat from a fresh skull takes about one to two hours of simmering. Much of the flesh comes off easily after this time, but there are spots were the meat likes to cling – the back of the skull where the spine enters the skull and the ear canals are the trickiest. It is vital to remove everything but the bone to prevent the skull from smelling after it’s mounted. Simmering times vary, but you should check it after the first hour. Too much time in the hot water causes the skull bones to separate and teeth to fall out. My steps include boiling and a combination of brushing and scraping off loose meat. Repeat until the skull is clean.
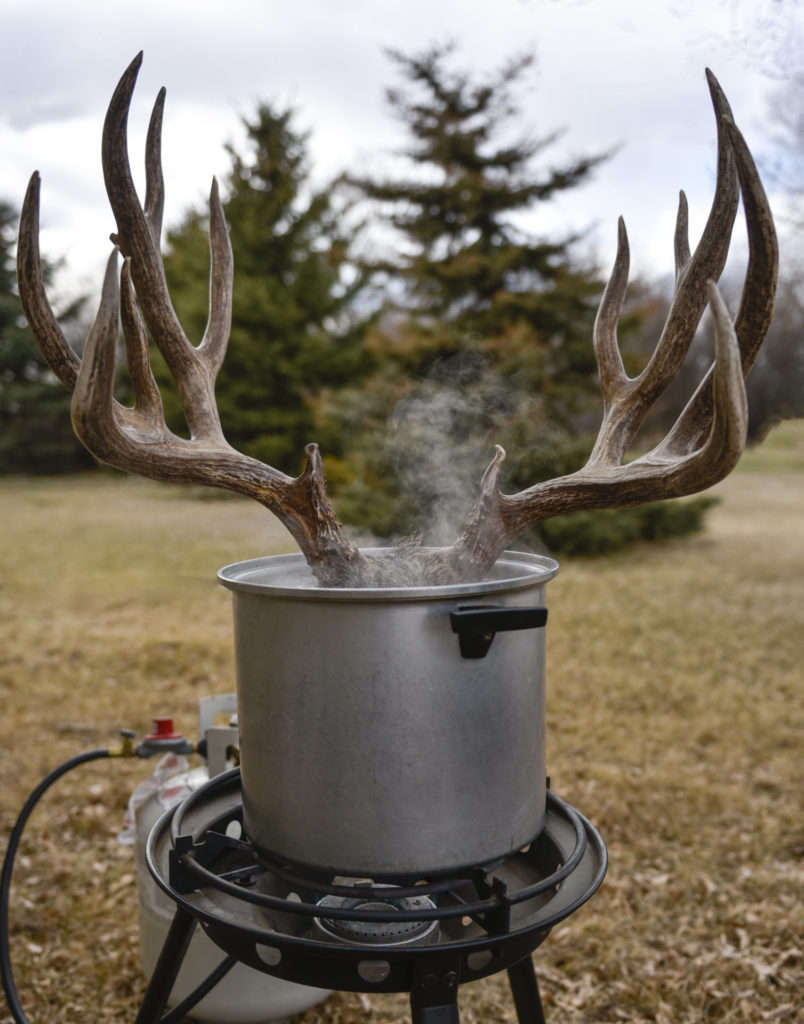 To remove meat from an animal skull, use a large pot with a water and sodium carbonate solution and heat with a propane burner.
Note: The simmering method shouldn’t be used for cleaning potential record-book skulls. If the zygomatic arch (bridge of bone extending from the ear bone to the cheek bone) breaks, the skull is disqualified.
Turn Up The Pressure
The fastest technique uses a pressure washer to blast off meat with a jet of water. It’s a method I discovered on the last skulls I cleaned, and honestly, it is by far the easiest and fastest of all the methods for the average person. A hot water pressure washer is enough on its own to completely clean the skull. If using a household pressure washer, a combination of boiling and pressure washing works best. It’s important to not spray the antlers because the high-pressure water strips the colour off.
It’s going to get messy – but don’t worry, it’s quick. Put on safety glasses, rubber boots, waterproof pants and even a rubber apron to protect you from flying bits of gore. Secure the skull with zip-ties to an old pallet for its power shower. Start with lower pressure and increase until the meat blows off easily. I prefer to clean out the brain and discard it before I get to this stage. However, if the brain is still in the skull, pressure washing removes it too. Using a screwdriver to punch holes in the base of the brain cavity helps get everything out.
Some hunters like to leave the nasal bones inside the skull, while others remove them to ensure every bit of tissue is extracted. The choice is yours; I’m confident that the skull won’t smell after bleaching and drying, so I choose to leave the nasal bones intact because I like the look of them.
 Some people remove the nasal bones for ease of cleaning while others like the look of the nasal bones so leave them intact.
Whitening
Bones are naturally oily, with yellowish fat deep inside the bone. After the skulls are clean, give them a final rinse in hot water with a dishwashing soap. Bear and pig skulls have heavier bones and more fat, requiring extra time for complete degreasing.
After the skulls are clean and degreased, it’s time to bleach the skull to make it pearly white. Professionals use a mixture of magnesium carbonate and 30 to 40 per cent hydrogen peroxide (this is not the three per cent stuff you buy at the drug store.) This mixture is more forgiving than household bleach and doesn’t leave a residue of chlorine. I ordered these industrial supplies through my local taxidermist.
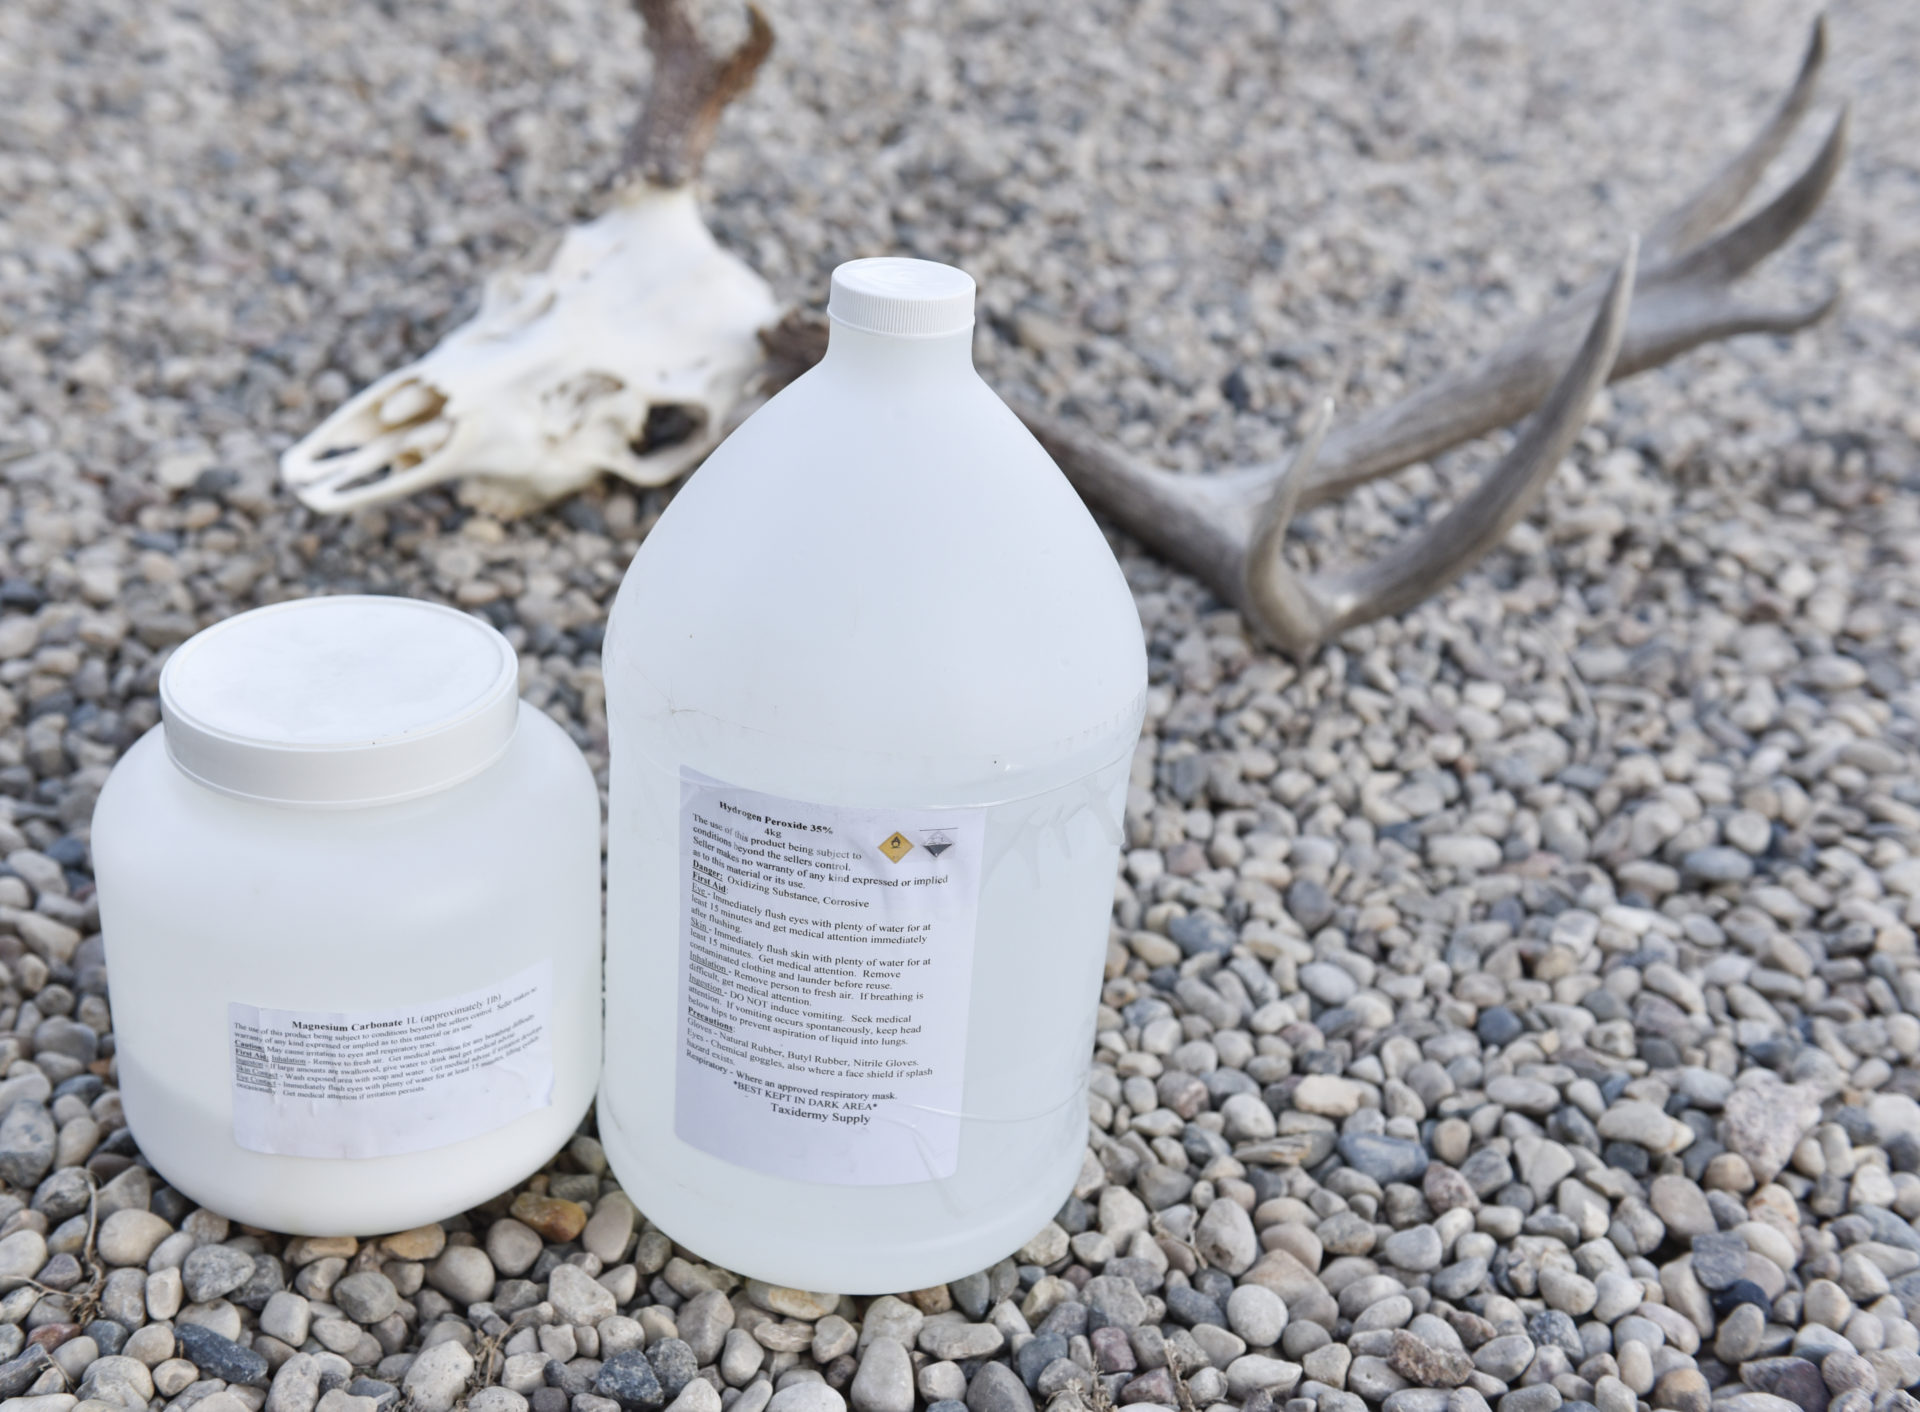 Make a paste of hydrogen peroxide and magnesium carbonate for whitening the skull.
It’s time to put on your protective equipment! Glasses, gloves and a respirator when working with the magnesium carbonate powder will save your eyes, lungs and skin. Mix the powder and hydrogen peroxide until the paste is the consistency of mayonnaise. Using a paintbrush, apply the bleaching agent to all the parts of the skull you’d like to whiten. On antlered skulls – and be extraordinarily careful – do not get it on the rack. Hang the skull for 24 hours to let the mixture dry. Then put on your dust respirator and brush off the powder (saving it for the next skull.) If you like an extra white skull, repeat the process or cover the wet paste with a plastic bag for an extra day, giving the bleach more time to work. Rinse thoroughly to remove all traces of the powder.
Mounting
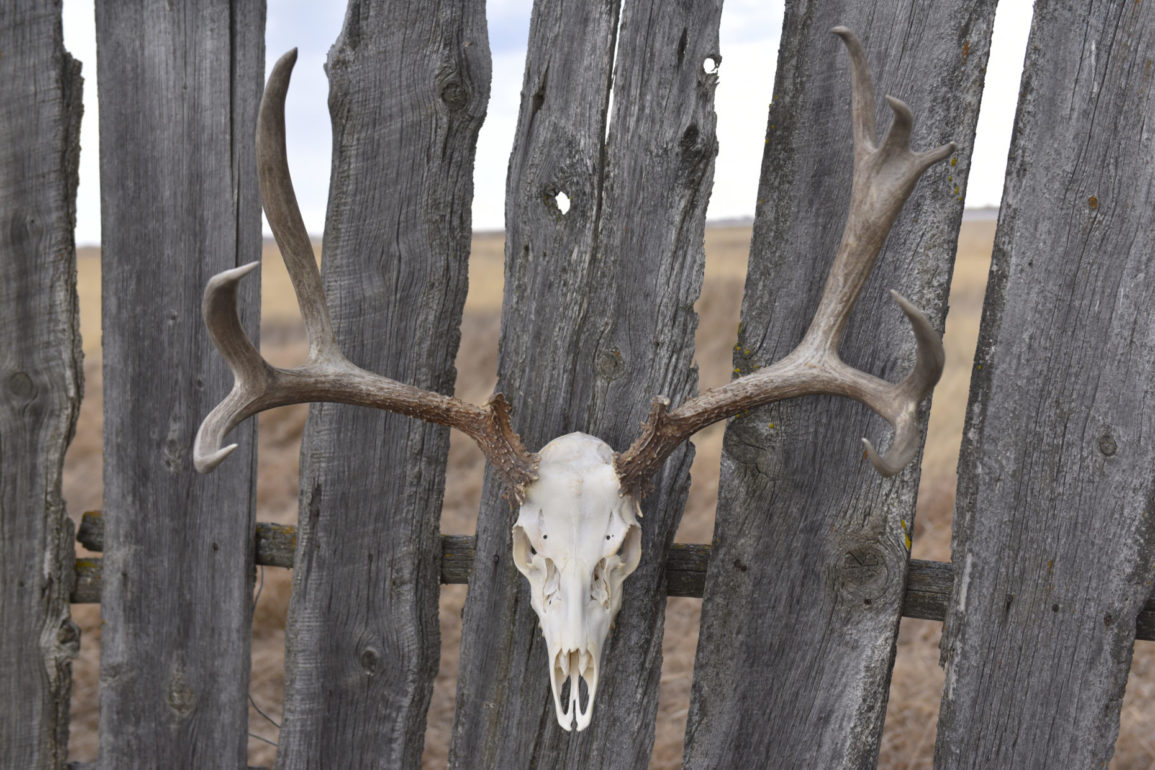
Now that you’ve completed a DIY Euro-mount, it’s time to display it in your home or office. Search Pinterest for inspiration on custom mounting options – weathered barn boards, driftwood or handcrafted wooden plaques are eye-catching possibilities for backdrops. Mounting hardware is a quick and relatively inexpensive option to mount any skull, from alligator to zebra. Skull Hooker (www.skullhooker. com) makes an adjustable European skull mounting bracket to showcase your trophy game animal. These mounts are easy to install because they the use the natural holes and crevices inherent in the back of the skull. No need to drill the skull to get a solid mount.
The ability to create a European mount is extremely satisfying. Every hunt has special memories and the Euro-mount is a low-cost way to respect the animal and reminisce about the hunt.
Whoops, please excuse me, my simmering skull is ready for its next scrubbing.