Stanton Jack is a professional classical guitarist and head of the Guitar and Harp Department for the Vancouver Symphony Orchestra’s School of Music. As an accomplished fly tyer, Stanton applies the same dedication and attention to detail to his flies as he does with his music career. Stanton grew up in Kamloops, BC, where he spent countless days fly fishing the lakes and rivers within the surrounding area. In his mid-teens, Stanton became an active fly tyer and started designing trout patterns to match the hatches he observed on his local waters. Since then, the art of fly tying and fly fishing for trout has become his true passion. Stanton uses various tying techniques and materials, both old and new, within his design process. A meticulous fly tyer, Stanton’s patterns almost look too good to fish. Almost.
Advertisement
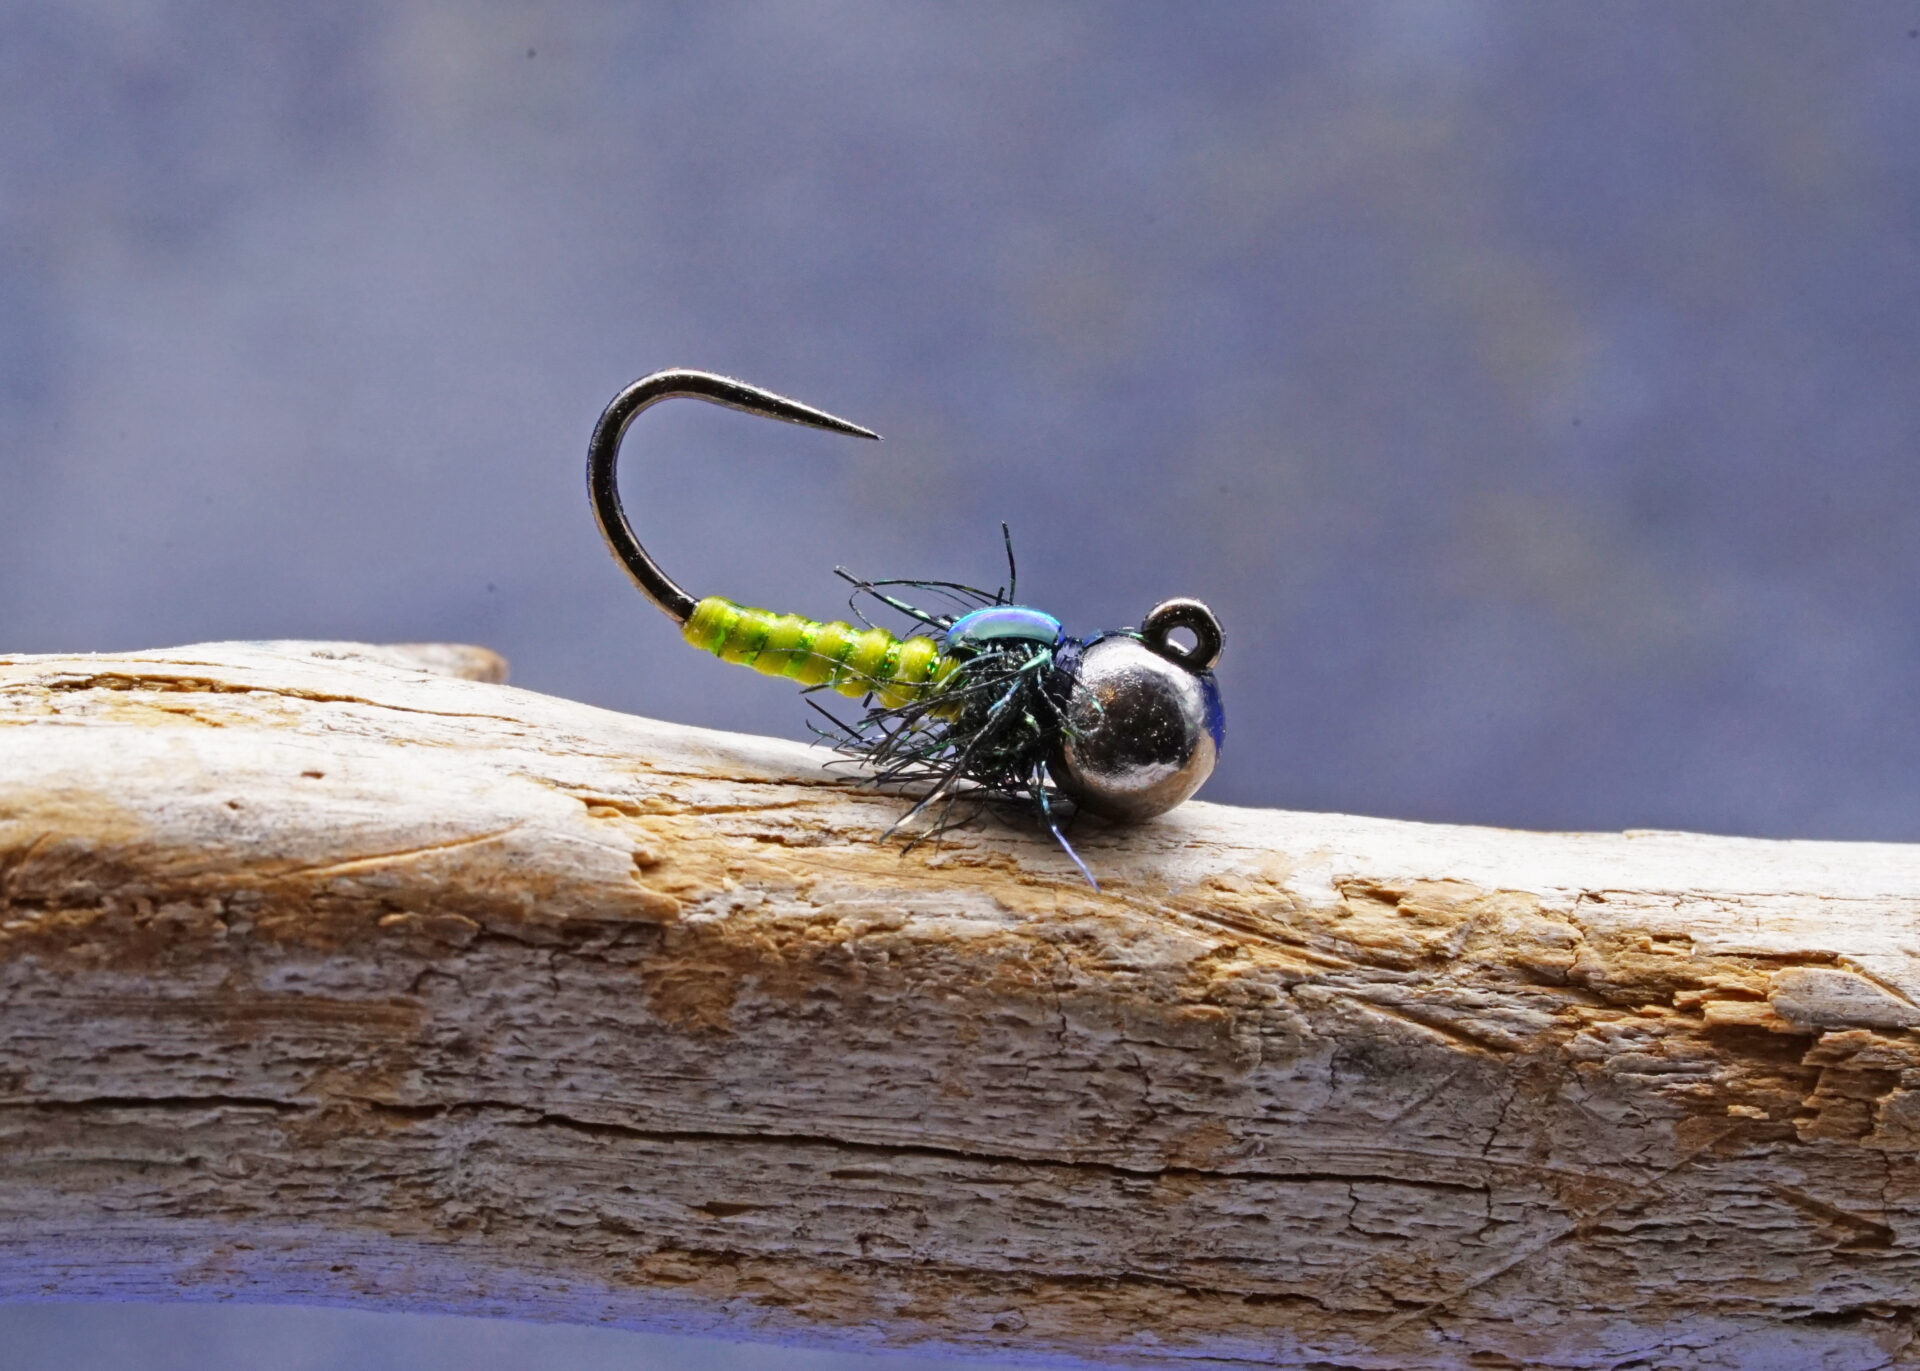
Stanton’s Krypto Caddis Larva features a slotted tungsten bead and slim body profile, so it sinks fast in swift flows or when prospecting deeper pools where caddis larvae live. The holographic Chirony Skin body delivers a touch of attractive flash, while the Stretch Floss ribbing provides an element of contrast. These pattern characteristics work together, allowing you to deep drift Stanton’s Krypto Caddis Larva through the lies of feeding, bottom-hugging trout.
Advertisement
Stretch Floss is a Lycra-based Spandex material that was popular for many years. It is still an excellent tying material, but with the ever-increasing volume of synthetic materials available to the fly tyer it has slipped in popularity or been forgotten altogether.
Depending on the materials provider/producer, Stretch Floss has many aliases, including Spanflex and Sexi Floss. For the purposes of this column, I will continue to refer to it as Stretch Floss. Stretch Floss remains a versatile tying material with many uses and is available in various colours, including mottled colour schemes. Stretch Floss can be used as a body material, ribbing, wing pads on chironomid pupa patterns, wing cases on small nymphs, legs on water boatman and dragonfly nymphs, as well as antenna and tails on stonefly nymphs.
Advertisement
The elastic, stretchy nature of Stretch Floss is both a blessing and a curse. On the blessing side of the ledger, stretching and wrapping Stretch Floss over bright, shiny materials takes advantage of the material’s translucent nature, allowing you to create some interesting effects. Stanton uses this technique to good effect with many of his patterns besides his Krypto Caddis Larva.
On the negative side of the ledger, applying too much tension while wrapping over the body or pulling along a thorax can lead to challenges and frustration. When pulling Stretch Floss along the sides of a thorax to suggest wing pads on chironomid pupa, avoid pulling too tight. Use only enough tension so the Stretch Floss lays against the sides of the thorax. Use minimal thread wraps when tying off the Stretch Floss wing pads to maintain the overall slender pattern profile necessary to suggest a natural chironomid pupa. If you pull it too tight, the elastic nature of the Stretch Floss causes it to slide from the securing wraps and spring free. This can also happen when tying off Stretch Floss bodies and ribbing.
Once secured, and before trimming the excess, get into the habit of adding a three to five-turn whip finish to lock off and isolate the Stretch Floss body, rib or wing pads. Applying a whip finish also avoids any accidental unraveling issues should you accidentally knock or bounce the bobbin after you have tied off and removed the excess Stretch Floss. It is a habit that also works when securing other stretchy or challenging materials, such as Scud Back.
If you are creating Stretch Floss legs or antenna, be careful when using superglue. Superglue can react with the Stretch Floss, causing it to curl.
Stanton’s Krypto Caddis Larva also utilizes a unique way of forming the wing case that is well worth mentioning. The wing case is usually tied in after forming the body and rib, just before building the thorax. After tying in the body and ribbing material, Stanton ties in the wing case material just back from the bead or hook eye where the rear of the thorax will be located. Once tied in, Stanton then builds the body and thorax around the wing case material. Once the thorax has been completed, the wing case is then pulled over and tied off. His wing case technique applies to other nymph patterns, too, such as mayfly and damselfly nymphs. You can also use this technique when forming wing pads on chironomid pupa.
After adding several Krypto Caddis Larva to your fly box, take a moment to consider other patterns that would benefit from a touch of Stretch Floss. I am sure a few ideas will pop up, helping extend your tying session and filling a few other fly box spaces in the process.
How To Tie The Krypto Caddis Larva
Designed by Stanton Jack
- Hook: #14 jig hook
- Threads: UTC 70 yellow olive and black
- Bead: 3.8-millimetre slotted tungsten (5/32 inch) black nickel
- Body: Togen’s Holographic Chirony Skin, chartreuse
- Rib: Togen’s Ultra Stretch, light olive
- Wing Case: Uni-Mylar peacock/orange #14
- Thorax/Legs: Ice Dub, Black Peacock
Tying Instructions
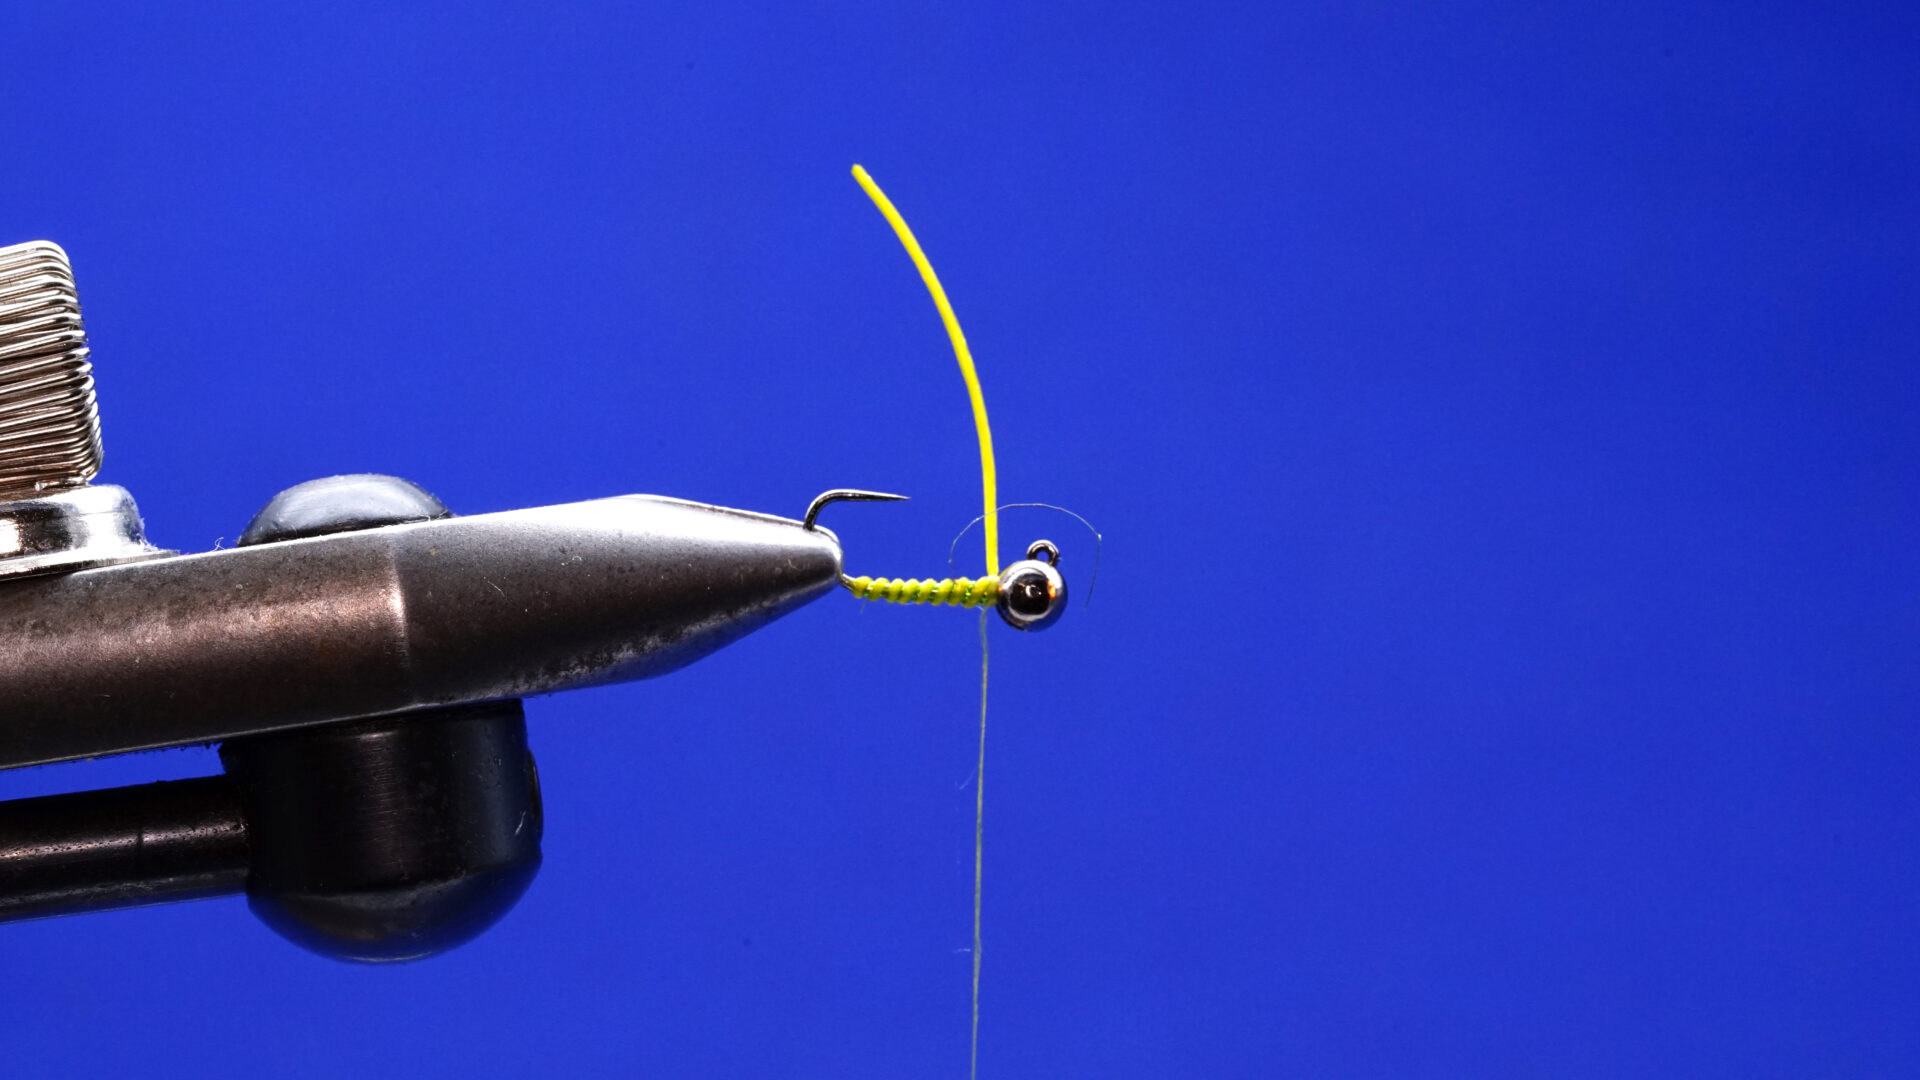
- Slide a 3.8-millimetre, black nickel, slotted tungsten bead onto the hook narrow opening first up to the hook eye. Twist and navigate the bead along the shank, so it fits tight against the hook eye. Tie in yellow olive thread directly behind the bead. Wind the thread back to the hook bend and then forward to the rear of the bead. Tie in the Ultra Stretch at the back of the bead along the near side of the shank, facing you. Secure the Ultra Stretch rearward to the bend. Stretch the material as you bind it rearward to reduce bulk. Double the Chirony Skin around the tying thread. Secure the Chirony Skin in place directly behind the bead and secure it rearward to the bend, even with the Ultra Stretch.
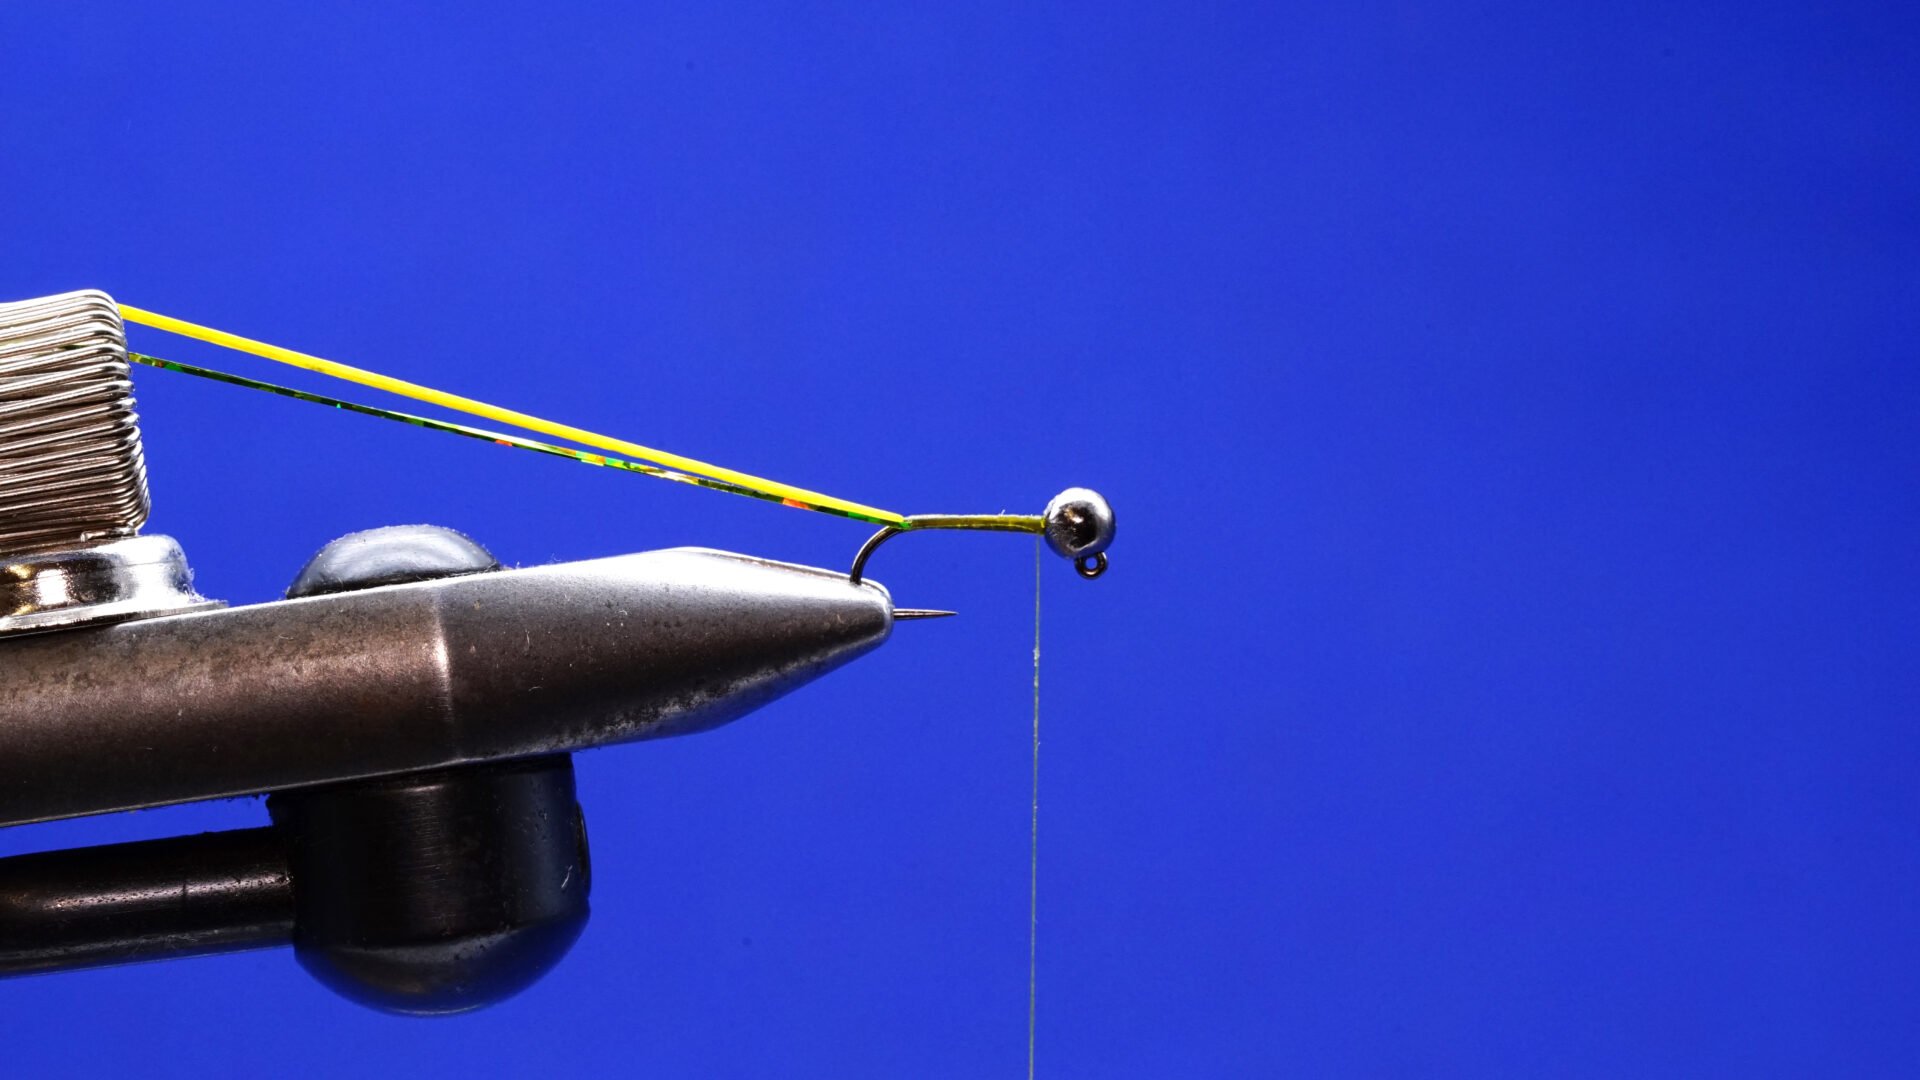 The Krypto Caddis Larva: Step 1.
- Bring thread forward to rear of the bead. Invert the hook. Tie in the Uni-Mylar wing case behind the bead, orange side facing up. Secure the Uni-Mylar back along the shank, approximately a bead’s width back from the rear of the bead.
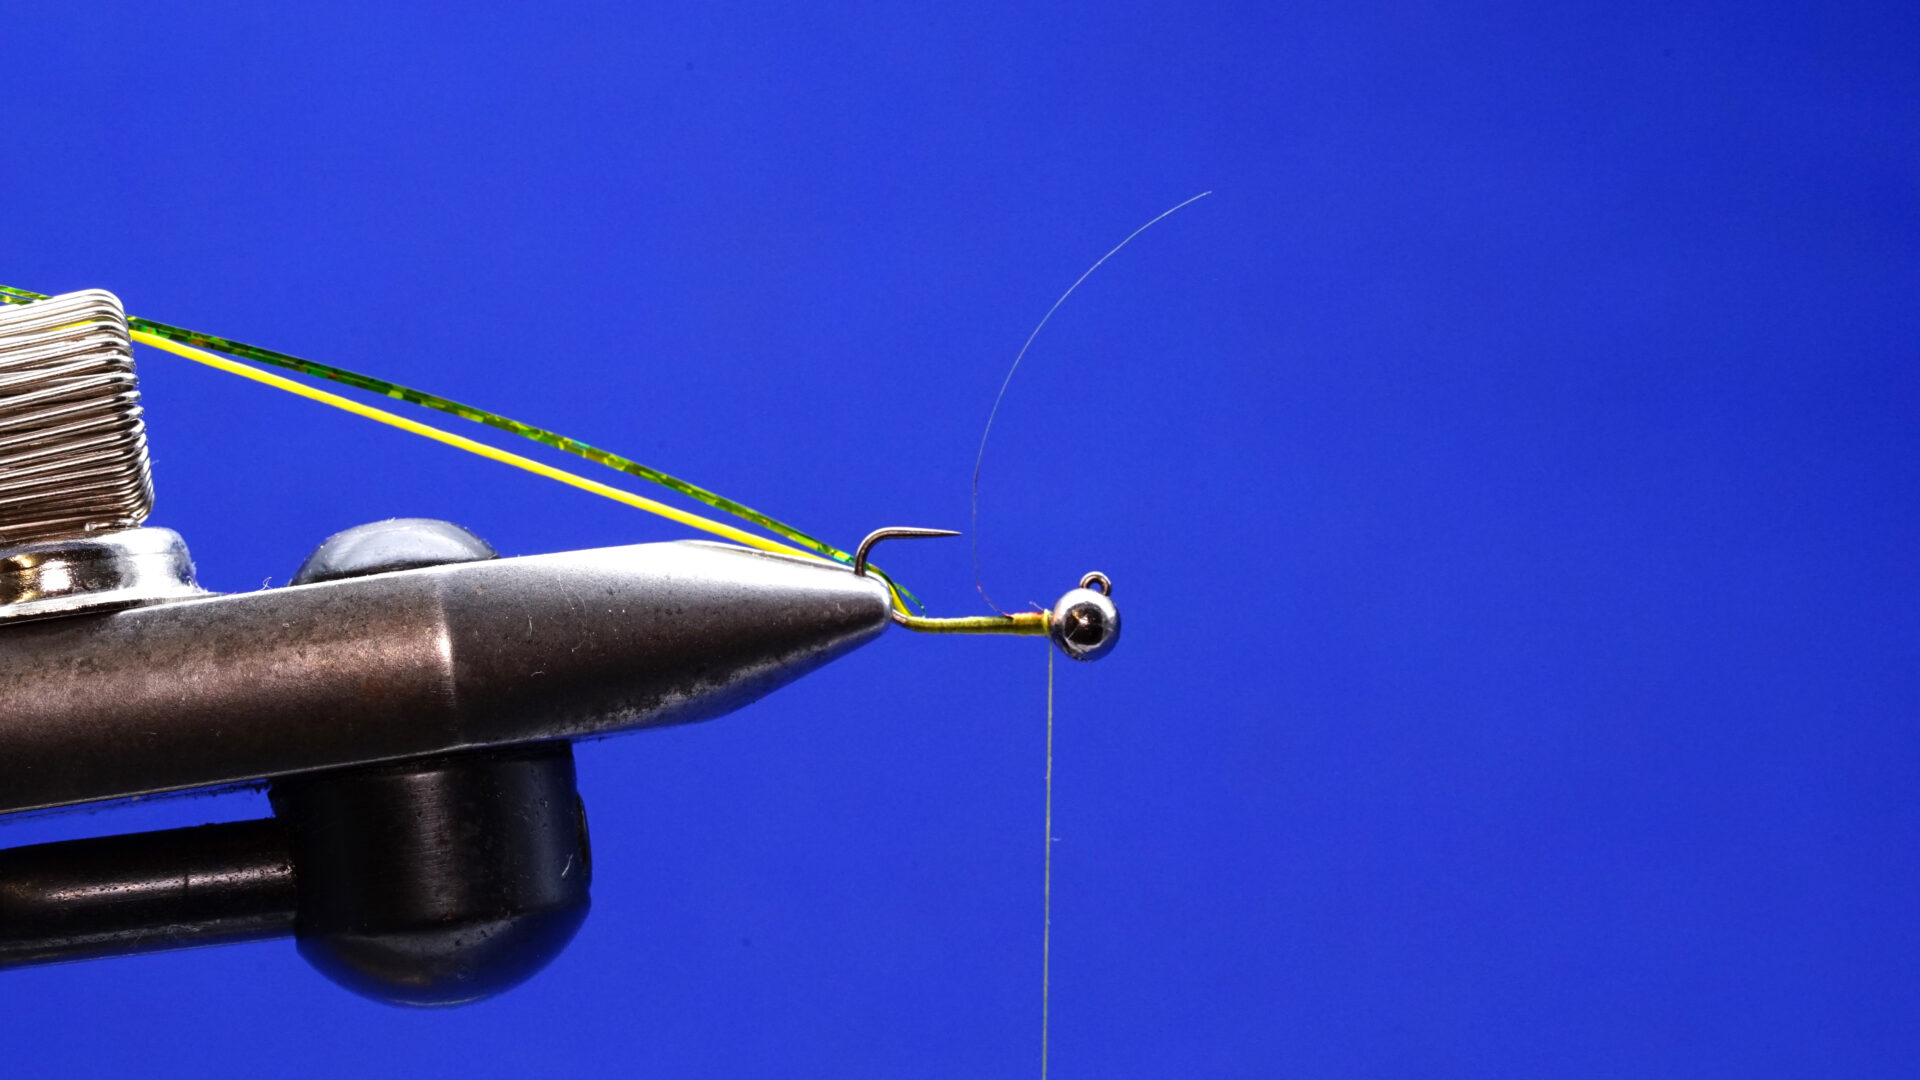 The Krypto Caddis Larva: Step 2.
- Wind the tying thread forward, so it hangs at the rear of the bead. Form a slender, slightly tapered, body by wrapping the Chirony Skin forward, using close-touching turns, to the back of the bead. Tie off the Chirony Skin using two wraps and trim away the excess.
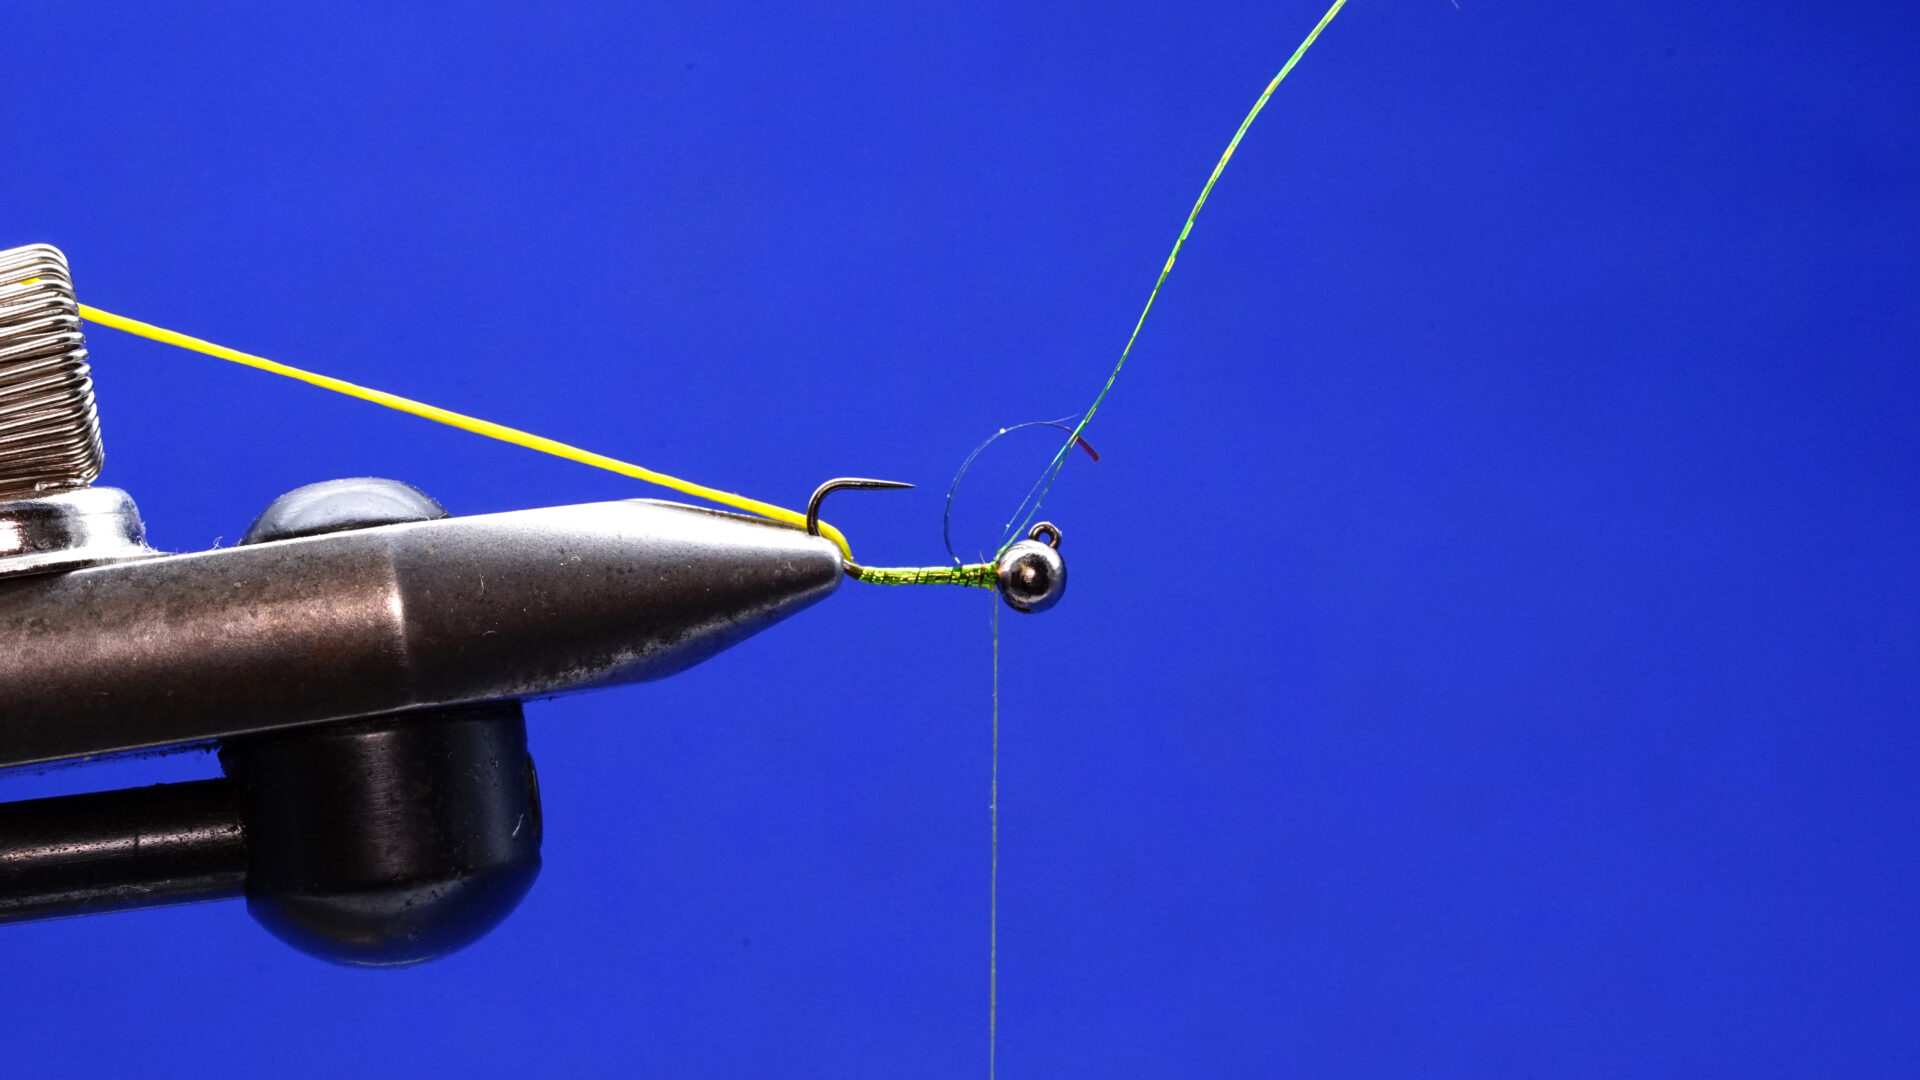 The Krypto Caddis Larva: Step 3.
- Using even, open wraps, form the rib by counter-winding the Ultra Stretch forward, ensuring each wrap lays flat, to the rear of the bead. Be careful not to trap or fold the Uni-Mylar. Using two thread wraps, tie off the Ultra Stretch. To avoid having the Ultra Stretch accidentally slip and unravel, secure it in place using a five-turn whip finish. Remove the excess Ultra Stretch and tying thread.
 The Krypto Caddis Larva: Step 4.
- Tie in the black tying thread directly behind the bead. Add durability to fly by applying, and then curing, a thin, even coat of UV resin over the body and rib. Using a dubbing loop, form a small, scruffy thorax between the Uni-Mylar and the rear of the bead. Tie off and trim the excess dubbing loop. Form the wing case by pulling the Uni-Mylar forward over the thorax and aligning it with the hook eye. Tie off and remove the excess Uni-Mylar.
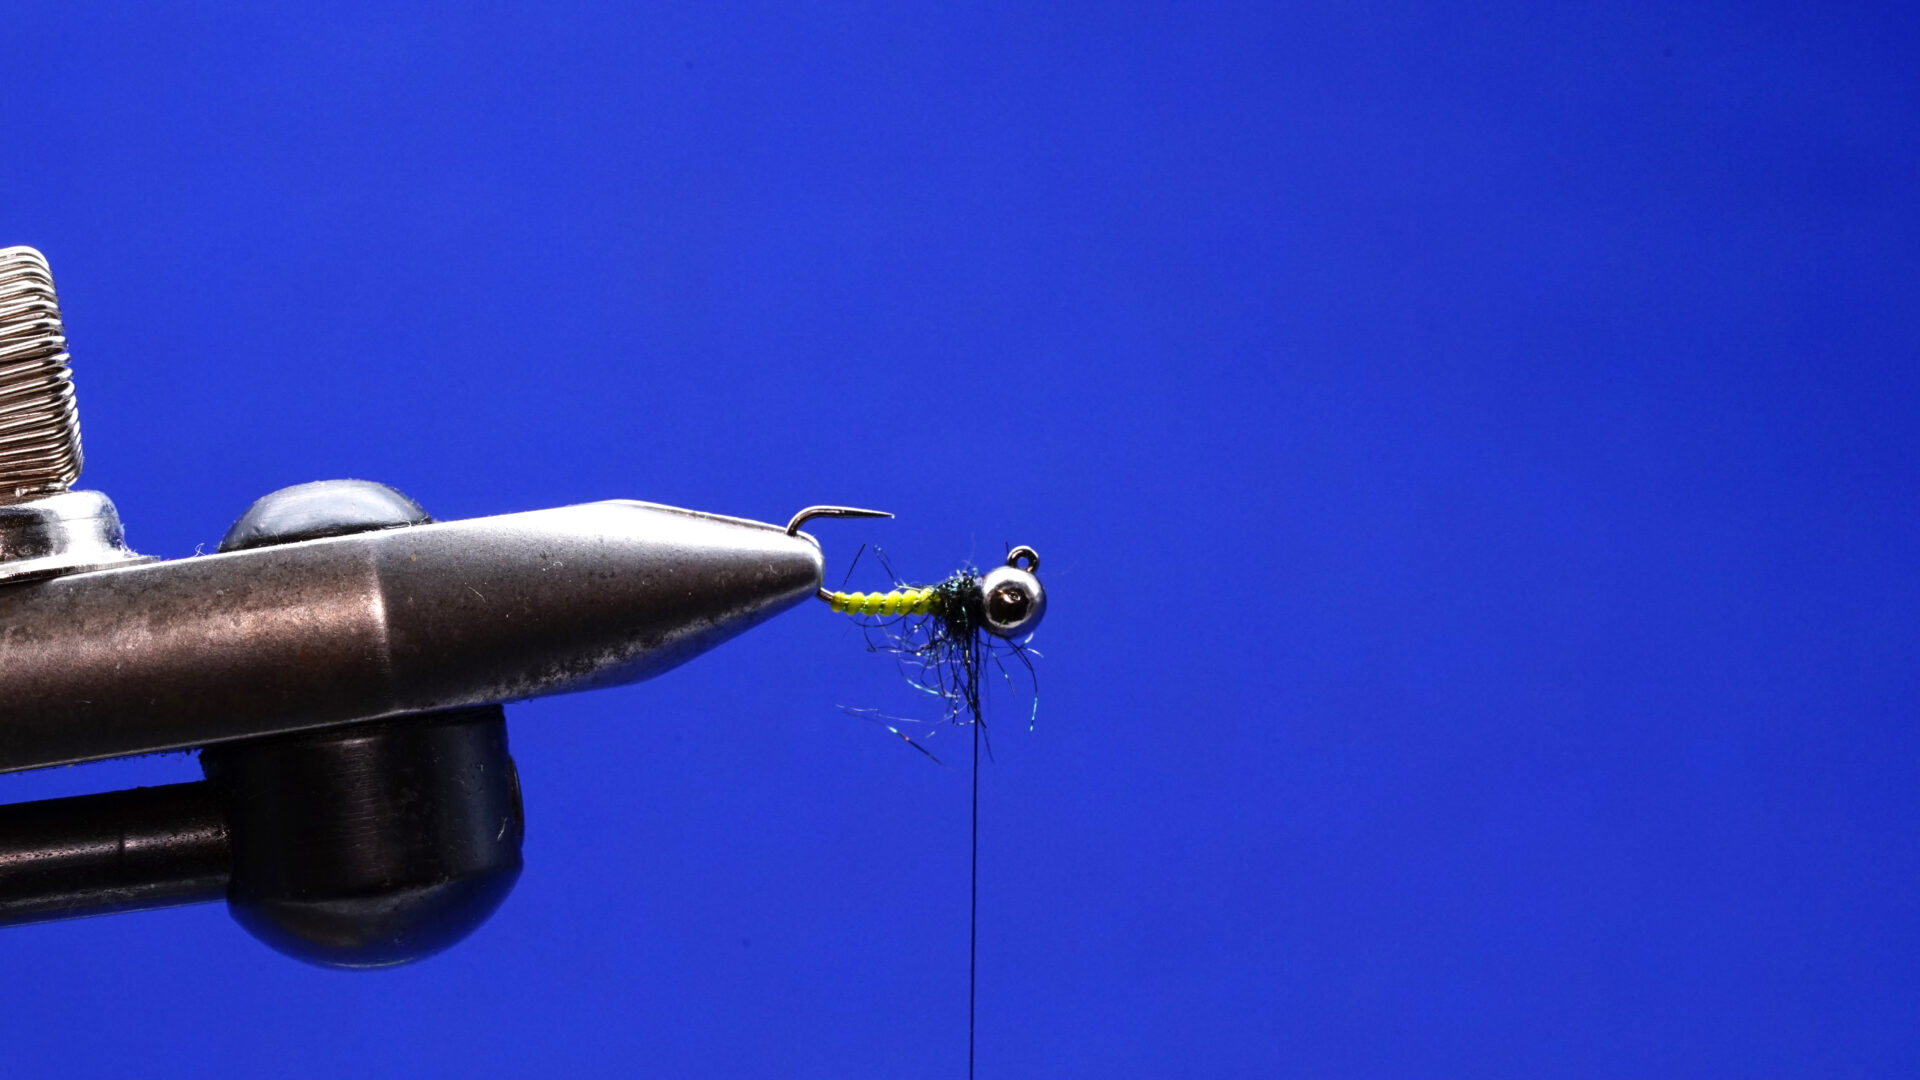 The Krypto Caddis Larva: Step 5.
- Whip finish and remove the tying thread. Apply a small drop of UV resin onto the wing case and cure it for added durability. Pick out the dubbing fibers from the thorax. Trim the fibres even with the bead to suggest the short legs of a natural caddis larva.
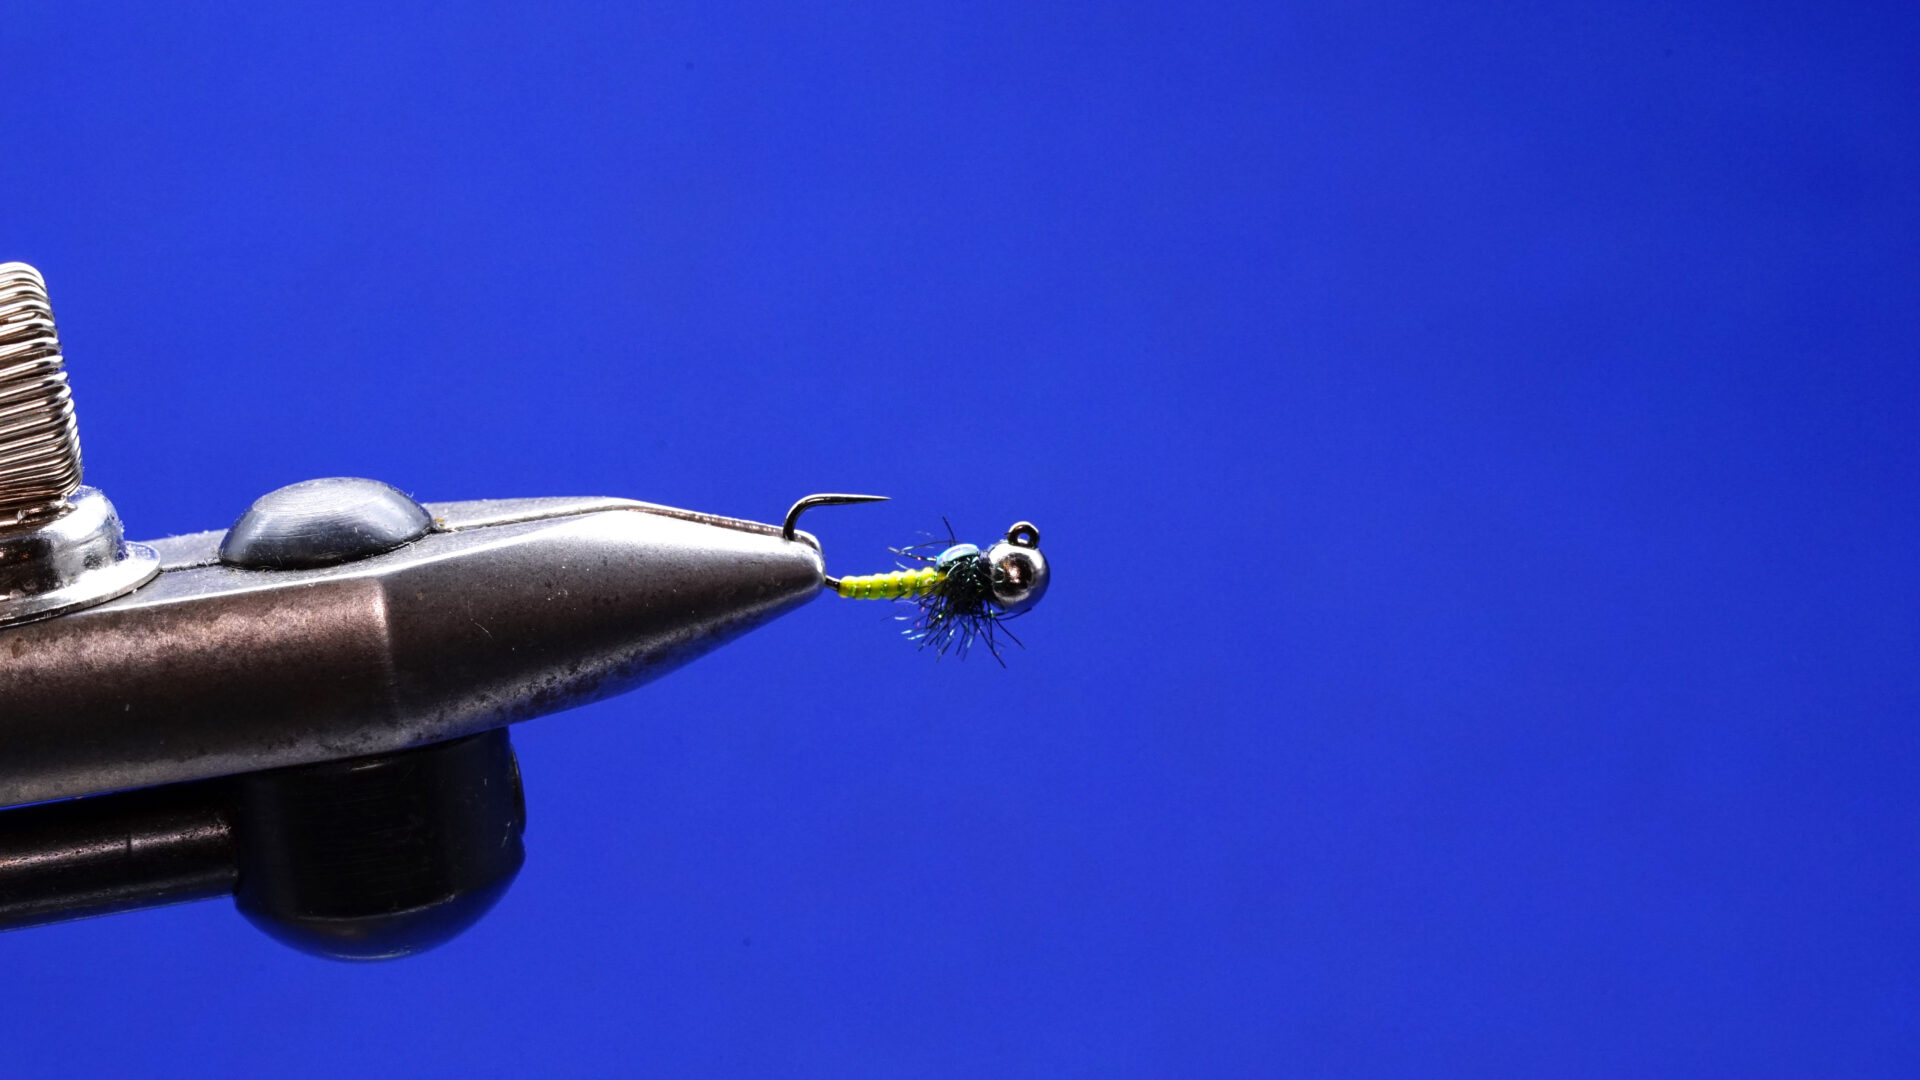 The Krypto Caddis Larva: Step 6.