Scott Howell is a renowned steelhead guru, Oregon guide and innovator within the steelhead fraternity. Along with fly-fishers such as Ed Ward, Scott has influenced the design of many steelhead patterns today – particularly intruders.
Advertisement
 Via Phil Rowley
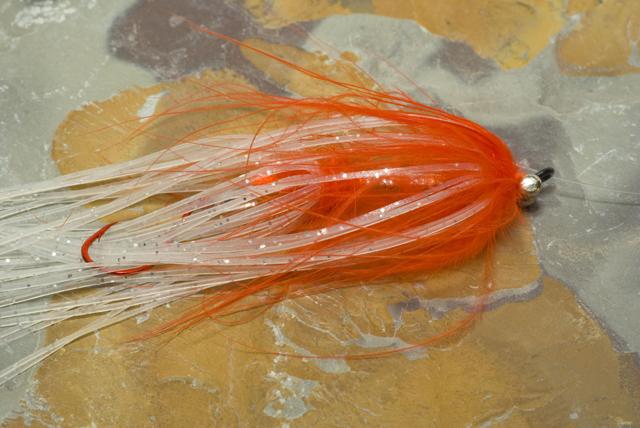
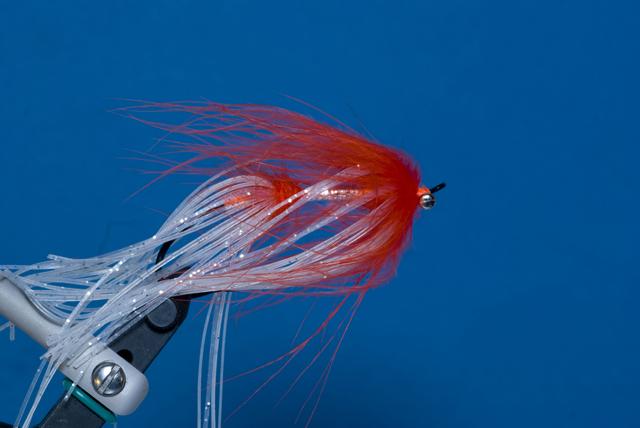
Frustrated after watching the natural ostrich and rhea hackles of his intruder flies mauled and reduced to tatters by aggressive steelhead and Dollies time and time again, Scott began a quest for a durable alternative. The substitute had to be long-lasting, readily available and easy to work with. Silicone, or sili legs, proved to be the perfect substitute, and the Squidro – a rubber-legged intruder – was born. The creation in many ways suggested an assortment of primary steelhead prey.
Scott sampled other synthetic leg materials such as round rubber hackle and Stretch Floss but they were either too stiff or, in the case of Super Floss, too supple. Silicone legs have the right balance of mobility and stiffness, and they come alive in the current. The smorgasbord of colour options available allowed Scott to create large, durable, easy to cast, animated patterns capable of triggering an instinctive response from returning steelhead in all manner of conditions.
Advertisement
Sili legs are not new – they have been popular for years with saltwater and bass fly-tiers. Scott, however, has begun supplying his own unique steelhead blend of sili leg called Steely Legs. Steely Legs can be purchased online through www.scotthowellflyfishing.com, along with a variety of unique steelhead-centric products and materials.
A Squidro’s legs are tied in along the sides of the fly in front of large, scruffy dubbing balls fore and aft. These are meant to keep the legs away from the body and to create a hydrodynamic disturbance to animate the fly. There are about half a hank, or roughly one dozen, legs per side. Use wide tying thread, as narrow diameters such as 8/0 can sever the leg materials. Form a solid thread base and attach the legs using loose, controlled wraps. Massage the legs into position and before tightening to secure.
Advertisement
When building the front section Scott begins by forming, loading and spinning dubbing loop at the front of the body at the wire return of the hook eye. He then holds the dubbing loop back and ties in the legs on both sides of the shank so they protrude forward in front of the hook eye. The dubbing loop is wound behind the legs. When this is done correctly only the doubled thread from the dubbing loop remains. The thread loop is then brought through the sili legs and tied off.
Most intruders today are tied on large, stout steelhead irons. Scott recommends #3/0 or #4/0 to provide a large enough foundation on which to construct the fly. Upon completion, use a pair of side cutters to remove the hook bend. Large steelhead hooks are not always easy to find, but Scott assures me he will soon have a solution.
Modern intruders feature a short, stiff loop of Dacron backing, gel-spun braid or knottable bite tippet attached to the rear of the shank prior to tying. A small octopus hook is attached using a loop-to-loop connection. Scott prefers Dacron and will soon have dyed backing available through his site to help you colour coordinate your Squidros and intruders. This system is intended to facilitate quick and easy hook changes without sacrificing the fly.
The short loop is a recent innovation on the intruder timeline. Original intruders featured a short loop of stiff backing or mono tied in at the rear of the shank. The leader was passed through the hook eye, along the back of the fly through the small loop at the rear of the shank, and through a short length of hook shank diameter-wide tubing. Once threaded, the hook was tied on. The hook eye was then stabbed into the tubing, which, in turn, was stabbed onto the hook shank where the bend was removed. Hook changes are a breeze. Scott still prefers this external tube fly-like setup.
Once Scott’s Squidro is engulfed by a steelhead it slides up the leader, out of harm’s way. Consider using this approach on your next intruder or Squidro.
Scott ties his Squidros in three unique series:
- Seafood Series: Tied in natural pastel ocean-flavoured colours: white, orange, pink and pearlescent. Seafood Squidros are intended to suggest squid, a primary steelhead food source.
- Winter Series: Winter Squidros are large, over six inches. They feature large dumbbell eyes to help slice through deep, cold flows and are dressed in fluorescent pink, hot orange and purple – proven colours that, in
Scott’s words, “work in grubby water.” - Summer Series: Designed to produce in low, clear summer flows. Summer Squidros are smaller and bred from a sombre, natural palette.
The Squidro Designed by Scott Howell
Materials:
Hook: Up eye steelhead, #4/0-#2/0
Thread: Hot or fire orange 6/0
Leader Loop: Stiff Dacron backing, gel-spun braid or knottable bite tippet
Tag: Silver Mylar
Butt: Hot orange seal’s fur, African goat or suitable synthetic
Rear Legs: Pearl with silver flake sili legs, or Squid Pearl Steely Legs
Rear Dubbing Ball: Hot orange seal’s fur, African goat or suitable synthetic formed in front of the rear legs
Body: Silver Mylar
Body Collar: Hot orange seal’s fur, African goat or suitable synthetic
Front Legs: Pearl with silver flake Sili legs, or Squid Orange Steely Legs
Collar: Fluorescent flame or light flame orange marabou
Eyes: Dumbbell eyes, silver
Directions:
-

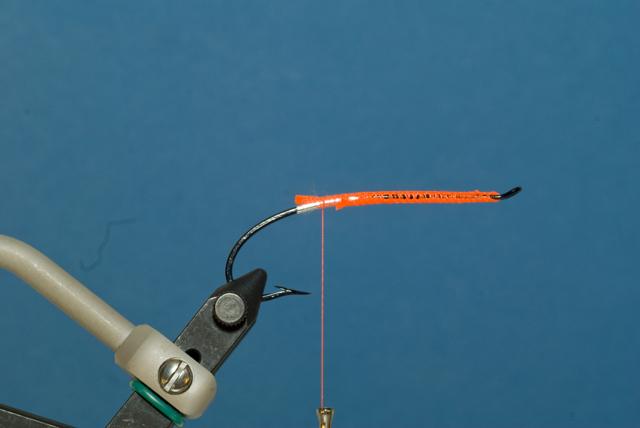 Via Phil Rowley
Place the hook into the vise. Cover the shank with tying, even with the point of the hook. Form a smooth tag of silver Mylar just in front of the hook point. Take a length of suitable strength backing, gel spun braid or knottable bite tippet and form a small loop. Slide the tag ends of the loop through the rear of the hook eye. Double the tag ends under the shank and secure in place so the loop does not extend any further back than the hook point. The finished loop should be no larger than one quarter inch. Remember to leave enough of the shank bare to push on a short length of tubing to hold the hook and leader in place.
-
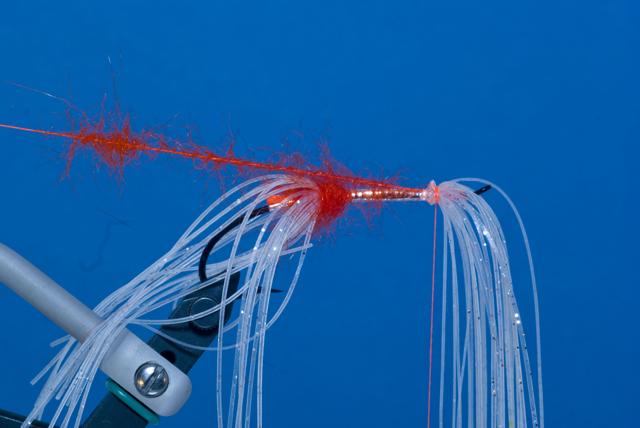
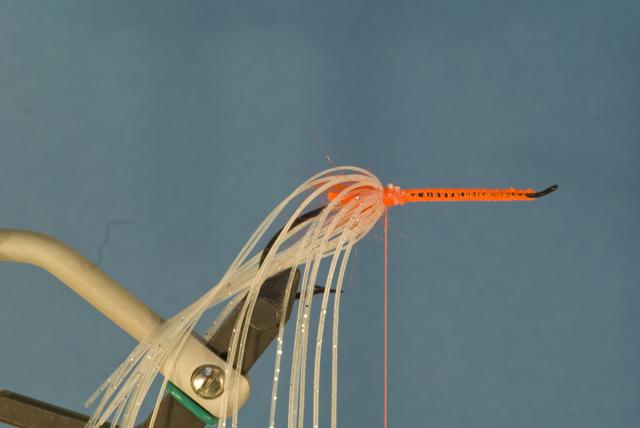 Via Phil Rowley
Using a dubbing loop, dub a robust and spikey dubbing ball at the rear of the hook using six or seven wraps. Tease and brush the finished dubbing ball as necessary. Take a hank of sili or Steely Legs and cut one end at an angle so they are of varied length. Tie in the prepared hank (approximately 20 strands) material directly in front of the dubbing ball. Massage the legs to evenly distribute them around the shank. Depending upon the size of the Squidro you may be able to get two flies out of one hank. The finished legs should extend back approximately one to one and one half times the shank length. Trim the waste leg material flush to reduce bulk. The finished legs should be held away from the shank by the dubbing ball.
-
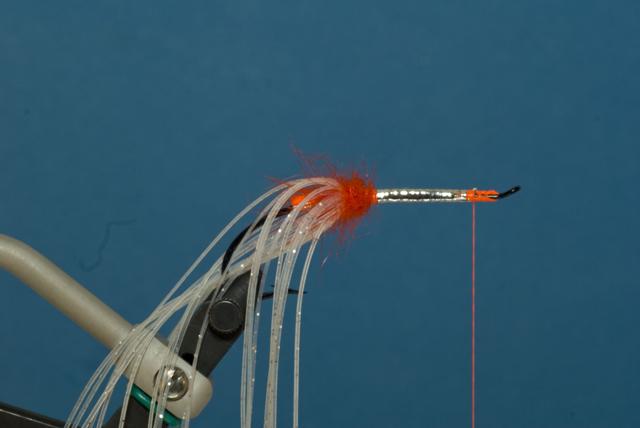 Via Phil Rowley
Using a dubbing loop form a second dubbing ball and wind it tight against the rear legs. Tie in the body material. Form a smooth, even body that runs from the rear dubbing ball to the wire return on the hook eye. Tie off and trim the excess body material.
-
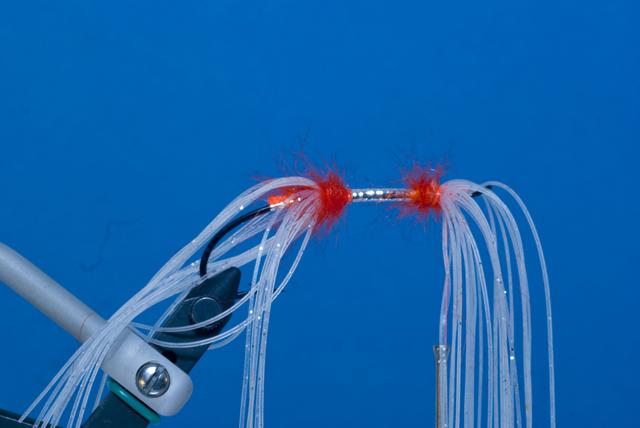
 Via Phil Rowley
Form a second dubbing loop, load it with dubbing and spin tight. Hold the dubbing loop back out of the way. Prepare and secure in the front set of legs in the same manner as the rear so the tips protrude forward, in front of the hook eye. Trim the waste ends flush to the rear of the tie in point. Weave the tying thread forward so it is hanging directly in front of the legs. As with the rear set of legs there should be approximately 20 legs distributed around the shank. The front legs, when folded back into position, should reach back to roughly half the length of the rear legs.
-
 Via Phil Rowley
Wind the dubbing loop behind the legs six to eight times forming another stout, spikey dubbing ball. Once the dubbing ball is complete weave the thread strands of the dubbing loop through the legs and tie off in front where the thread is hanging.
-
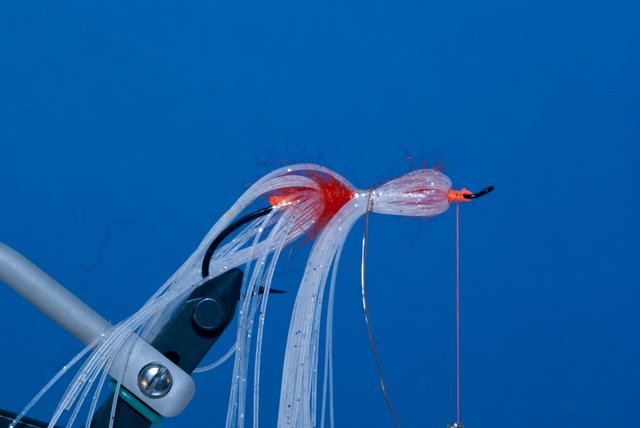 Via Phil Rowley
Fold the legs back over the body of the fly and temporarily secure them in place at the midpoint of the shank with wire or thread from another bobbin.
-
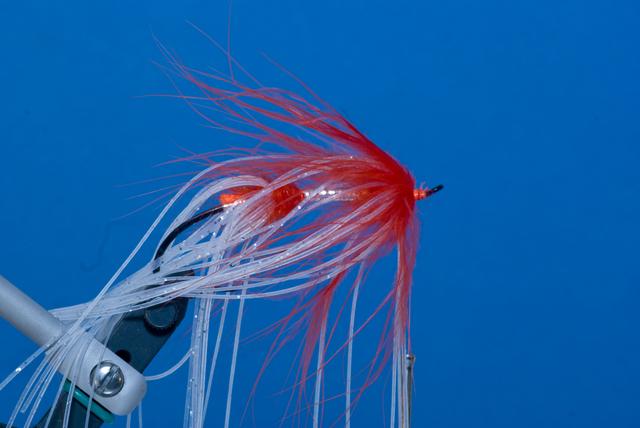 Via Phil Rowley
Tie in a plume of marabou by the tips and wind it in front of the eyes and head. Wind the marabou in front of the legs as the stem of the plume allows, sweeping the fibres back after each wrap. Tie off the marabou and trim the excess.
-
 Via Phil Rowley
Using figure eight wraps tie in a pair of dumbbell eyes on the underside of the shank. Build a neat tapered head, whip finish and apply cement. Using a pair of side cutters move the bend and point of the hook.