Craft fur is a durable synthetic material that breathes and flows in the slightest current or under the subtlest of retrieves. It is an ideal tail and wing material, especially for baitfish patterns. You can use craft fur in several ways: tie it in as a wing or tail, insert the fur or underfur into a dubbing loop, you can even cut the backing into Zonker strips.
Advertisement
The fur is attached to a cloth, hide-like backing and is available in a wide range of colours, from bright fluorescents to mottled schemes. You can also use permanent markers to add features such as gills or dark vertical barring.
Advertisement
Although you can purchase shorter-length patches at craft shops and other retailers, I prefer premium craft fur intended for fly tyers. Premium craft fur features long, straight fibres that are easier to work with, have less underfur and adapt to various pattern sizes. Shorter-length patches are more challenging to work with and are best suited for smaller patterns.
Despite its appearance, craft fur fibres have no taper. The taper is an illusion created by the staggered lengths of the fibres on the hide. In reality, the fibres are the same diameter throughout. If needed, you can trim a clump in half and use both ends.
Advertisement
Before trimming a clump from the hide, comb the fur using a pet flea or mustache comb to remove any tangles and align the fibres. Lift the fibres vertically. Slide the scissor tips against the backing, as you would with natural deer or elk hair, across the grain of the fur, from the side to isolate a section. Keep your scissor blades close together to ensure a narrow width. For a sparse application, use a short cut. Use a longer cut to remove a dense section. Once trimmed, roll the fibres into a clump. Pinch the tips tightly and carefully remove the underfur using your fingers or a fine-tooth comb. Don’t be too aggressive, or you could accidentally pull the clump free.
Save the underfur, as it makes excellent dubbing. If you plan on using lots of craft fur, specific synthetic scissors are a wise option. As with most synthetics, craft fur soon dulls standard scissors.
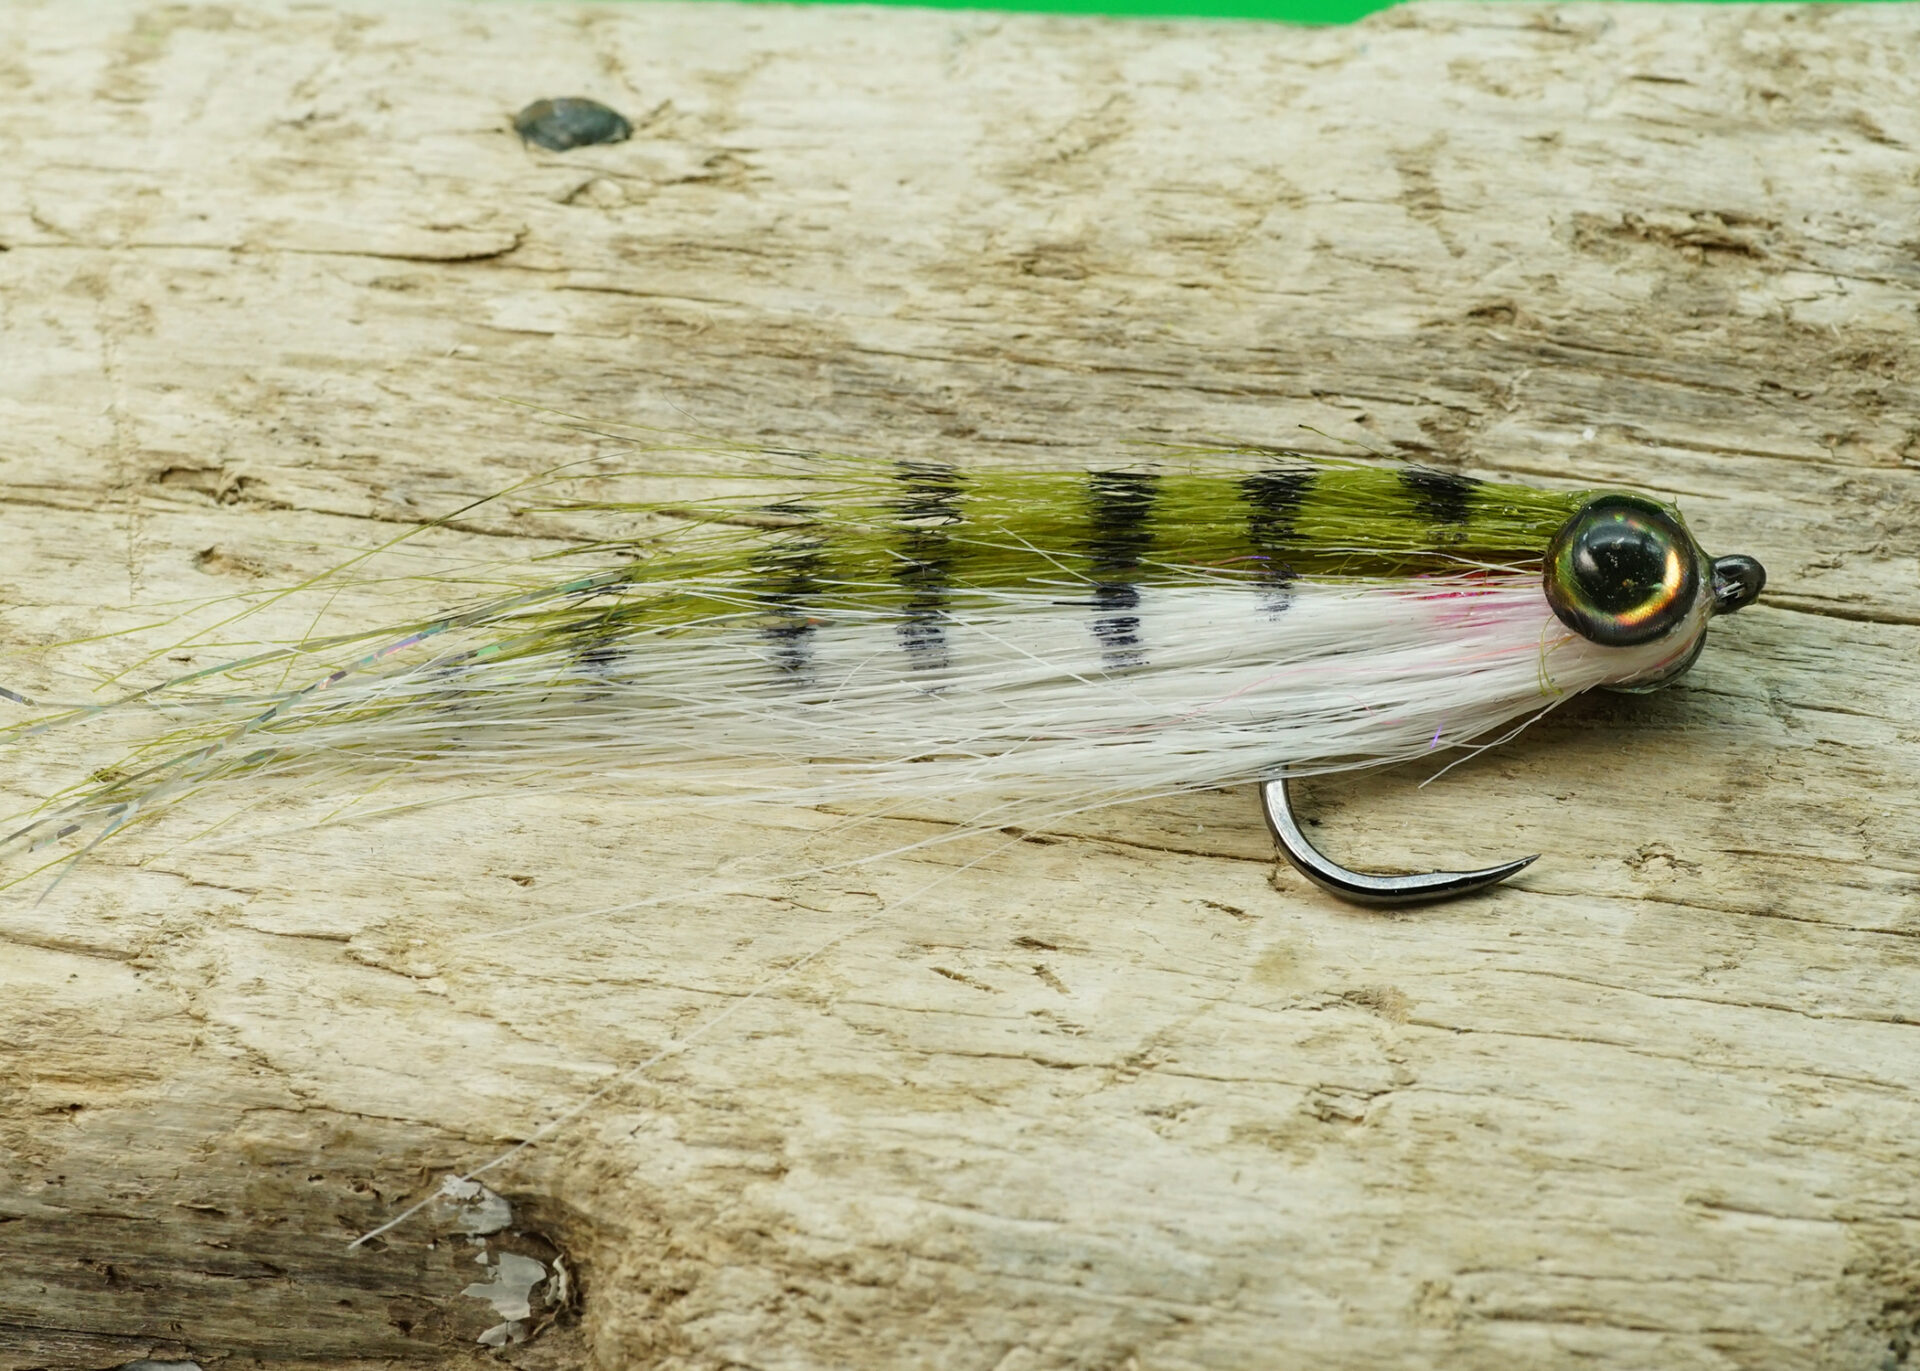
The craft fur minnow is simple to tie. It features a long craft fur tail and two wings. A typically dark upper wing that flows over the hook and onto the tail, coupled with a lighter lower wing that flows along the hook’s underside, resulting in a neat natural tapered baitfish pattern.
After trimming a sparse clump of craft fur from the backing, remove the underfur. Rearrange the fibres to align the tips, while still maintaining a natural-looking taper. Secure the craft fur clump just back from the hook eye, back down the shank to provide an even body foundation. The finished tail should be two to three times the length of the hook. If you wish, you can work a sparse amount of thin UV resin into the tail base and cure it. The resin base stiffens the tail, reducing the risk of it fouling around the hook bend. With the tail in place, dub a slender body. A contrasting body colour bleeds through the wings, providing a convincing look to the fly.
Reverse tie in the wings by securing in two clumps of craft fur that are about the same length and volume as the tail, one on top of the shank, the other on the underside, so the tips point forward out in front of the hook eye.
Work the fur around the shank before binding it in place. The top wing section occupies the upper half of the shank, the lower wing along the underside. Many craft fur minnows feature two contrasting wing colours. Some tyers add additional colours to further compliment the fly. With the wings tied in, tie in a sparse amount of Flashabou or Crystal Flash just behind the wing tie-in area. Secure the flash over the body. Stagger cut the flash, so it shimmers throughout the finished fly.
With the wing sections in place, advance the thread forward to the hook eye. Sweep and hold the wings back over the hook and tail. Build a neat, tapered thread dam directly in front of the wings to push them back. Moisten your fingers and sweep the fur back a few times to train and coax the fibres back while trying to keep the two colours from mixing. Don’t worry, the wings rarely lay back over the body and tail. Avoid the temptation to secure the wings back using the tying thread.
With the wings more or less folded back, massage a small amount of thin-viscosity UV resin into the head area only using your fingers or a dubbing needle. Hold the wings in position to match the baitfish profile you are trying to suggest. Once you are satisfied, cure the resin to lock the wings in place.
To finish the fly, use gel Superglue to affix a pair of eyes just back from the hook eye. Coat the head area with UV resin to encapsulate the eyes, so they stay in place.
How To Tie A Craft Fur Minnow
- Hook: Straight eye, short shank streamer or saltwater streamer #6 to #1/0
- Thread: White
- Tail: Craft fur, colour to match baitfish
- Body: Ice Dub, UV pink or red
- Flash: Flashabou or Crystal Flash
- Upper wing: Craft fur, colour to match the dark, dorsal surfaces of the baitfish
- Lower wing: Craft fur, colour to match baitfish
- Eyes: Molded, 3D eyes
Tying Instructions
- Cover the hook shank with thread to just a wrap or two past the hook point. Prepare a sparse clump of craft fur. Tie in the prepared craft fur just back from the hook eye and secure down the shank, forming a tail that is two to three times the length of the hook.
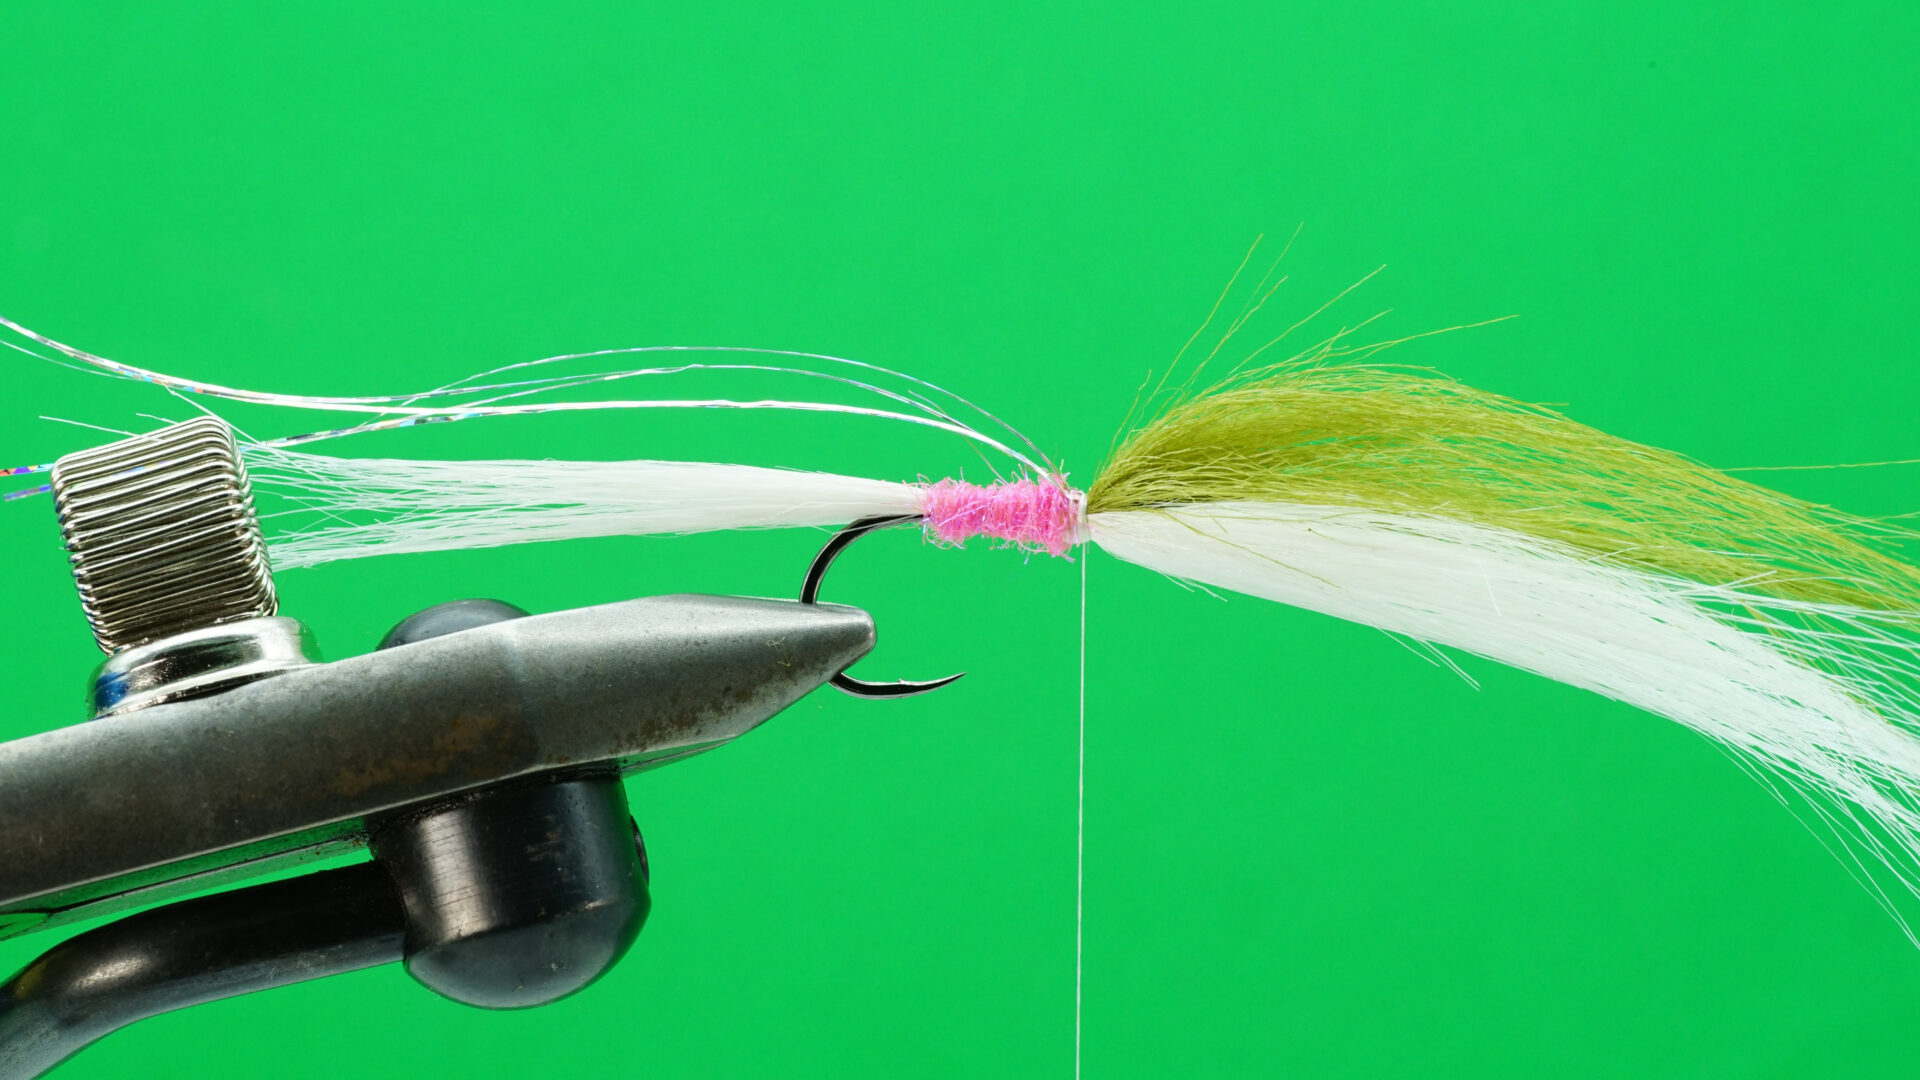
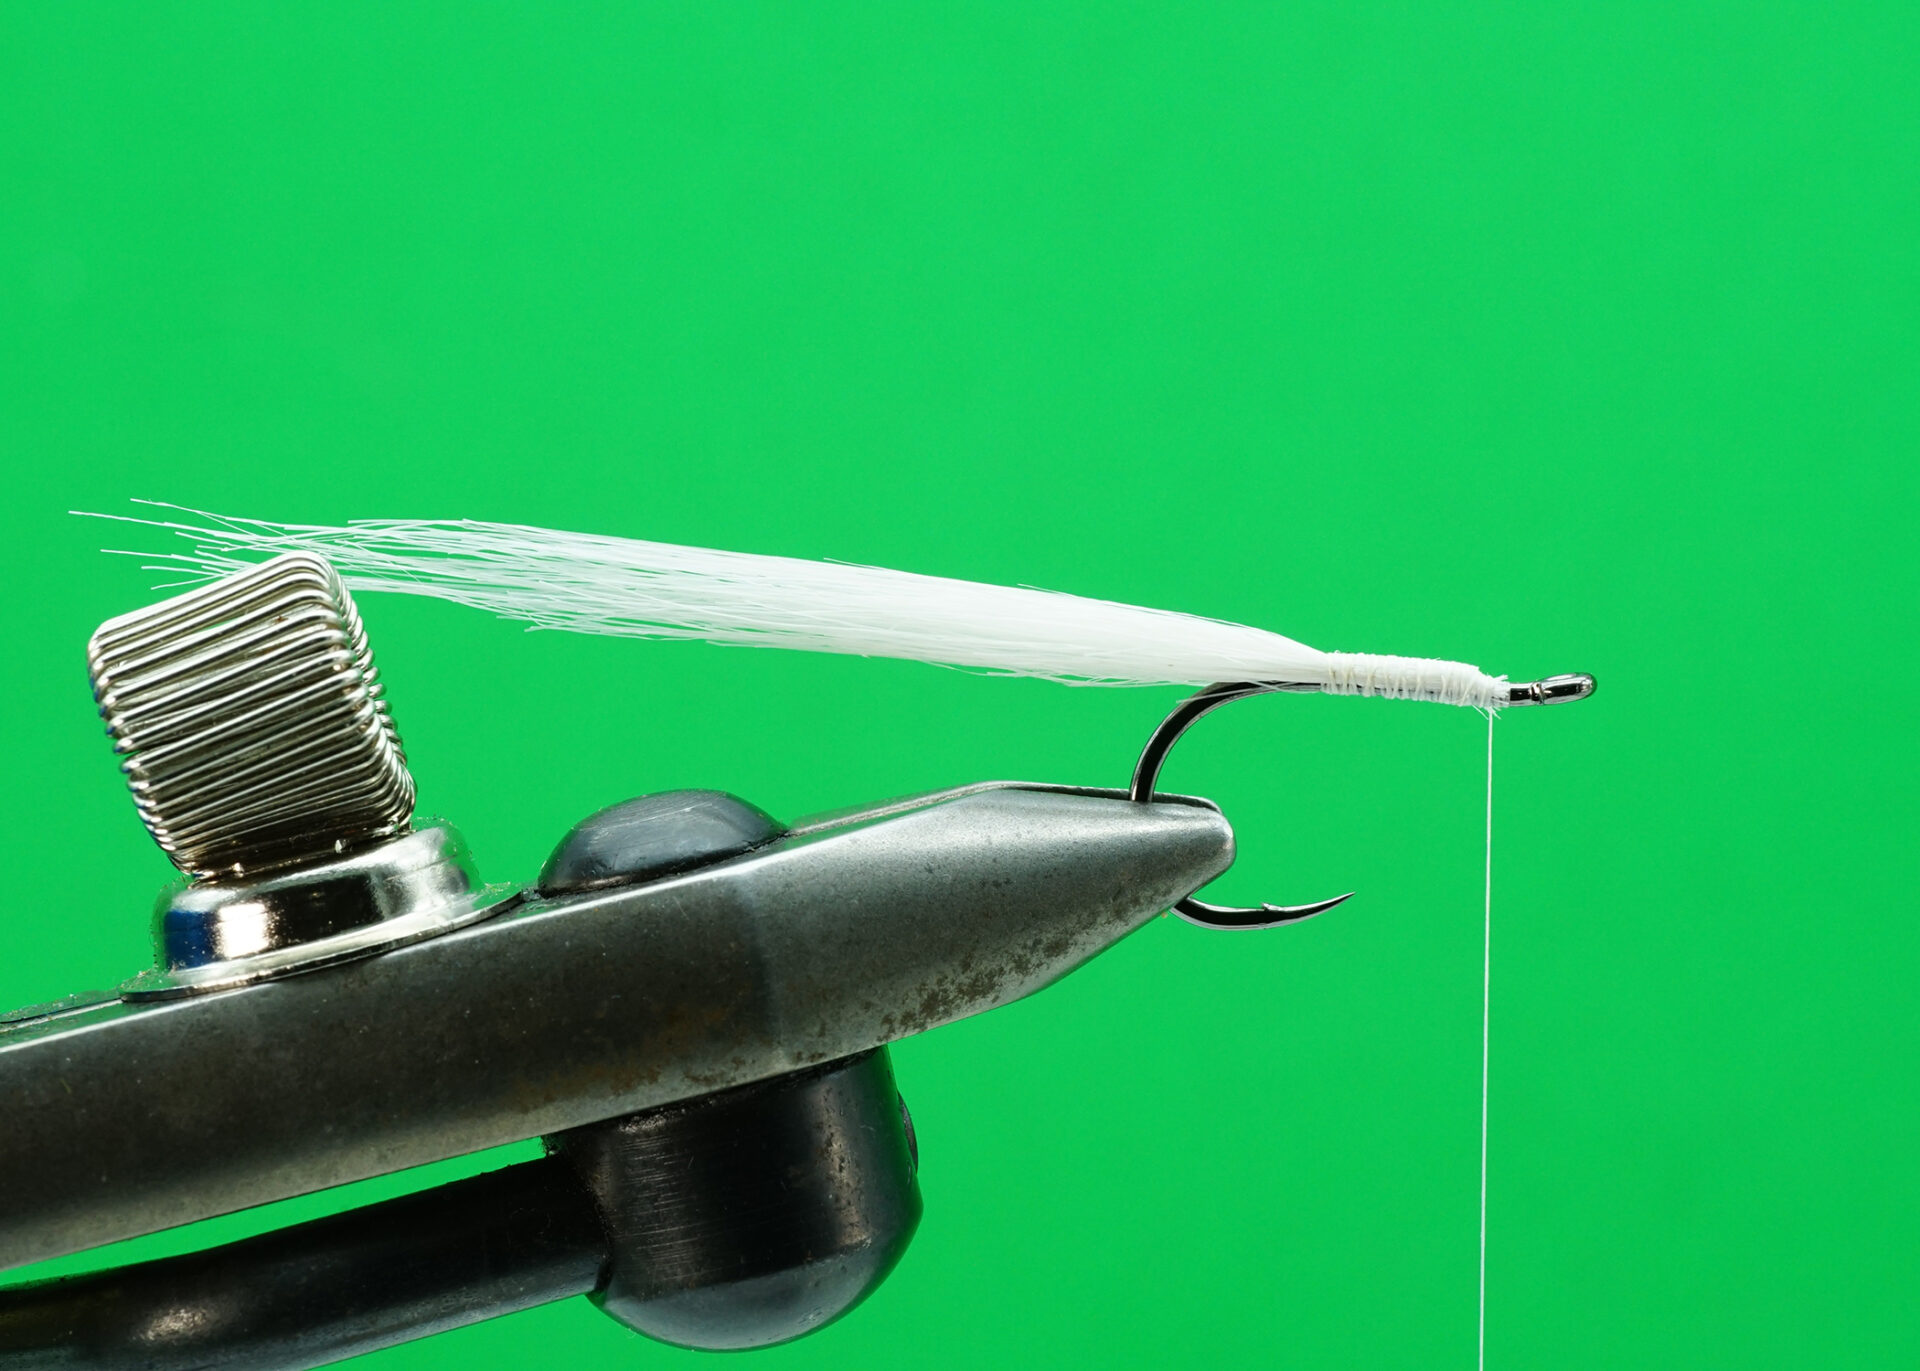 The Craft Fur Minnow: Step 1.
- Prepare a sparse clump of craft fur for the upper wing, similar in volume to that used for the tail. Secure the prepared wing one hook eye length back from the eye on top of the hook, with the tips pointing forward past the hook eye. The upper wing should be approximately the same length as the tail, two to three times the shank. Once initially tied in, massage the fibres so they occupy the top half of the hook. When you are happy with the wing, secure it in place using additional thread wraps. Trim the excess butt material.
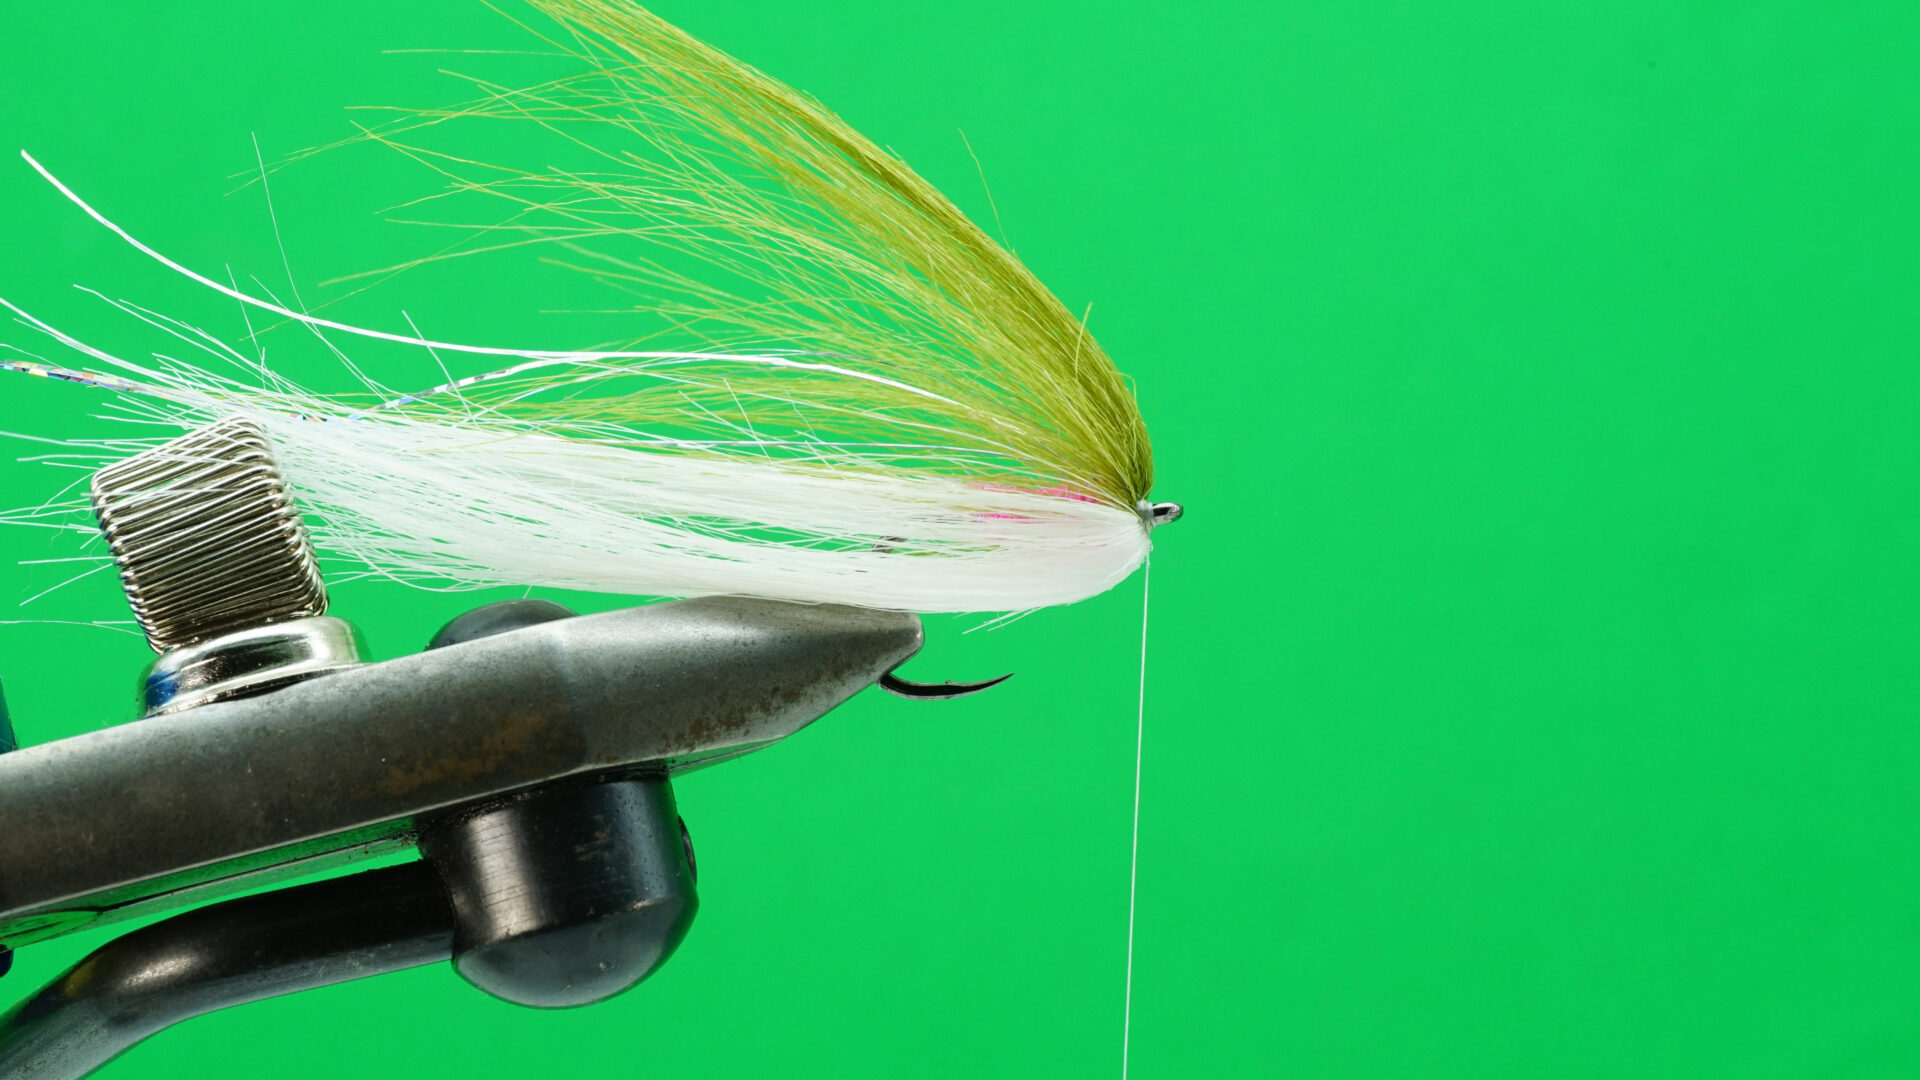
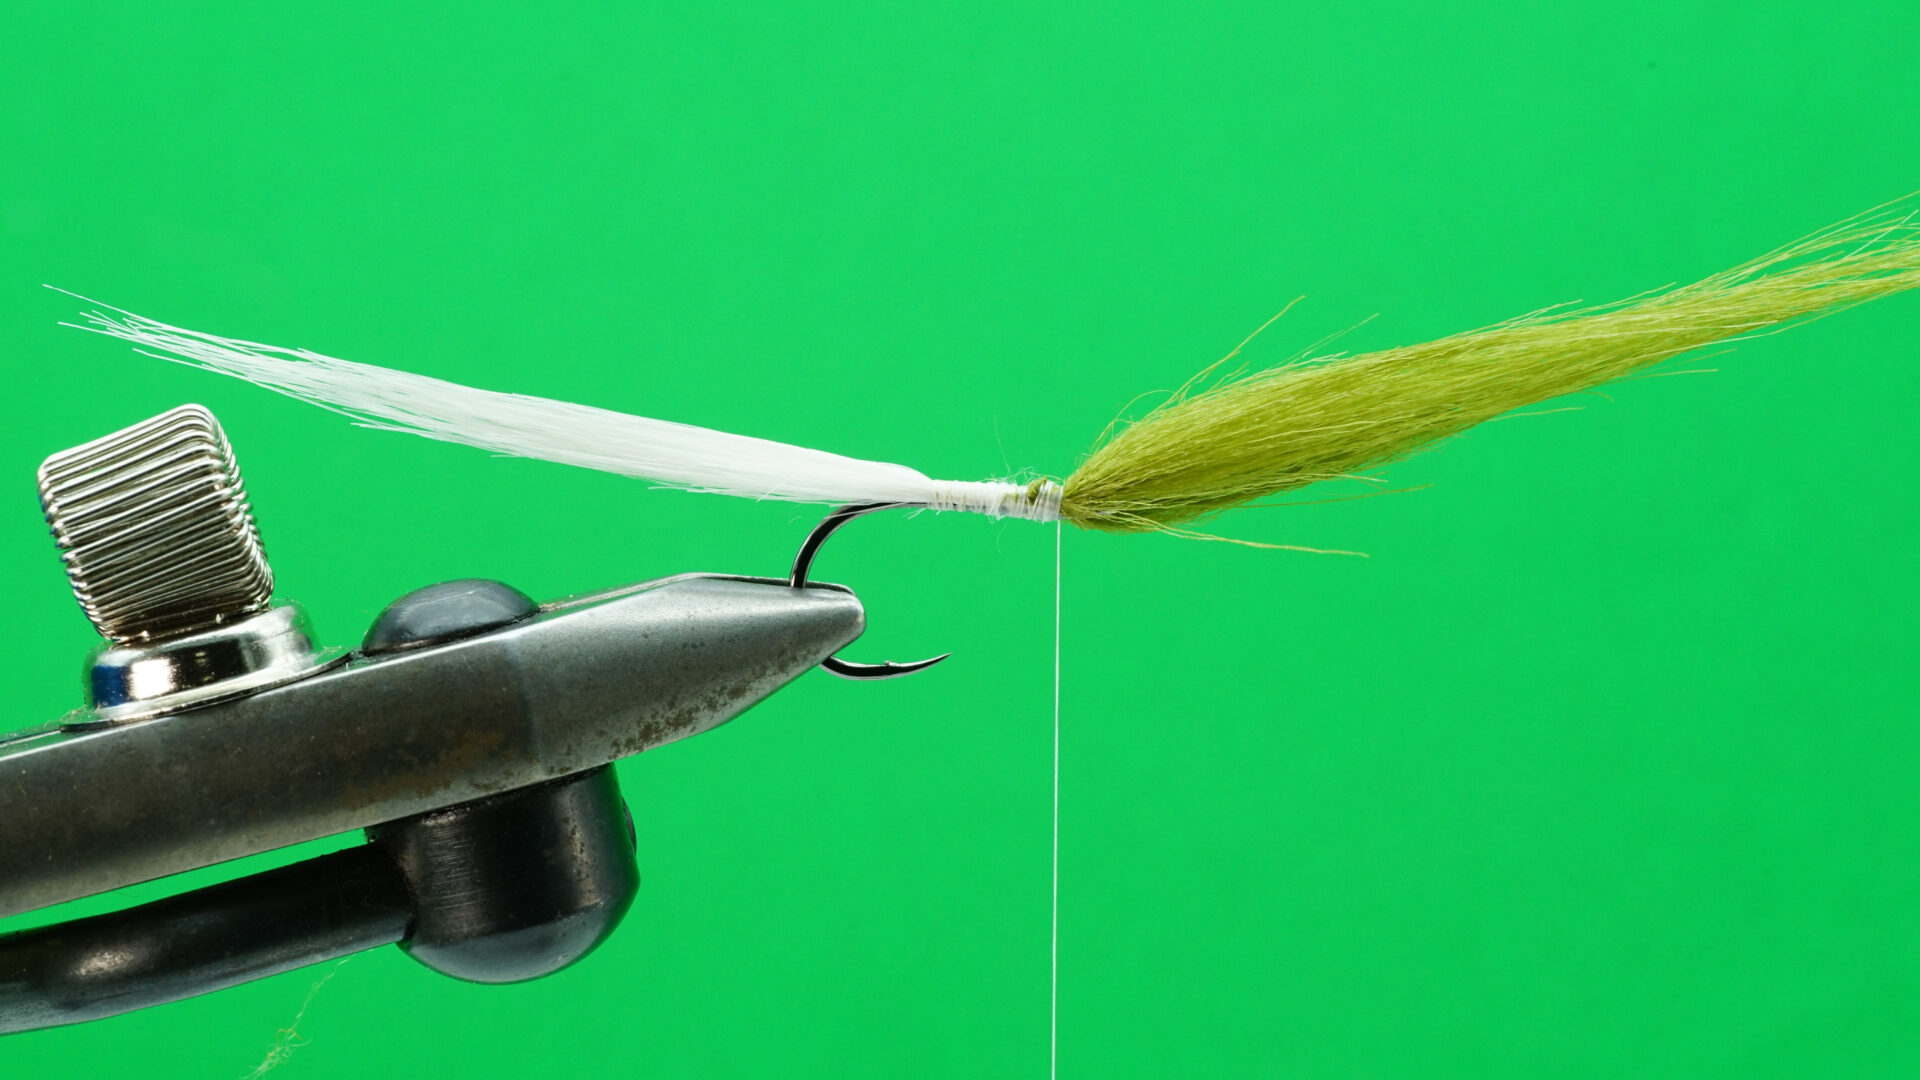 The Craft Fur Minnow: Step 2.
- Prepare a similar amount of craft fur for the lower wing as you prepared for the upper wing. As with the upper wing, tie in the lower wing just back from the hook eye along the underside of the shank, with the tips pointing forward. The lower wing should be the same approximate length as the upper wing, two to three times the shank. Once you have initially tied the lower wing in place, massage the fibres, so they occupy the top half of the hook. When you are happy with the wing placement, secure it using additional thread wraps. Trim the excess butt material.
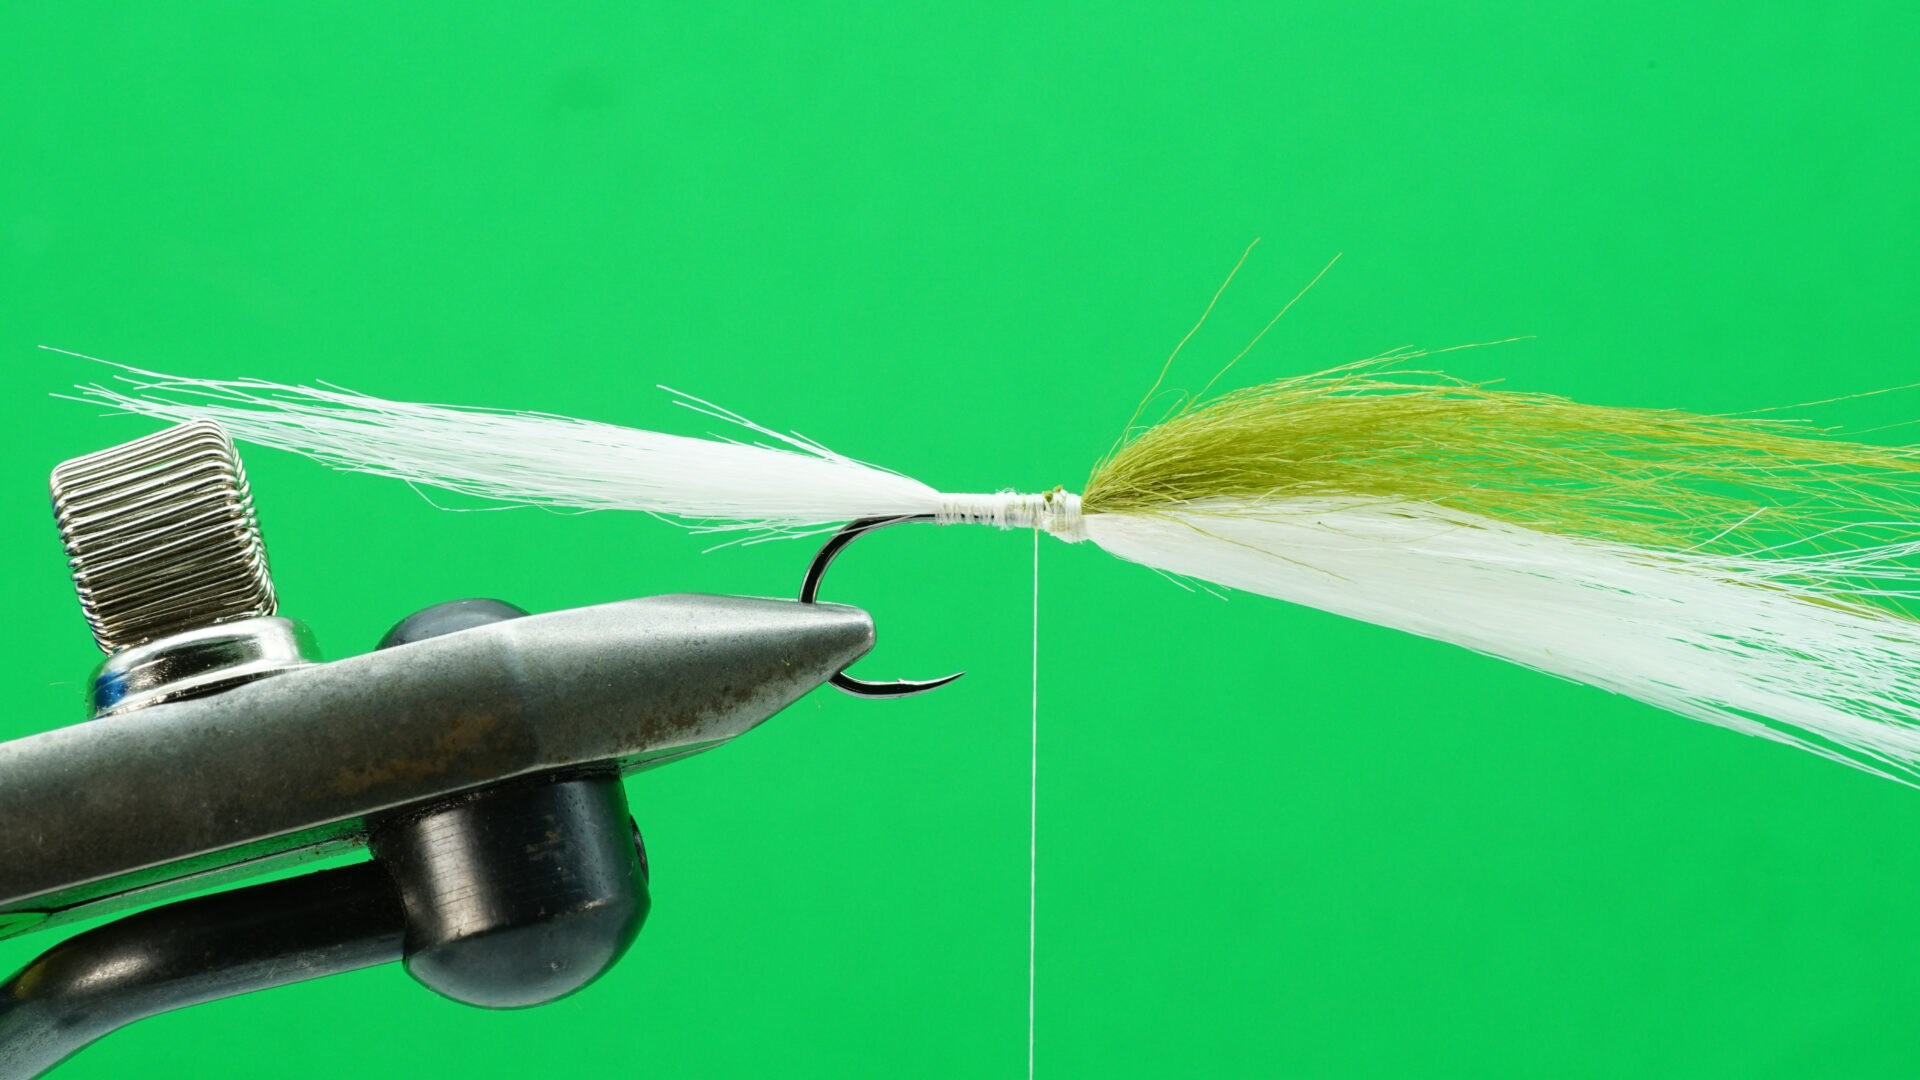 The Craft Fur Minnow: Step 3.
- Dub a slender body from the base of the tail to the rear of the wings. Tie in six to eight strands of Flashabou, Crystal Flash or a mixture of both directly behind the wings, so it flows back over the body and tail. Stagger cut the flash, so it shimmers throughout the length of the fly. Leave a few strands slightly longer than the tips of the tail.
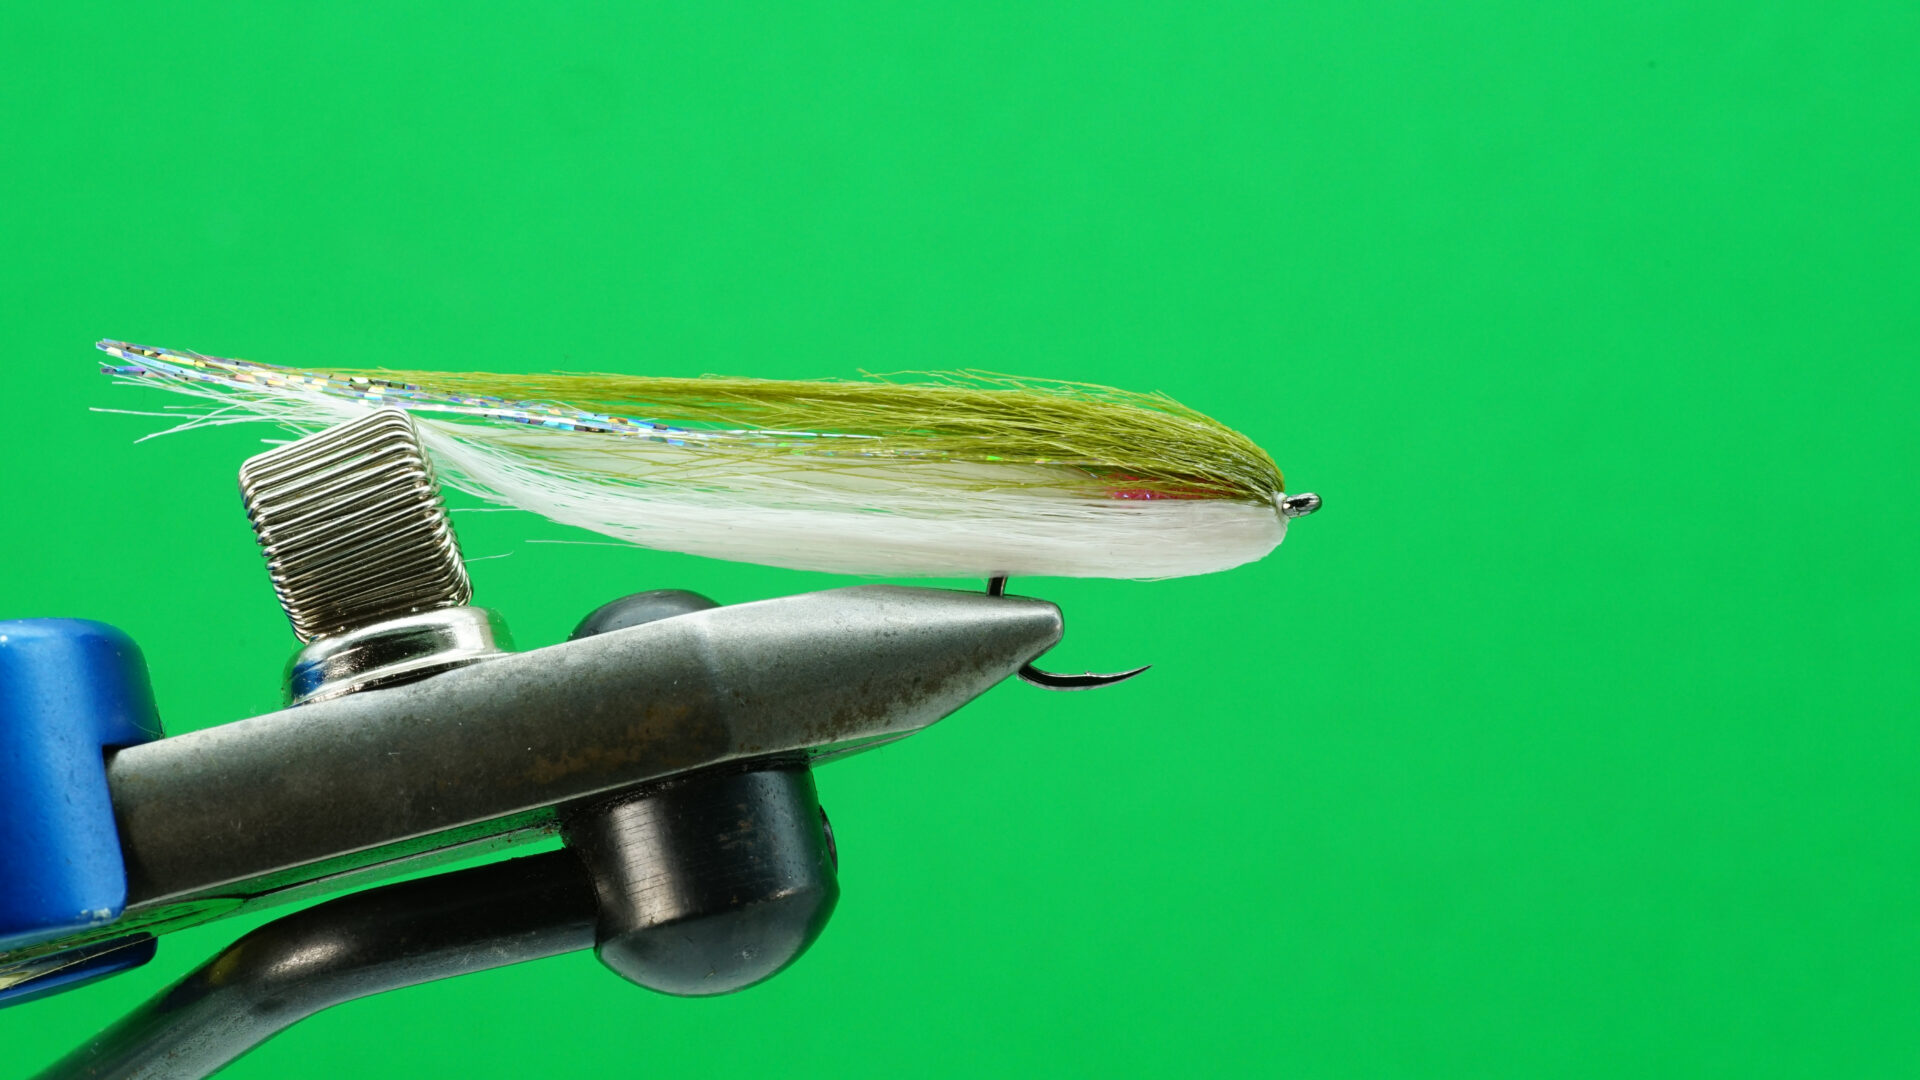
 The Craft Fur Minnow: Step 4.
- Work the tying thread forward to the hook eye. Sweep and hold the wings back over the tail and hold them in place. Build up a neat, tapered thread dam to push the wing fibres back over the hook. Whip finish and remove the tying thread.
 The Craft Fur Minnow: Step 5.
- Work a small amount of thin-viscosity resin into the head area of the fly. Massage the UV resin over the head area and slightly back into the wings. Hold the wings back to form a tapered body profile to match the baitfish you are trying to suggest. Thin and narrow or perhaps taller? Once you are happy with the wing placement and overall shape of the fly, cure the UV resin to hold the wings in place.
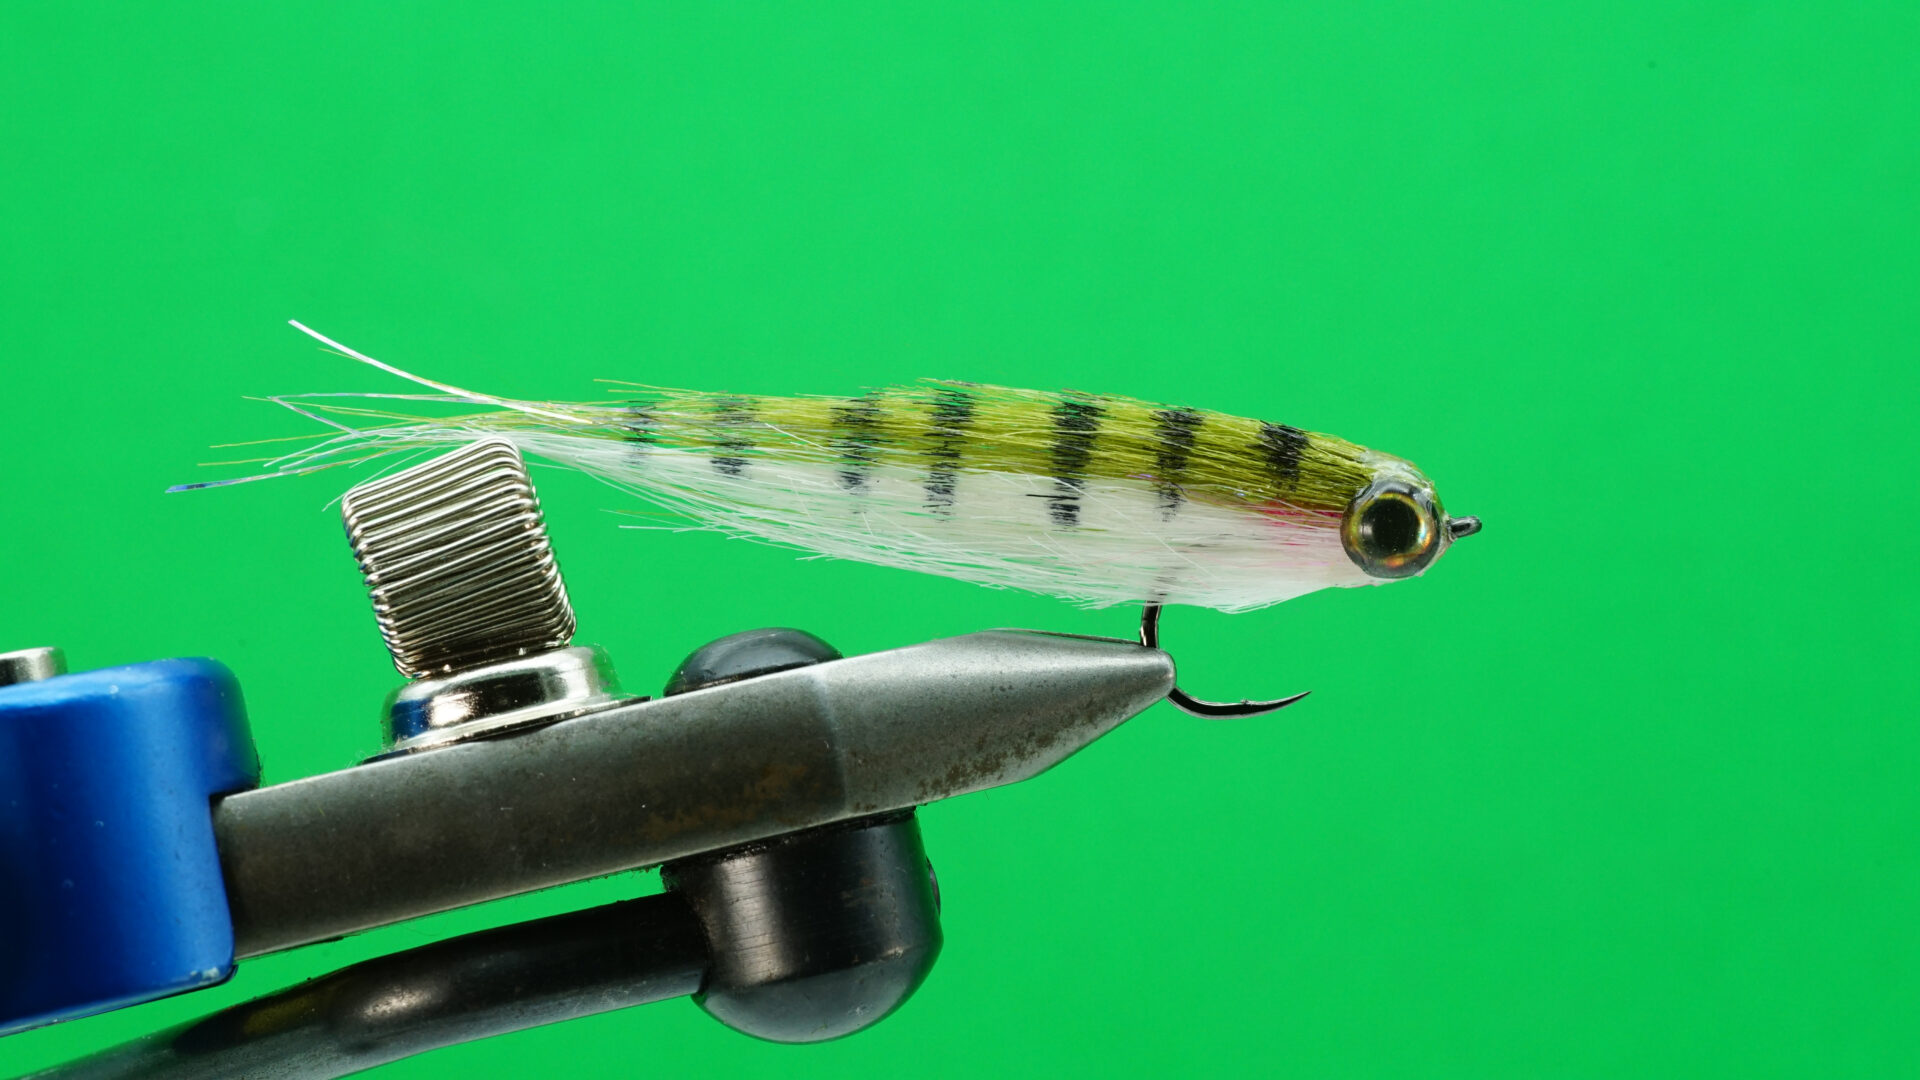
 The Craft Fur Minnow: Step 6.
- Glue a pair of eyes along each side of the head area, just back from the hook eye. Add thicker-viscosity UV resin between the eyes on both the top and bottom of the head area. Cure the UV resin. Place a drop of UV resin on each eye and work it just over the eyes’ edges to encapsulate them in resin. Cure the resin to lock them in place. If desired, use a permanent marker to add vertical marks to your fly or an additional thin dark strip to the upper wing.
 The Craft Fur Minnow: Step 7.