In my opinion, cast iron cookware is a must-have both in the kitchen and in the outdoors. Made by pouring a molten mixture of iron and steel into a sand mold, cast iron skillets are as common in Michelin-starred restaurants as they are in hunting and fishing camps, and for good reason. Cast iron’s superior heat retention provides an excellent means of achieving beautifully crispy salmon skin, evenly sautéed asparagus or fork-tender braised venison shanks.
Advertisement
For me, the real benefit of cast iron cooking is that the cookware is virtually indestructible and, with a bit of care and attention, will actually improve over time. The more you use your cast iron, the more the non-stick layer, known as seasoning, builds up and the easier your food will release.
Regardless of whether you’re using a skillet, griddle or Dutch oven, the same simple principles of cast iron care apply. Here’s what I do when I’m outdoors.
Advertisement
Cooking With Cast Iron
Cast iron itself is virtually indestructible, but the non-stick layer of seasoning that builds up is more temperamental. Particularly with only a small layer of seasoning, avoid extended exposure to acidic foods, such as tomato-based sauces, and cleaning with soap. Once a thick layer of seasoning has built up, pans are much less susceptible to chemical degradation, so this becomes less of an issue. Try to avoid aggressively scraping the surface with metal tongs or spatulas and always avoid scouring the pan with steel wool. If the cast iron is exposed to extremely high heat with nothing in the pan, the seasoning can burn off; however, this isn’t the end of the world, you can just re-season the raw cast iron.
Advertisement
Cleaning & Seasoning Cast Iron
When cooking over an open flame, once the meal has wrapped up, I’ll fill the cast iron with water and let it slowly heat up over the fire. Warm water helps to release any stubborn, burnt-on bits. After a while, I’ll take a small, nylon scraper and easily scrape off the remaining food, giving it a final rinse with water.
Dry out the pan using a cloth/paper towel or simply put the pan back on the heat until all of the water has evaporated.
Once the pan is completely dry and warmed through, rub a thin layer of oil on all surfaces using a (preferably lint-free) cloth or paper towel. You don’t need much oil, just enough to coat. Once cooled, store in a cool, dry place. Iron has a tendency to rust, so you’ll want to avoid moisture.
Cast iron is unique in that it needs more attention than other materials, but by investing this time up front, your new skillet could be an heirloom. My favourite cast iron skillet, shown in the photos, was purchased by my parents before I was born and passed on to me. I use it nearly every day. Cast iron cookware is an heirloom-calibre investment that looks great, cooks brilliantly and is incredibly reliable. If you’re on the fence about getting into cast iron cookery, I would encourage you to take the plunge.
Breakfast Of Champions
Ingredients
- 1 lb new potatoes
- 2 tbsp canola oil
- Knob of butter
- Eggs
- Cold-smoked salmon
- Sour cream
- Arugula
- Parsley
- Seasoning salt
- Pepper
Equipment
- Two cast iron pans
- Spatula
- Cutting board
- Leatherman Wave+
Instructions
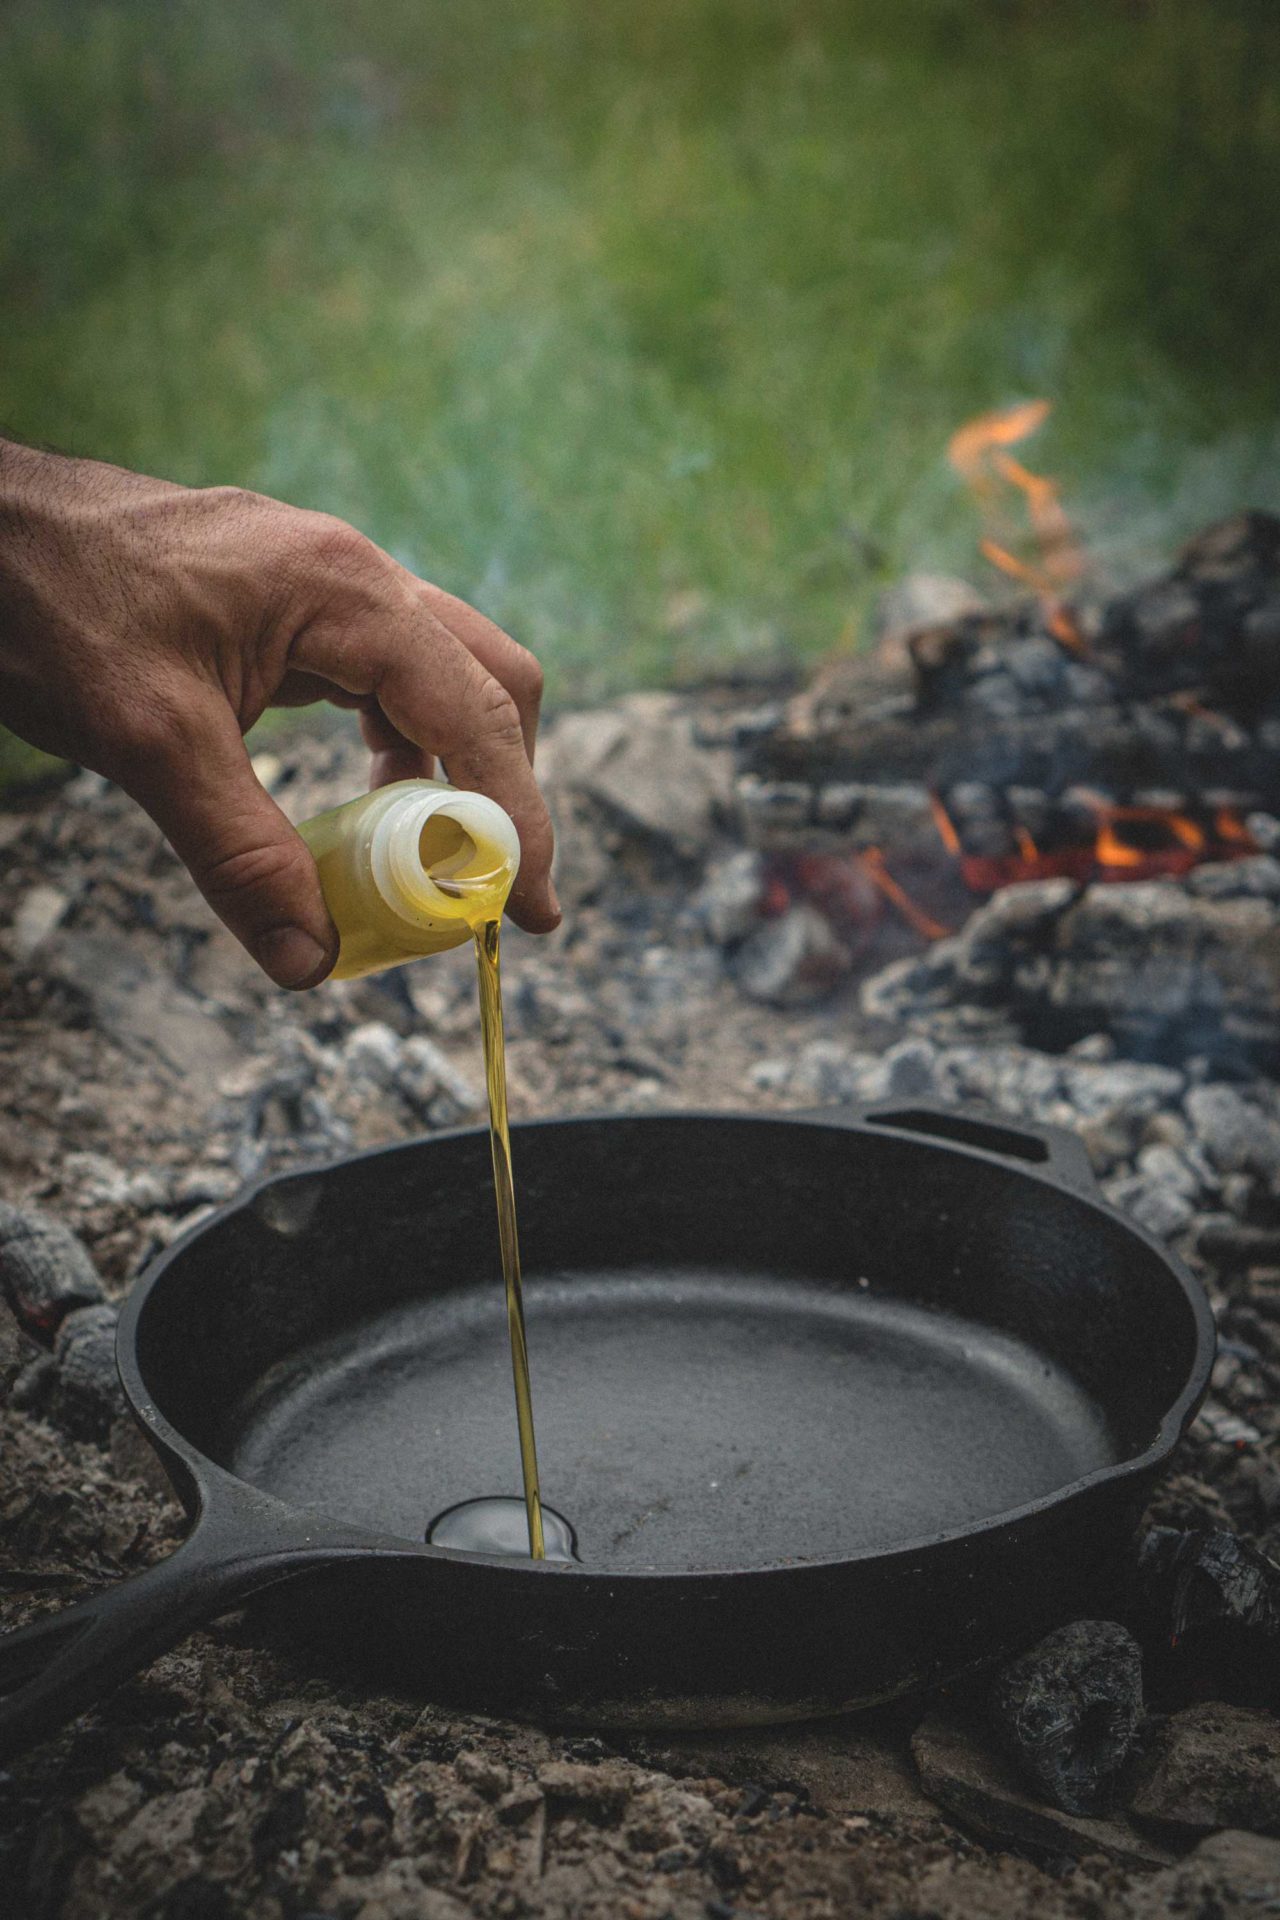
Slice the new potatoes into quarter-inch rounds whilst the oil preheats in a cast iron skillet. If the oil begins to smoke, turn the heat down or move the pan away from the hottest part of the fire. Season with seasoning salt and pepper.
Whilst the potatoes are crisping up, put a knob of butter in the second preheated cast iron pan. Crack an egg into the butter when it begins to froth. Fry the eggs to your desired doneness – I prefer a runny egg – making sure not to burn the whites in the process.
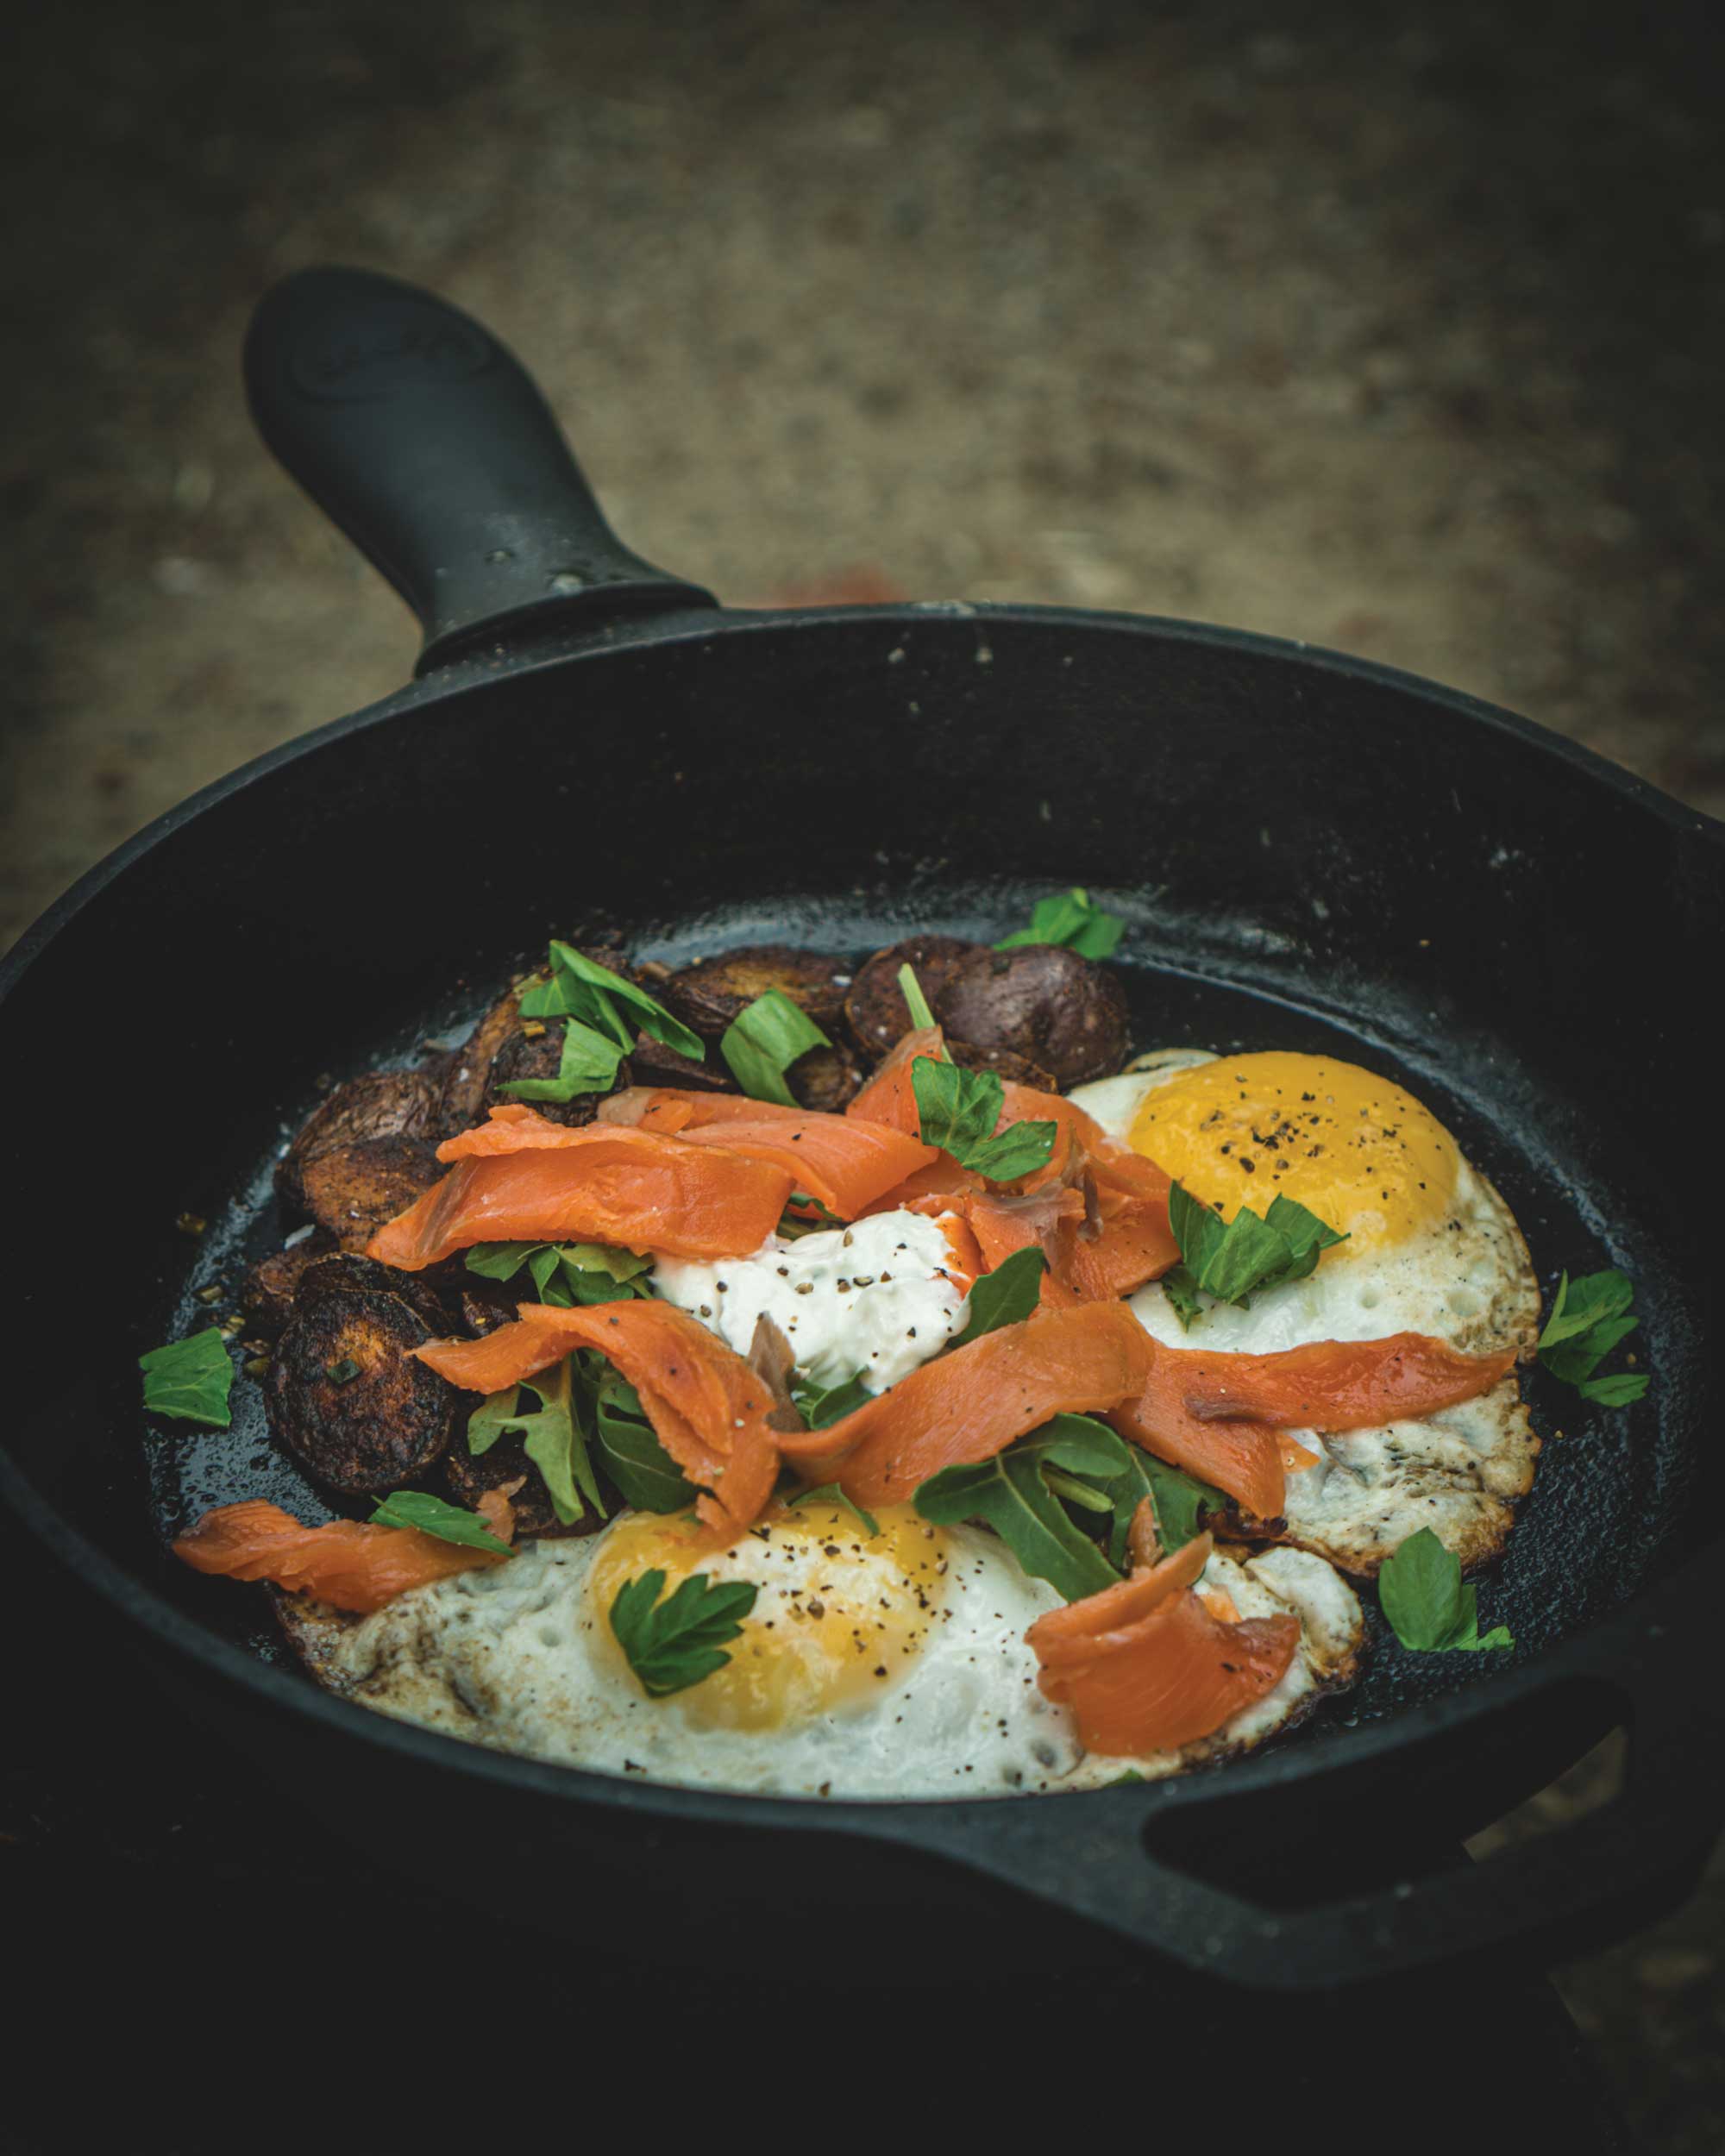
To plate up, place some sliced cold-smoked salmon on the eggs and crispy potatoes, alongside a few dollops of sour cream, some arugula and some torn parsley. Season to taste with salt and pepper and enjoy.
Thai-Style Salmon Fishcakes
Ingredients
- 2 tbsp high smoke point oil, e.g. canola
- 1 fillet salmon
- 1 medium starchy potato, e.g. Russet
- 1 cup Panko breadcrumbs
- 1 egg
- 1 bunch cilantro
- 1 bunch spring onion
- 1 tbsp fish sauce
- 1 bottle off-the-shelf sweet chili dip
- Salt and pepper
Equipment
- Cast iron skillet
- Fish spatula
- Cutting board
- One-burner propane stove
- Leatherman Wave+
Instructions
Preheat a cast iron skillet on medium-high heat and add a layer of oil to cover the base of the pan. Once the oil is glistening, add the skinless salmon fillet to the pan. Season with salt and pepper to taste. Once you have a good crust on both sides, use the spatula to flake the fish into dime-sized pieces. Remove the flaked and fried fish and put into a mixing bowl. Add a (par-boiled) starchy potato to the skillet in which the salmon was fried.
Brown the potato in the oil and mash it up with the spatula. Add the potato mixture to the salmon in the mixing bowl. Finely chop up the whites of the spring onion and roughly chop the cilantro stems, adding to the mixture. Season with salt, pepper and (a tablespoon or so of) fish sauce to taste.
Crack an egg into the mixture and add approximately half a cup of Panko breadcrumbs. Mix thoroughly. You want the mixture to be able to stick together into patties that hold their shape. If the mix is too dry, add another egg; if it’s too wet, add some more breadcrumbs.
Bring a heavy pan up to high heat and add a layer of high smoke point oil. Form patties of the mixture in your hands to whatever size you’d like. I like to eat these by hand, so patties about three inches across work well. Once you’ve formed the patties, add them to the hot oil; flip when golden.
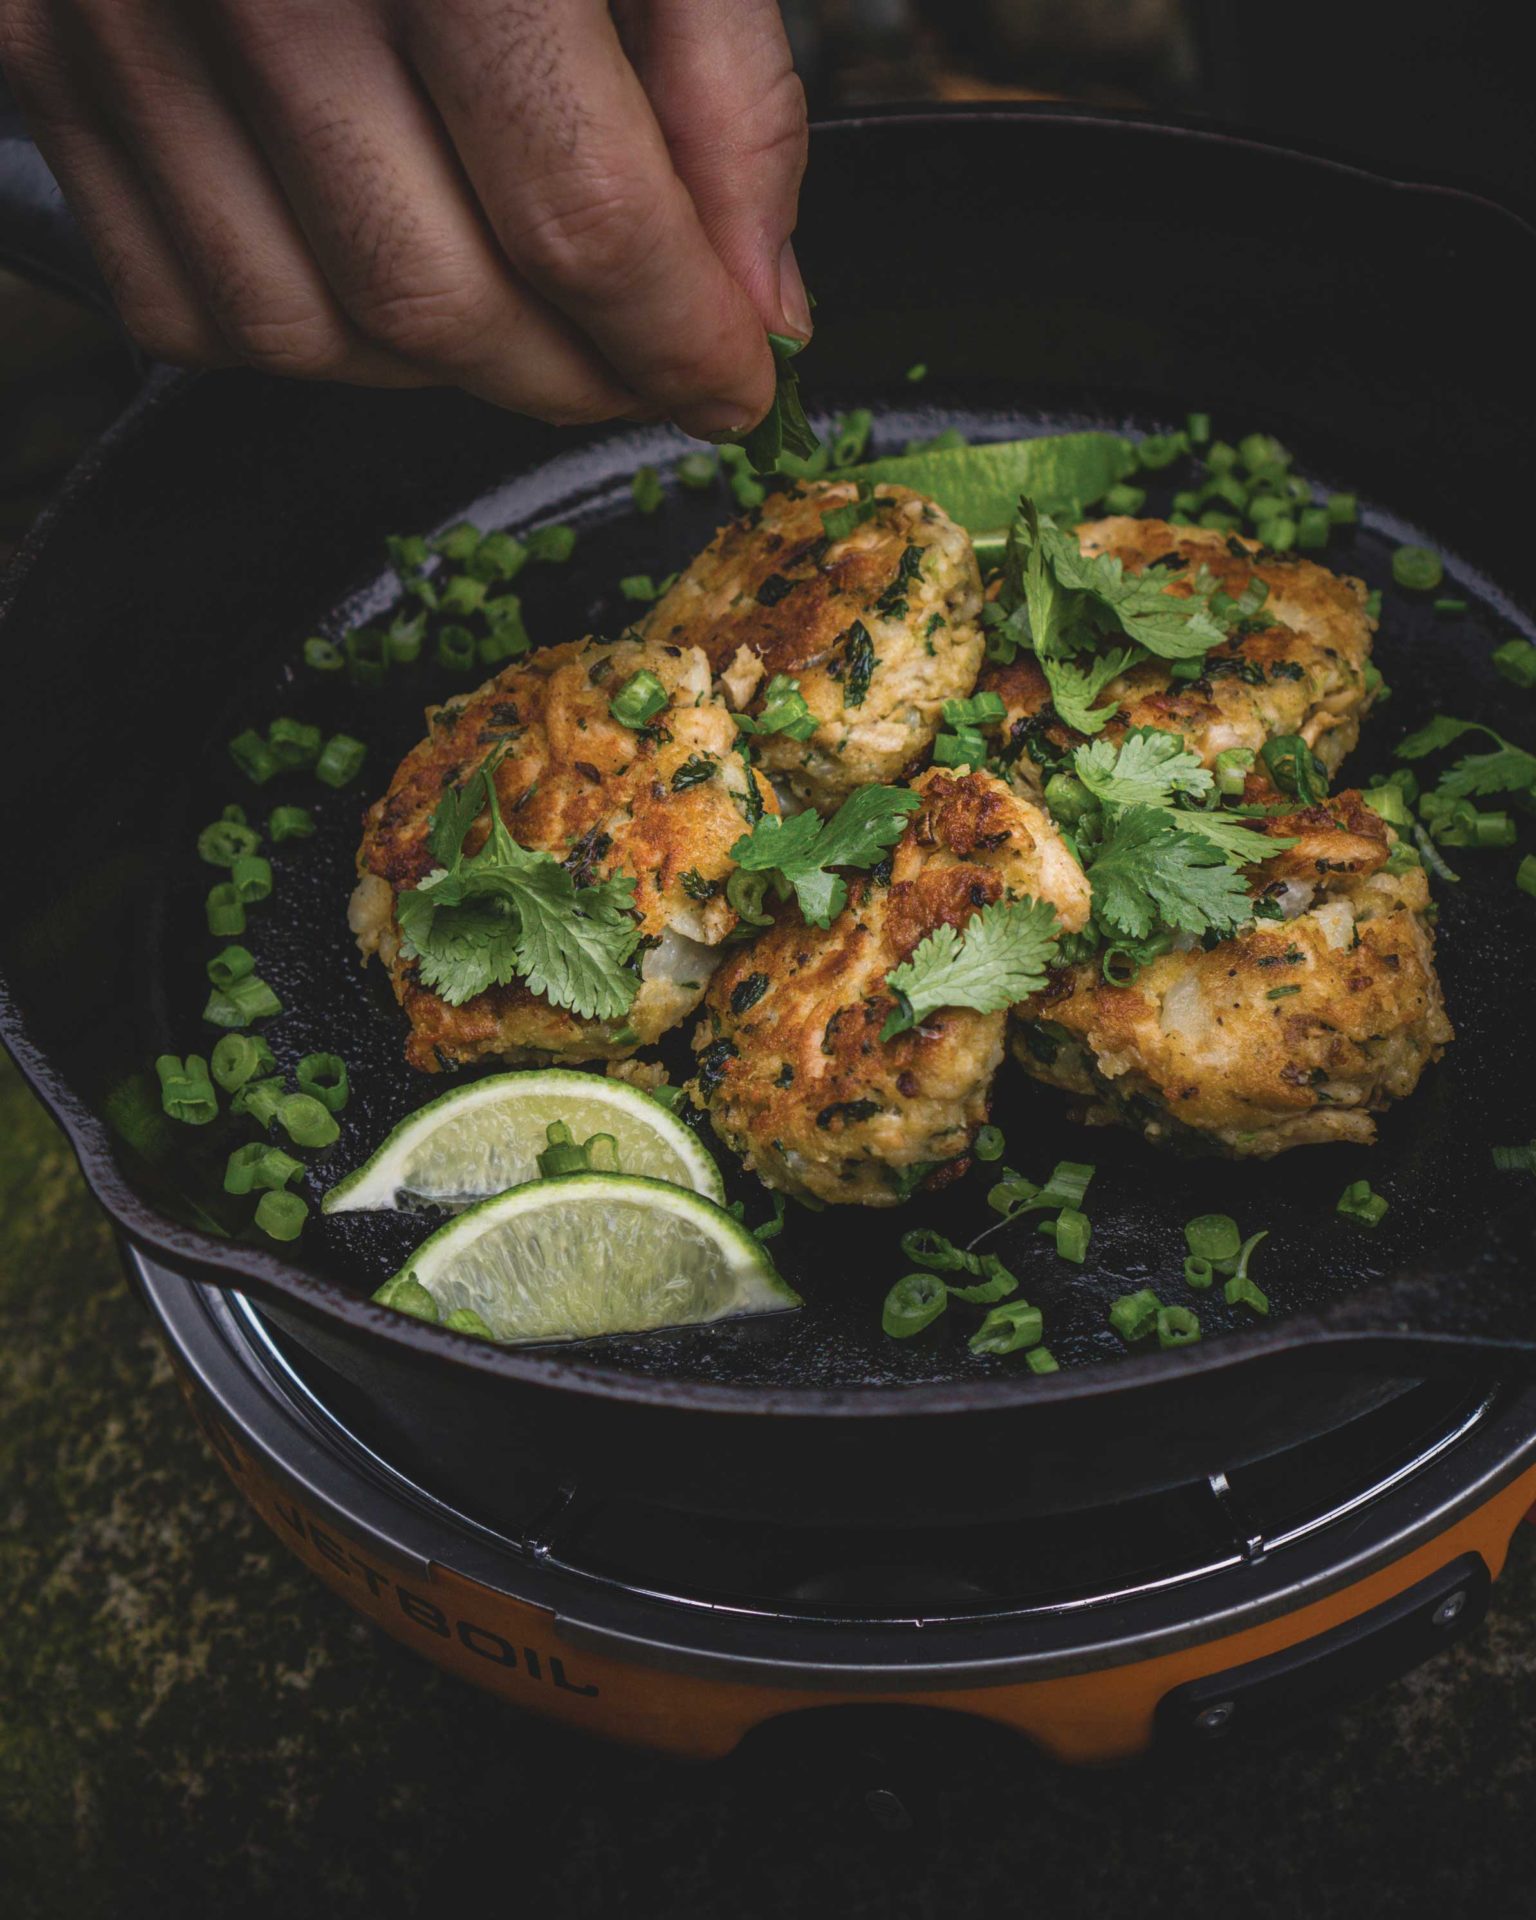
Whilst the patties are browning, chop the greens of the spring onions, rip up the leaves of the cilantro and chop the limes into quarters. When the second side has crisped up, squeeze the lime over the patties, and sprinkle the spring onion, cilantro and some sea salt over the patties. Serve hot. Eat by hand, dip in sweet chilli sauce and enjoy with friends.
Blackened Trout
Ingredients
- Blackened trout
- 1 tbsp paprika
- 1 tbsp smoked paprika
- 1 tbsp cumin
- 1 tsp salt
- 1 tsp pepper
- Cayenne pepper to taste
- 1 medium yellow onion
- 1 yellow bell pepper
- 2x trout fillets
- 2 cups par-boiled rice
- 1 tbsp oil
- 1 knob butter
- 1 lime
- 1 bunch cilantro
Equipment
- Two cast iron skillets
- Fish spatula
- Cutting board
- Leatherman Wave+
- Two burner propane stove
Instructions
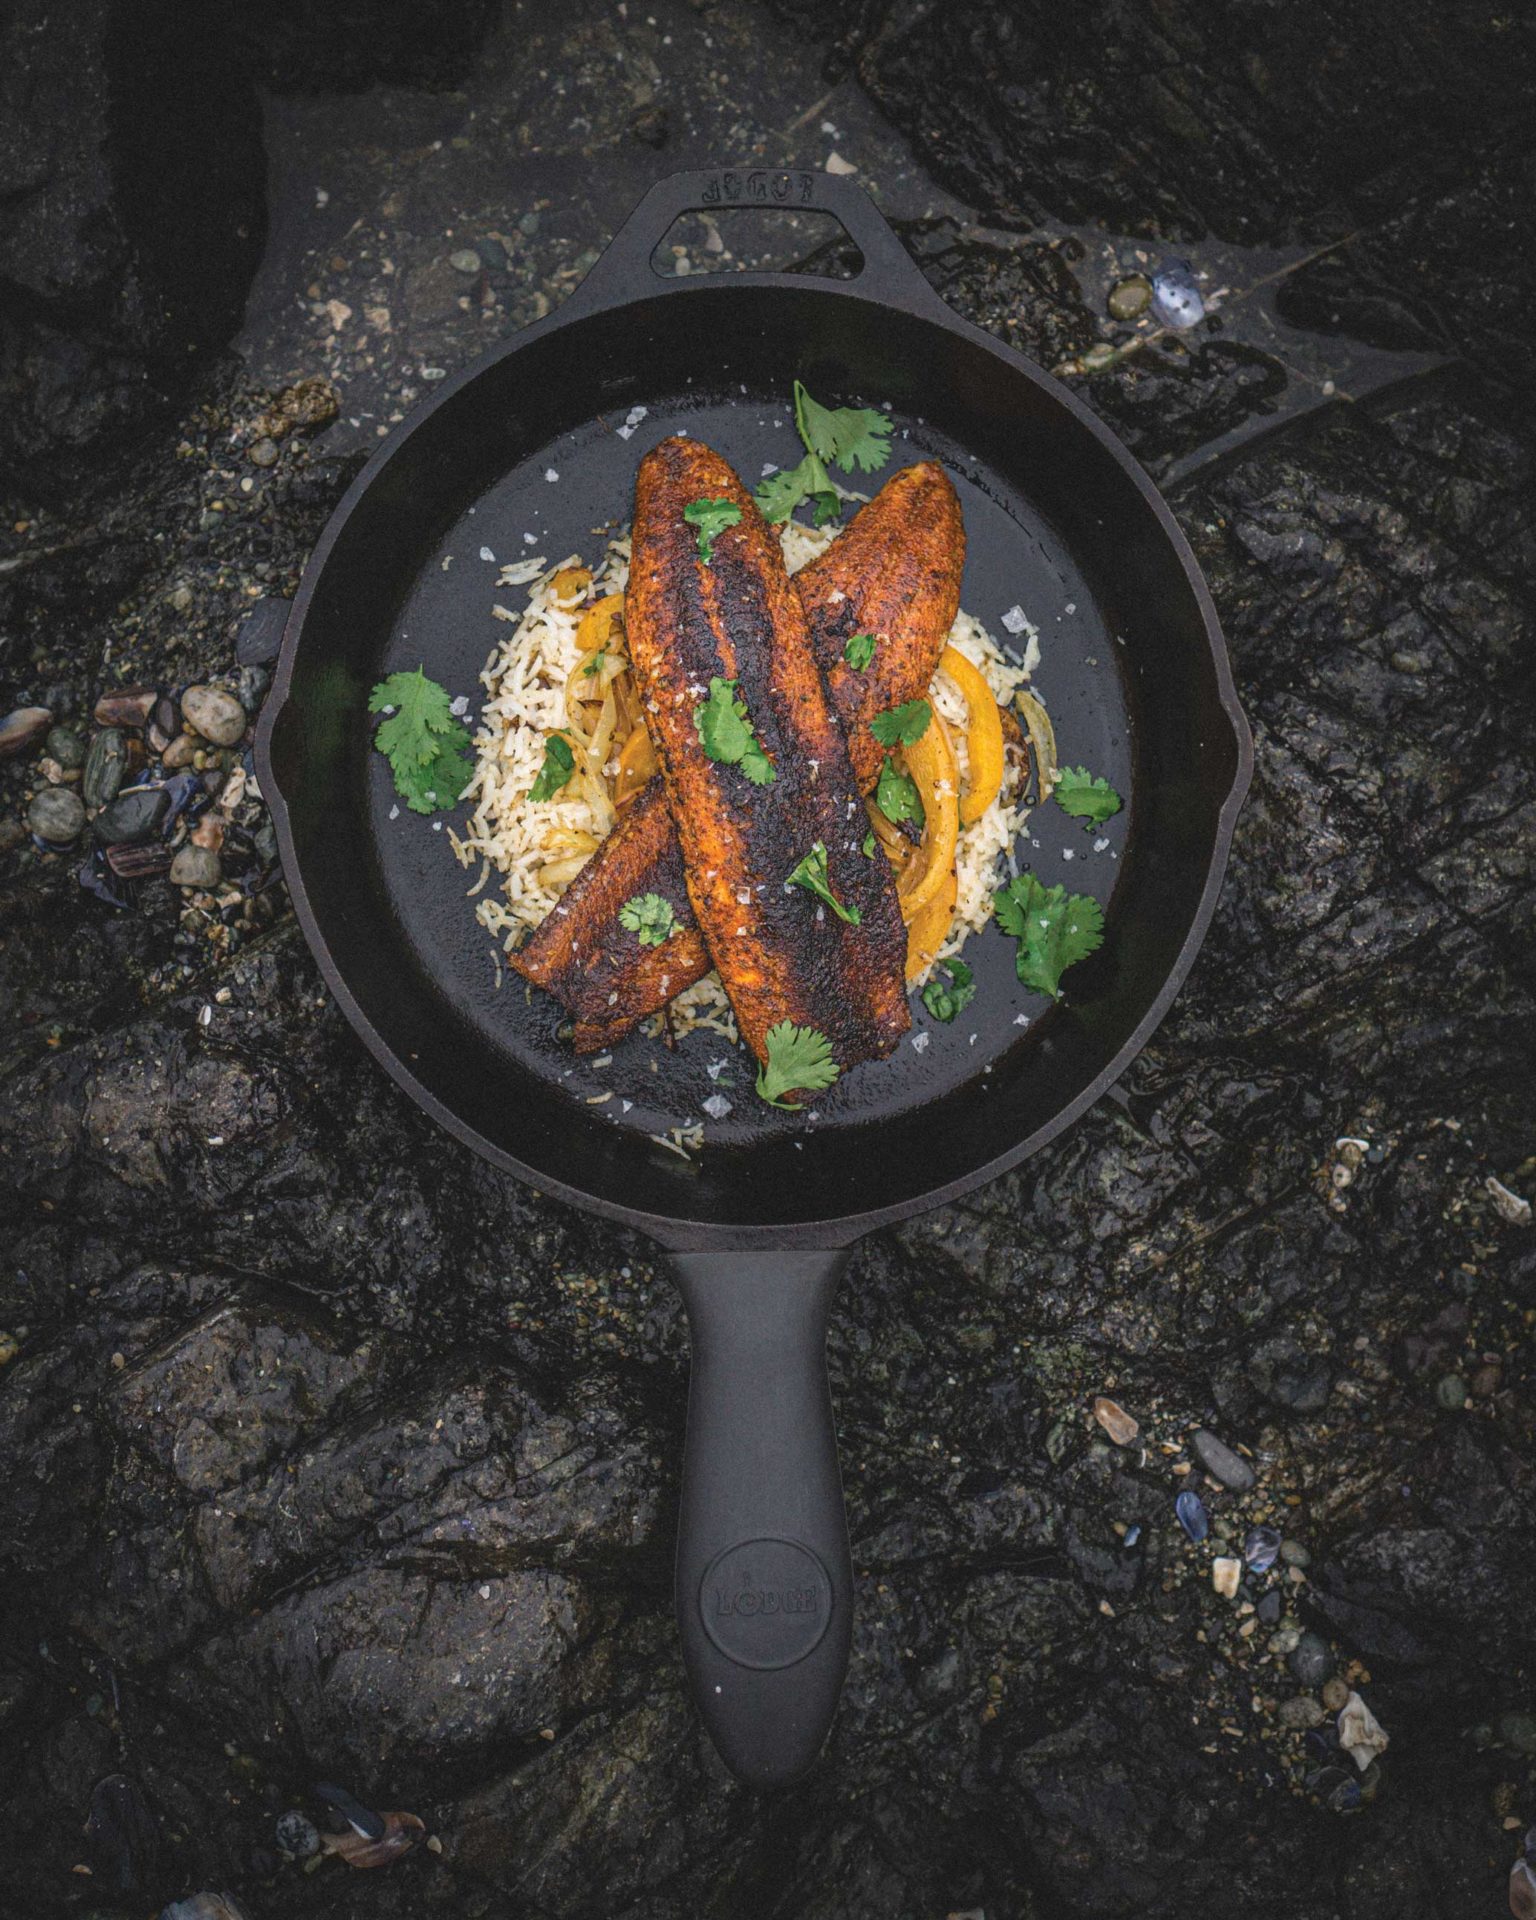
First, mix all of the spices together and coat the fillets with the spice mix. Make sure to pat them down so the spices really penetrate. Preheat one cast iron on high heat with the oil and the other cast iron at a medium heat with a knob of butter. Thinly slice an onion and pepper, before sautéing in the pan with the knob of butter. Once the veggies have softened up and have a little colour going, set them aside. Add another knob of butter to the same pan and reheat the parboiled rice at a low temperature.
In the second piping-hot cast iron skillet with oil, fry the fillets skin-side down until the fillet is opaque halfway up. Flip the fillets over for a brief sear on the flesh side, giving the trout some of that characteristic blackening. To plate, top the warmed rice with the vegetable mix, place the trout on top of the veggies and finish with some lime, cilantro, salt and pepper to taste.