In recent years European nymphing techniques have become dominant across North America. Not only the method itself but also the unique patterns fly fishers tie and use such as Spanish style nymphs. Spanish nymphs are small, thin and hard bodied. Designed to succeed in the shallow clear streams of the Pyrenees, Spanish style nymphs perform equally well in North America, especially when trout are focused on tiny prey. U.S. competition angler, Devin Olsen’s Pliva Perdigon nymph is an excellent example of the perdigon tying style.
Advertisement
Perdigon nymphs were designed for targeting trout in clear waters frequented by many fly fishers. Literally translated, Perdigon means pellet owing to this pattern style’s slender lines and quick descent characteristics. Much like a pellet. Although considered a Spanish design, perdigon nymphs originated in France, migrating over the Pyrenees where their popularity and use exploded. Perdigon nymphs can be tied in a range of sizes but smaller versions, #14 through #18, work best.
Hook choice is critical when tying perdigon nymphs as the fly is designed to ride on its back to avoid snagging rocks and debris when presented just above the bottom. Most tyers use small up eye jig hooks in conjunction with a slotted tungsten bead to roll the fly on its back. Standard, non-jig, hooks can also be used providing the slotted tungsten bead is positioned so the majority of the bead lies above the hook shank causing the fly to roll over on its back. After sliding the slotted bead into position, a touch of brushable superglue ensures it remains in the correct position.
Advertisement
In addition to the tungsten bead and a sparse Coq De Leon fiber tail, perdigon nymphs feature slender, hard, tapered bodies. These traits enable perdigon style nymphs to slice through the water with speed and ease. Unlike many popular nymph designs, perdigon nymphs do not utilize any fibrous materials such as dubbing that could slow the patterns decent. Depending on the depth and current speed, a few wraps of lead wire or lead wire substitute, placed directly behind the tungsten bead, boosts overall pattern weight and when pushed into the slot helps position the bead. Once weighting process is complete, build up a neat tapered body.
A perdigon nymph’s tapered body is a function of material choice and a body coating, typically U.V. resin, varnish or lacquer. Common body choices include Crystal Flash, Flashabou, stripped peacock quill and a relatively new product, Body Quill. Of these body choices Body Quill is fast becoming a personal perdigon favourite. Body Quill is a spooled multi-strand thread that is available in a range of interesting colours. Although thicker than standard 8/0 or 70 denier tying thread, Body Quill allows you to tie in materials and form a finished body without changing products. Body Quill is also an excellent option for chironomid pupae and larvae patterns, particularly smaller sized 16’s and 18’s. Traditional thread is only required if you wish to form a hot spot thorax, typically hot pink or hot orange, directly behind the bead. Hot spots are common components to many European patterns, especially Spanish designs such as perdigon nymphs.
Advertisement
Some perdigon patterns feature dark wing cases. Others do not. Perdigon wing cases are simple, nothing more than a dark spot of nail polish, head cement or permanent marker applied after the body is complete. To form the wing case simply dab or colour a small section of the fly’s thorax along with the rear section of the bead on the opposite side to the hook eye. I favour the nail polish or head cement option that I was first introduced to after watching Devin tie his Pliva Perdigon Nymph through his Tactical Fly Fisher YouTube channel. The nail polish wing case technique works well for any small hard-bodied pattern. Once the wingcase has dried coat the entire fly, less the tail, with UV resin or a couple of coats of gloss lacquer or varnish.
Perdigon nymphs not only perform when using European nymphing techniques but also lend themselves to other presentation methods and pattern styles. For example, I now often incorporate the perdigon wing case technique to a number of my other patterns including scuds, Callibaetis nymphs, water boatman and backswimmers.
The Pliva Perdigon Nymph Designed by Devin Olson
Hook: Standard nymph hook or up eye jig hook (#14-#18), weighted
Thread: Body Quill, Olive
Tail: Coq De Leon fibers
Rib: Chartreuse thread
Thorax: Hot orange tying thread
Wingcase: Black lacquer (nail polish)
Bead: Slotted tungsten, 3/32” or 7/64”, copper, silver or gold
Tying Instructions:
-

 Via Phil Rowley
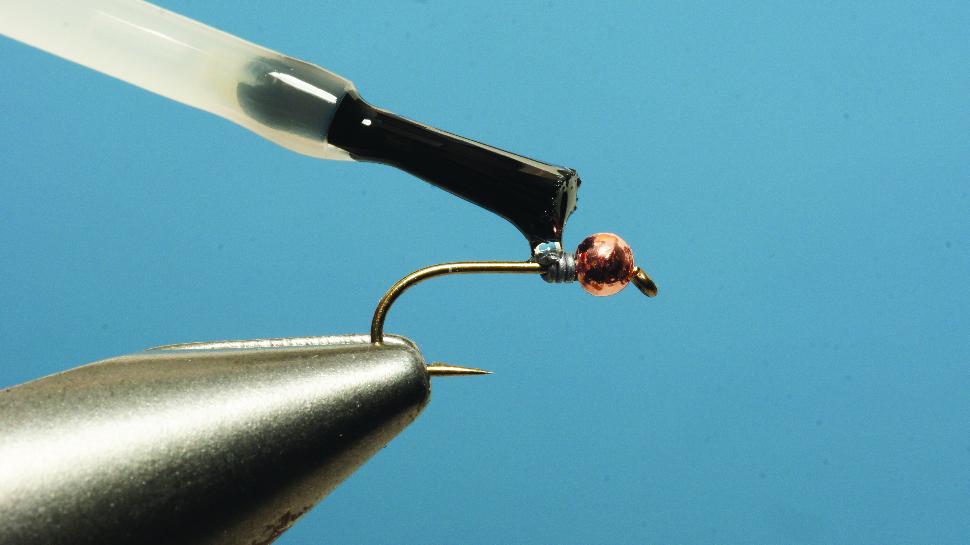
Slide a slotted tungsten bead, narrow opening facing the eye, onto the hook. Place 3-4 wraps of .015” lead wire substitute behind the bead. Push the lead wire substitute tight into the bead slot pushing it upward. This bead position helps roll the fly over so it rides hook end down when fished. Place a dab of brushable superglue over the lead and bead slot to secure them in place.
-
 Via Phil Rowley
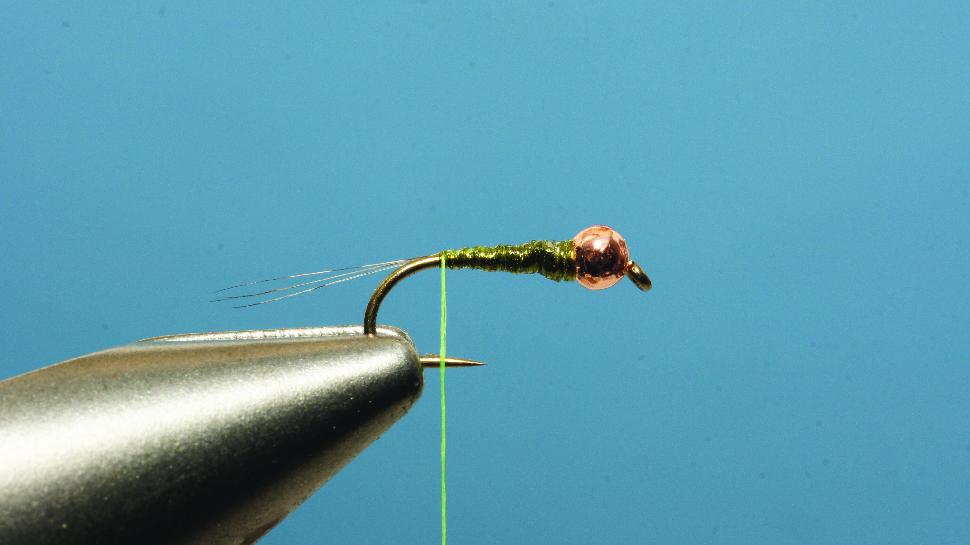
Wind the Body Quill thread onto the shank. Tie in 3-4 Coq De Leon fibers at the rear of the shank forming a shank length tail. With the ribbing thread in a bobbin secure the tag end of the thread at the base of the tail and secure forward to the read of the lead wire substitute. Build up a neat tapered body to the rear of the bead. Whip finish the Body Quill and remove the excess.
-
 Via Phil Rowley
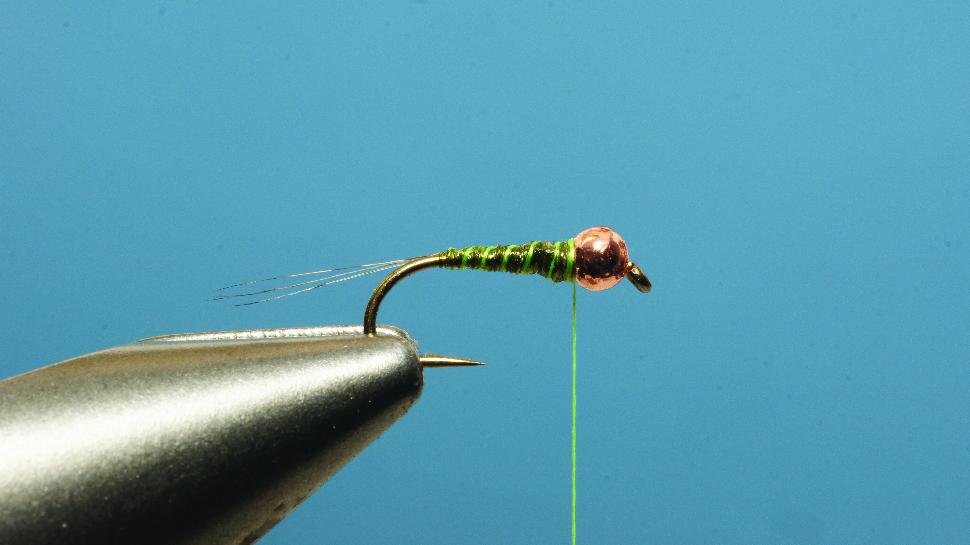
Cord the ribbing thread by spinning the bobbin clockwise. Wind the rib forward over the body using open even wraps. Whip finish the ribbing directly behind the bead and remove the excess.
-
 Via Phil Rowley
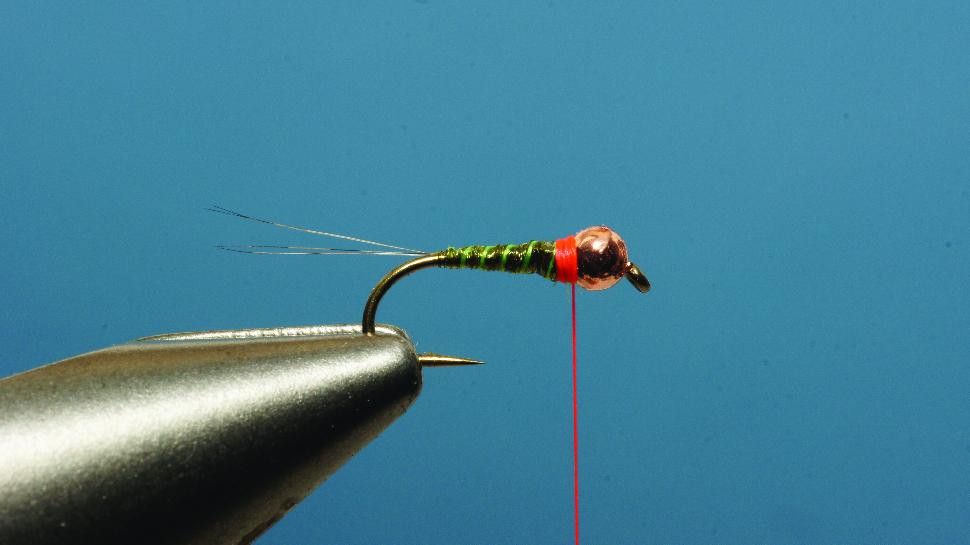
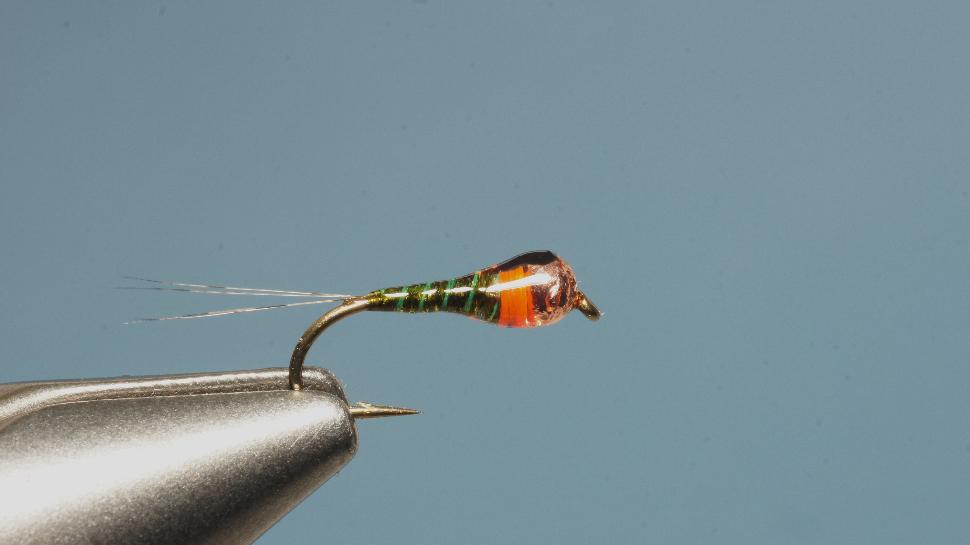
Attach hot orange tying thread directly behind the bead. Build up a neat focused thread thorax behind the bead. Whip finish and remove the tying thread.
-
 Via Phil Rowley
Using a series of small dabs form a wingcase of black nail polish on the rear of the bead and the thorax area of the fly. Allow the wing case to dry.
-
 Via Phil Rowley
Coat the entire fly with UV resin or a couple of coats of high gloss nail polish or head cement. Cure the UV resin or set aside the fly to allow the high gloss nail polish or head cement to dry.