 Via Phil Rowley
It has been said that trout spend up to 90% of their time feeding beneath the surface, often just above the bottom. With this fact in mind it only makes sense to want to get our flies down to the fish. For river and stream patterns this means incorporating weight, and the faster the flow of water is the greater the mass required to get nymphs bouncing and tumbling on or just above the bottom.
Advertisement
Depending upon conditions and personal preferences there are a number of options for adding mass to your flies, all of which can be used separately or in combination with each other. The legendary Frank Sawyer employed copper wire as tying thread and ribbing for his (now standard) Pheasant Tail Nymph. Ever since, other fly-tiers have blended wire into their designs with great effect. John Barr’s Copper John and Skip Morris’s Skip Nymph are two great examples of this technique. In British Columbia tiers such as Gord Honey use wire-bodied chironomid pupa patterns with devastating effect.
Wrapping lead wire around the shank has long been the most popular method for adding weight internally. Lead wire and non-toxic lead wire substitutes are sized in a variety of diameters measured in thousandths of an inch, ranging from .010” to .035”. Use the diameter of the hook shank as a starting point for which size wire to use. The larger the hook, the greater the diameter of the lead wire must be. Swift currents often mean you must overwrap the original lead wire with additional layers to sink your fly. A wide-barrelled floss bobbin dispenses lead wire efficiently if you plan on weighting lots of hooks.
Advertisement
Lead wire can be levelled out using flat nose pliers to protect the slender profile demands of some flies. I often use squashed .010” lead for my chironomid larvae and pupae patterns. Once flattened, the tying thread wraps the lead around the shank, adding weight while still maintaining a svelte profile.
Lead tape has also been popular in Europe for a number of years and is establishing a toehold on the North American scene. Some brands feature a sticky side to adhere the lead to the shank. Trimmed ‘sticky back’ strips are popular for ‘Euro’-style nymphs as they help create more slender weighted foundations.
Advertisement
Since their original introduction through competitive fly-fishing, beads have become a weighting staple. Brass and heavier tungsten beads come in a variety of colours and sizes, most often measured in fractions of inches or millimetres. I tend to use brass beads for lakes and tungsten beads for rivers and streams. Many wonder what sized beads to use, so here are my recommendations.
Tungsten sheets are another option for those wishing to pound on the weight. The material is roughly ten times heavier than lead or brass, and tungsten under-bodies, shell-backs or wing-cases add significant mass. Available in different colours, stretchy tungsten sheets require a degree of finesse; they are most often cut into strips prior to tying in and can break if you are heavy handed.
Regardless of the weight source, be aware how it affects your fly. Weighting curved, shanked hooks causes flies to roll inverted due to the ‘keel effect’, as the humped section of the shank is now the heaviest. Polish and Czech nymph tiers take advantage of this characteristic, which enables their patterns to ride point-up and snag-free, bouncing and skipping off rocks and debris. Lead dumbbell eyes and bead chains, common in steelhead, salmon and saltwater patterns, also cause flies to invert. Attaching weighted eyes to the underside of the shank eliminates this trait.
How we weight our pattern has an effect on how it moves through the water – additional weight augments the action of the fly. Stillwater fly-tiers often weight the front portions of flies such as water boatmen or leech patterns so that they plummet head first or undulate during the retrieve. In many instances the location of weight is equally important to its volume. Weight can also be used to help provide shape and form to a pattern, as in the beaded head on a chironomid pupa pattern or the lead wire lashed laterally down the shank of a stonefly nymph pattern.
It is important to identify internally weighted patterns so they don’t get mixed up with your un-weighted flies. Some fly-fishers are so organized that they keep their weighted flies in separate fly boxes. I am not. Using one colour tying thread for all of your weighted patterns is one option. Choose any colour you want, just be consistent. At times this requires tying off the main colour and attaching the ‘weighted’ colour to finish a fly. Another option involves using a permanent marker to colour the thread just prior to building the head or colouring the hook eye. Hook eyes can also be marked with coloured nail polish or head cement. I prefer to use red to indicate which of my flies are weighted.
Instructions:
Hook: 4XL #4 to #8 (weighted)
Thread: 6/0, colour to compliment body
Tail: Super Floss or Stillwater Solutions Midge Stretch Floss, colour to compliment body
Body: Variegated Chenille
Legs: Super Floss or Stillwater Solutions Midge Stretch Floss, knotted, colour to compliment body
Antenna: Super Floss or Stillwater Solutions Midge Stretch Floss, colour to compliment body
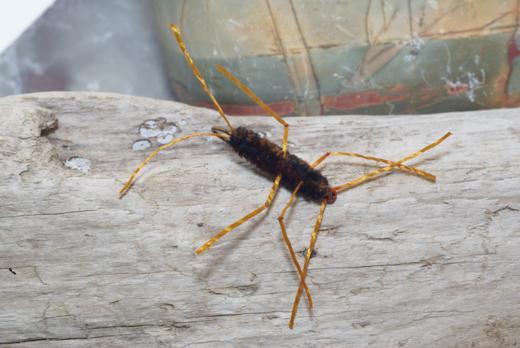
Suggest stonefly nymphs – vary the body and leg colours to match naturals. Favourite colours include variegated combinations of black, brown, olive and tan. Don’t be afraid to try colourful versions for salmon and steelhead.
-

 Via Phil Rowley
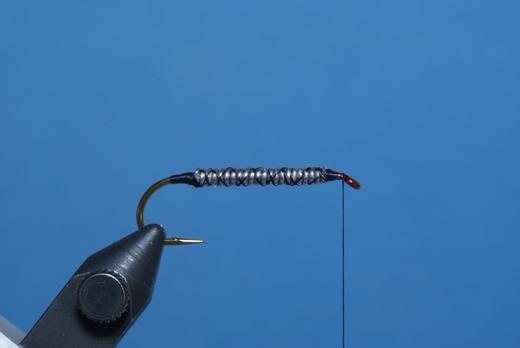
Place a de-barbed hook into the jaws of the vise. Colour the hook eye using a red permanent marker. Choose a size of lead wire or lead wire substitute that is approximately equal to the diameter of the hook shank. Starting just above the hook point, wind the wire forward around the shank stopping just back from the hook eye. Use your thumbnail to break off and smooth the edges of the lead wire. Attach the tying thread. Lock the lead wire underbody in place by covering the wraps with thread and by building tapered thread ramps at each end of the lead wire.
-
 Via Phil Rowley
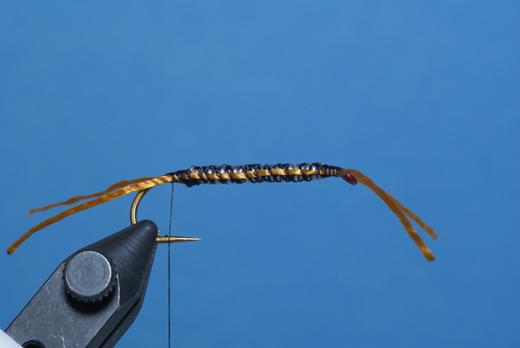
Tie in the tails and the antenna at the front and rear of the hook. Trim the tails and antenna so they are roughly shank length.
-
 Via Phil Rowley
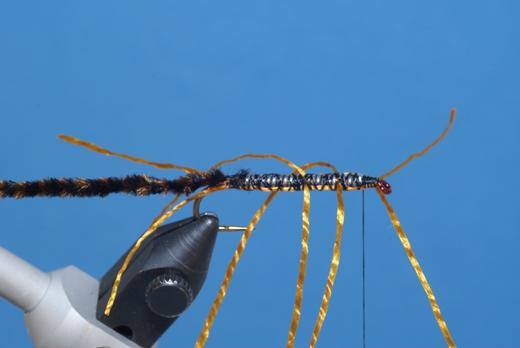
Tie in the body material at the base of the tail. Using figure eight wraps secure one pair of legs in place at the halfway point and a second pair at the three quarter point on the hook shank. Leave the legs long so you can knot them easily when the fly is done.
-
 Via Phil Rowley
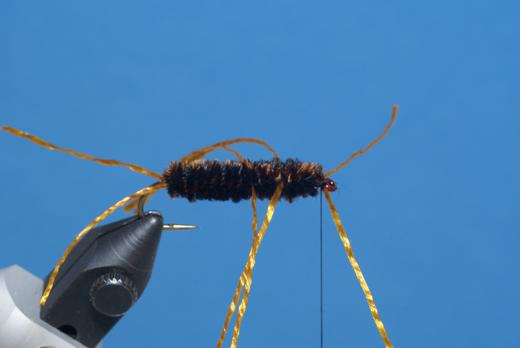
Wind the body material forward using tight wraps to the hook eye. Use the body material to further lock in and position the legs. Tie off the chenille just back from the hook eye and trim the excess.
-
 Via Phil Rowley
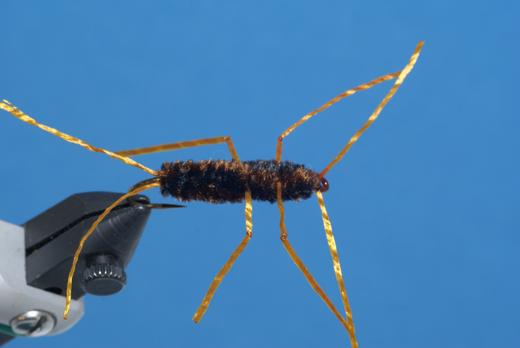
Build a neat head, whip finish and apply head cement. Place an overhand knot in each leg about a gape width away from the body. Trim the knotted legs so they are roughly shank length.